This is a Beta feature
Introduction
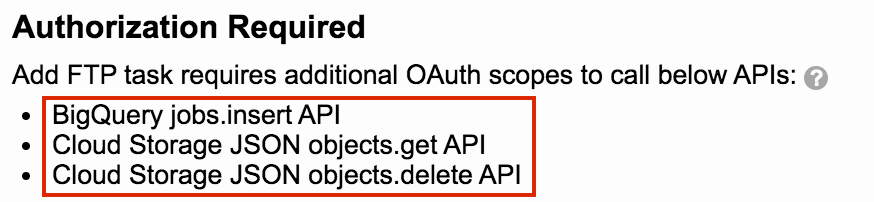
During signup, Potens.io asks for the most basic scope, bigquery.readonly, to perform actions within the applications. Some actions may need additional permissions and when initiated a prompt requesting to grant them is presented. This flow is known as incremental authorization.
Incremental authorization is the requesting of permissions when needed. Starting from the most basic permission and increasing in scope as more actions are used.
Two components, Incremental Authorization and Unlock Features, are used in Potens.io.
Incremental Authorization component is encountered whenever an action that requires additional scope is needed and the user currently does not have that scope. The user is presented with a description of what is needed and a choice of scopes to select.
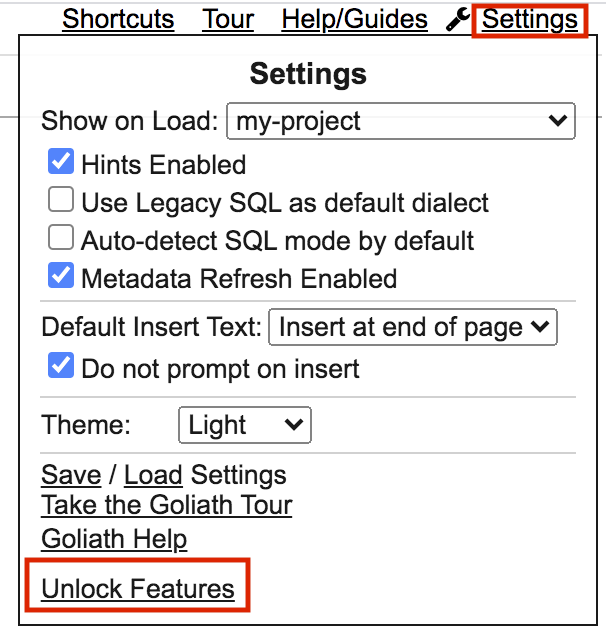
Unlock Features component is available on demand any time by clicking on the Unlock Features link. In Magnus, the link is available from the homepage. In Goliath, the link is available in Settings. The component displays all the scopes used within Potens.io. Each scope contains help/tooltip that lists the features each scope unlocks. The user can select from the scopes which ones they would like to grant.
Incremental Authorization
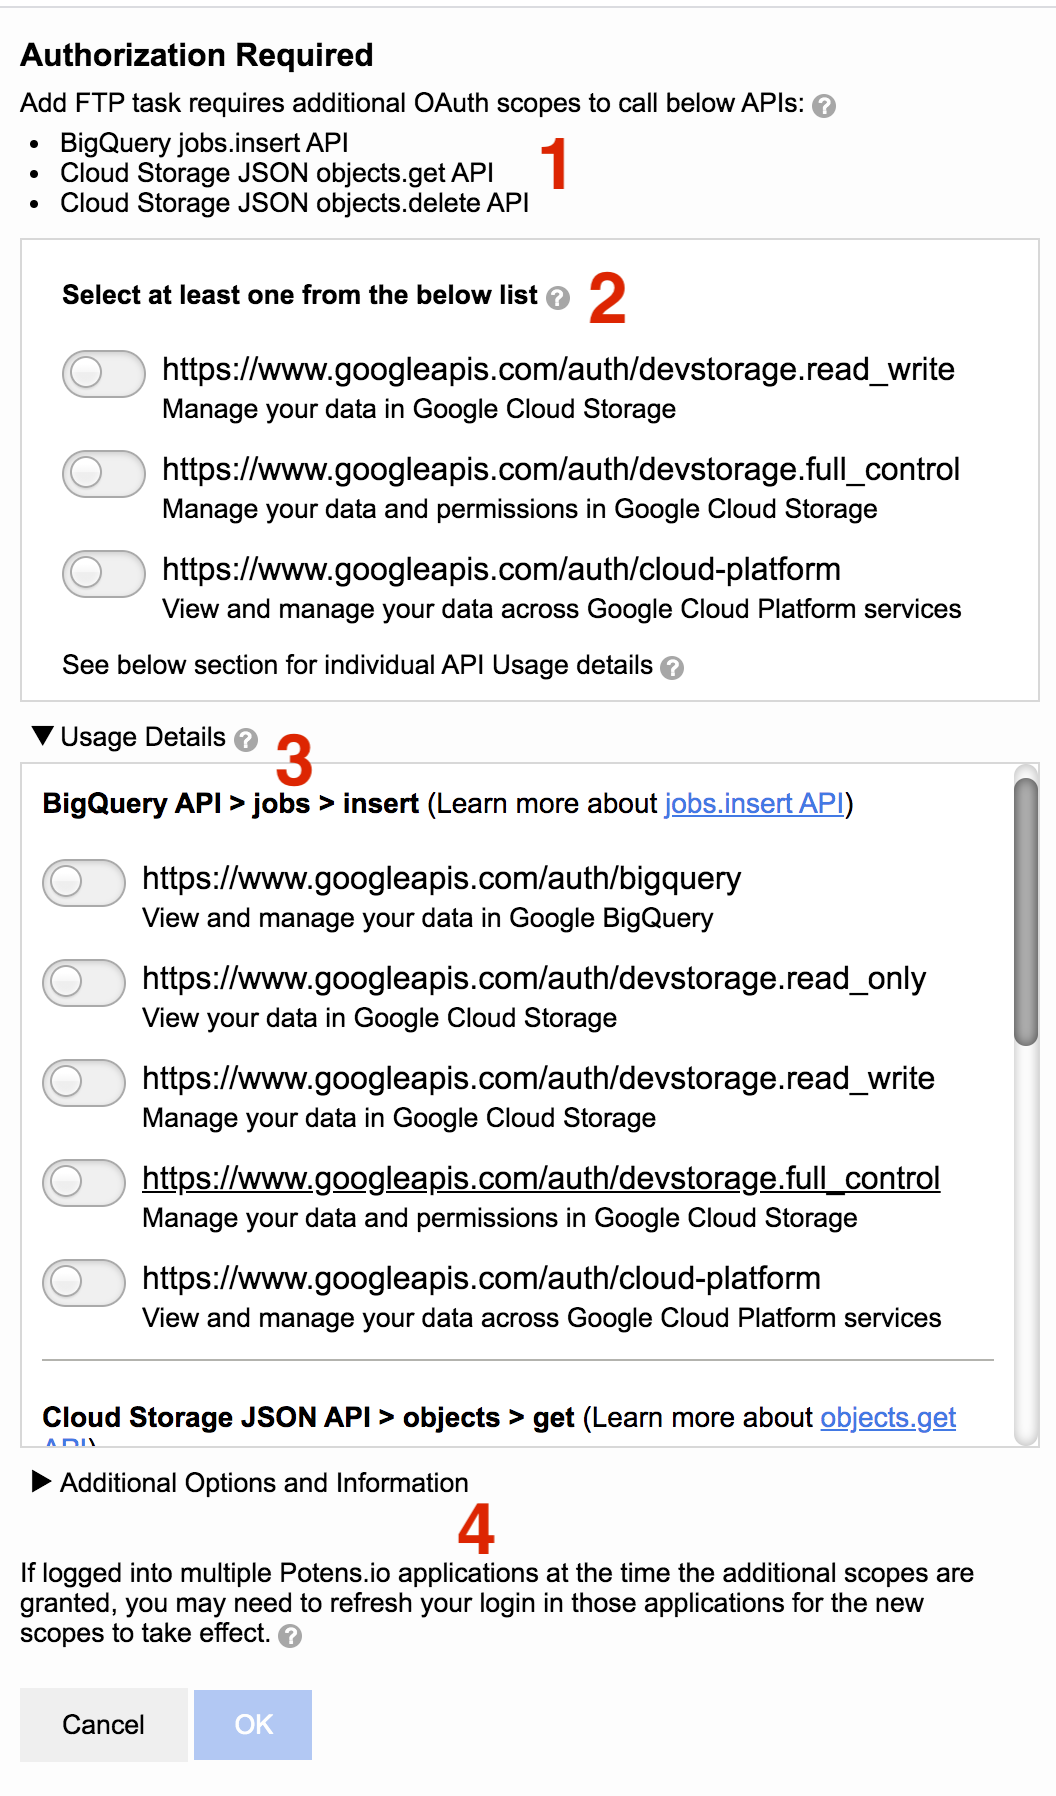
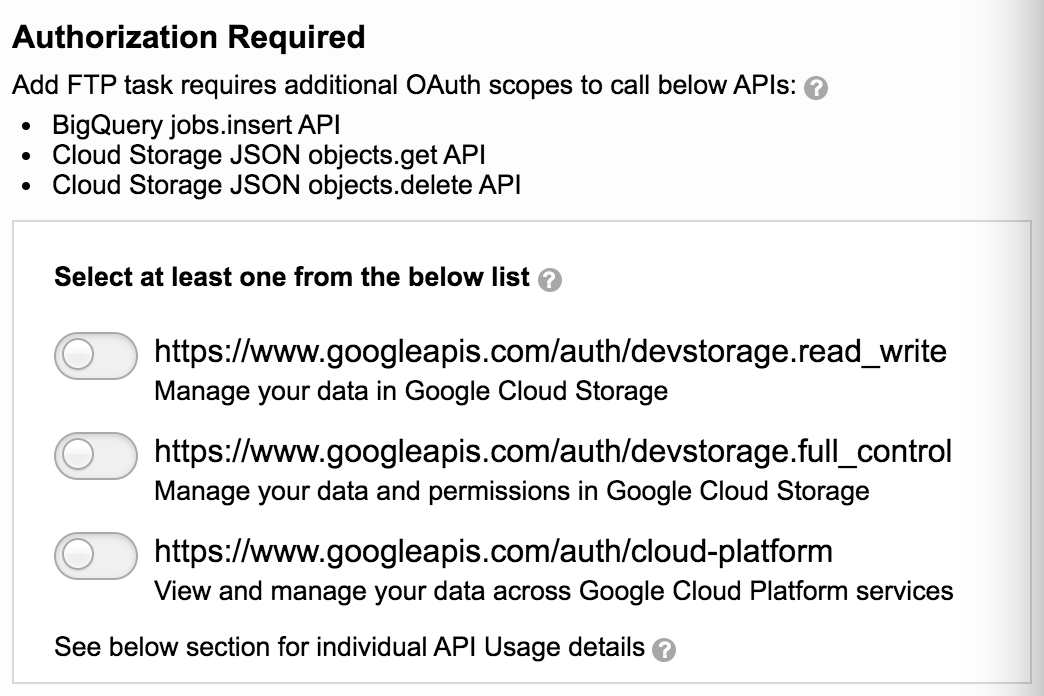
An example of Incremental Authorization component can be found in Magnus when adding an FTP-GS task. The task requires additional permission beyond bigquery.readonly. If the user does not have the needed permissions, they will encounter the Incremental Authorization component.
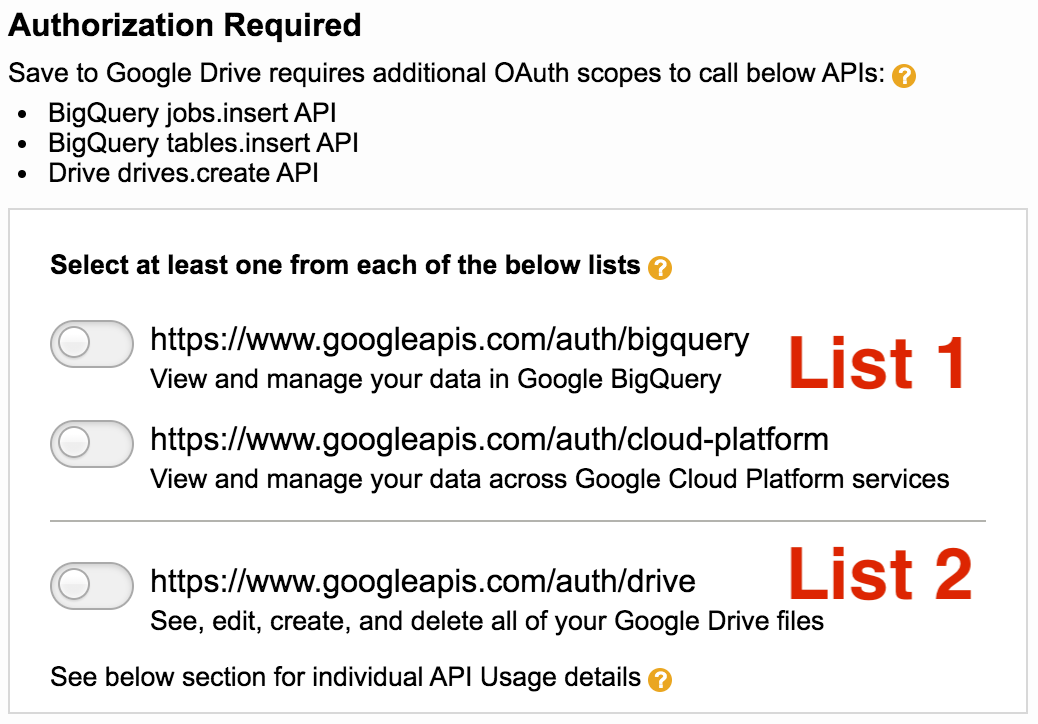
The sections of the Incremental Authorization component include
- Summary displays what methods are being used to perform the action.
- List of Scopes includes scopes which are needed to perform the action. One selection from each list is required.
- Usage Details contains a list of each method along with the scopes associated with them.
- Additional Options and Information displays the billing project and what scopes are currently granted permissions.
Summary
The presentation of summary is dependent on whether or not the action requires a single method or multiple methods.
In the case of a single method, the method will be identified.

In the case of multiple methods, each method will be listed.
List of Scopes
The list of scopes identifies those scopes which are common among the methods. They are grouped by increasing order of greater breadth of permissions. For example, a readonly scope will display first in the list and has lesser permissions than a full_control scope that appears later in the list.
For a single method, the list of scopes are all scopes associated with the method.
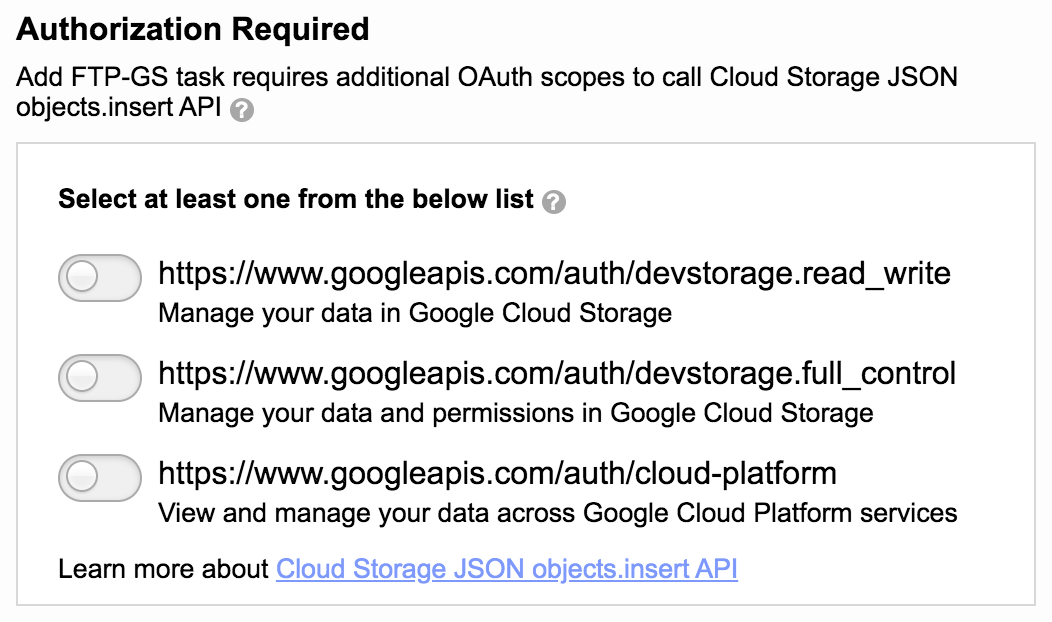
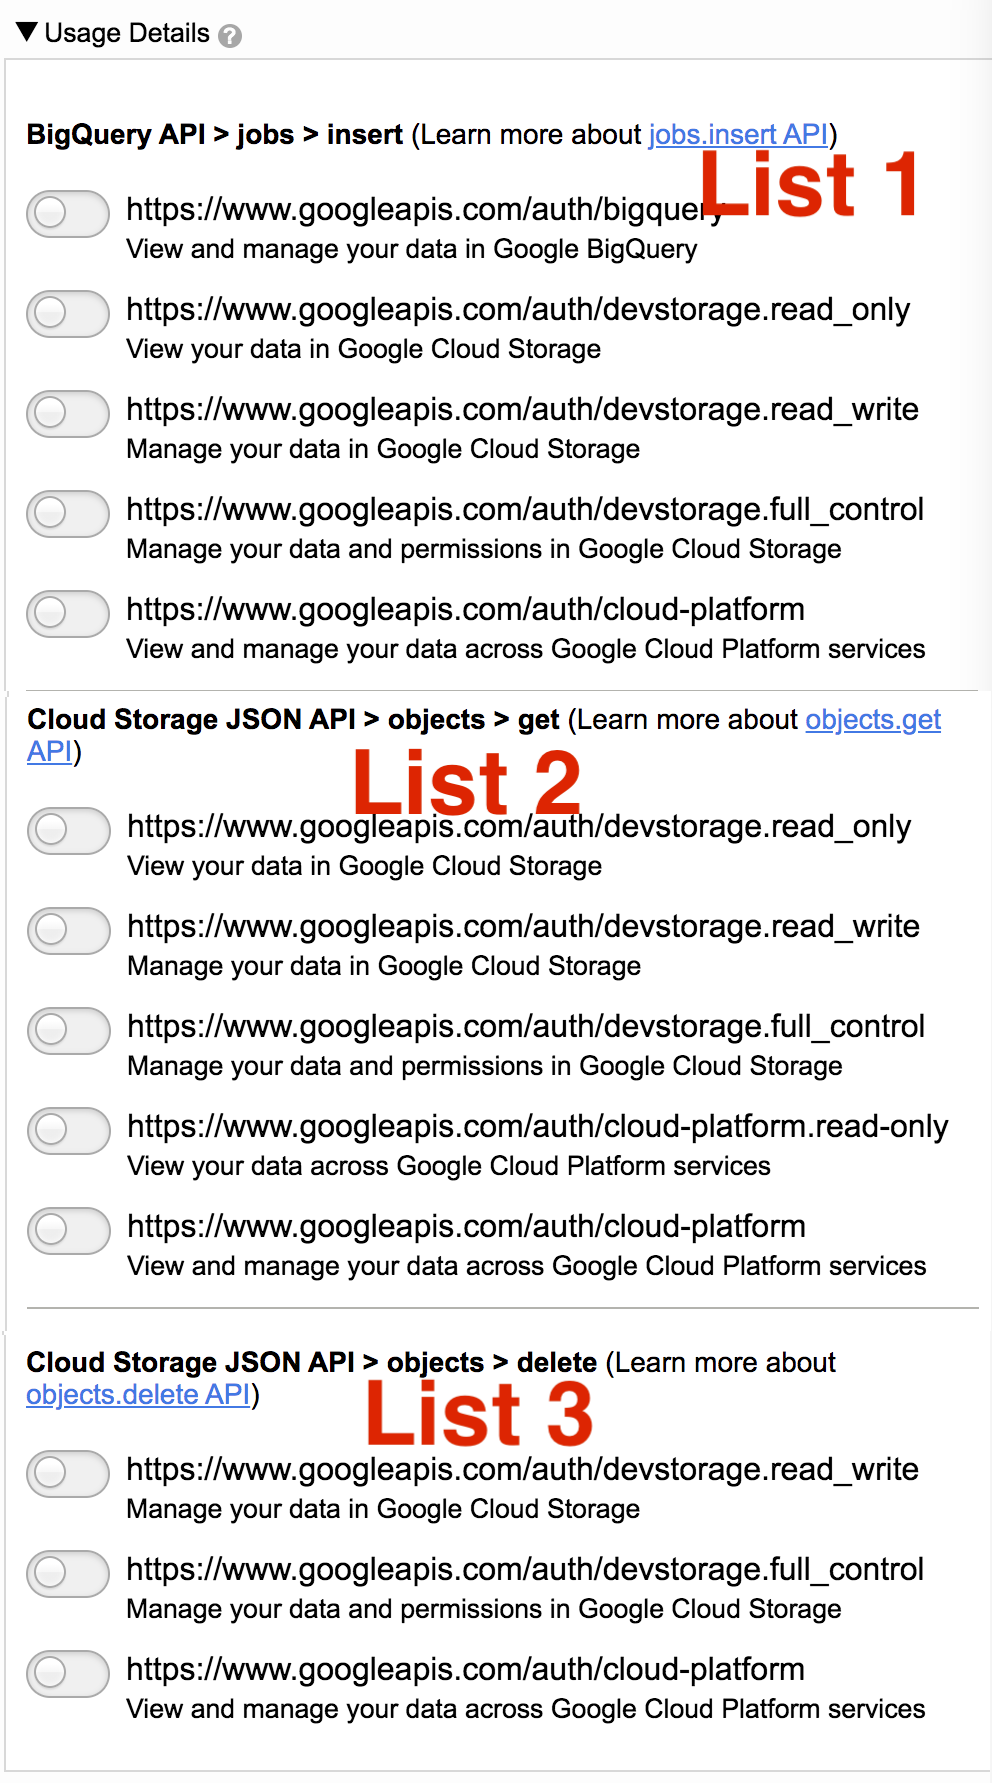
For multiple methods, the list of scopes are those scopes in common across the methods. For example, the image below shows three methods that all share the three scopes listed. Choosing at least one of the scopes qualifies permissions for all three methods. These lists are provided for convenience. As an alternative, the Usage Section displays detailed lists of scopes for each method and you can pick scopes individually from each method.
In some cases, multiple methods may not always have scopes in common. Multiple lists will display and a selection from each list is required.
Usage Details
When multiple methods are required, Usage Details section is displayed. It shows each method along with their related scopes. Choose a scope for each method to grant permissions for the action. As an alternative, selections can be made from the lists in the Summary section.
Additional Options and Information
Two sections make up this area
- Default billing project
- Scope you have granted previously

Default billing project
For trial users, a drop down will appear for projects the user has access to. Select from the list to set the project as default.
For organization users, the default project is displayed. The default is set by the user’s administrator.
Scopes you have granted previously
This list comprises of all the scopes the user has previously granted. In addition to the scopes used by Potens.io, all granted scopes are listed. For example, other scopes may be granted when using API Task. Those scopes would be listed here.
How to grant additional scopes
When an action requires additional permission the Incremental Authorization panel will display. Review the methods used by the action and the scopes being requested.
- From the summary section select one scope from each section.
- Click OK
- Google Sign In will prompt to accept the selections
- Sign into Google to approve permissions
Incremental Authorization will close, and the action will proceed.
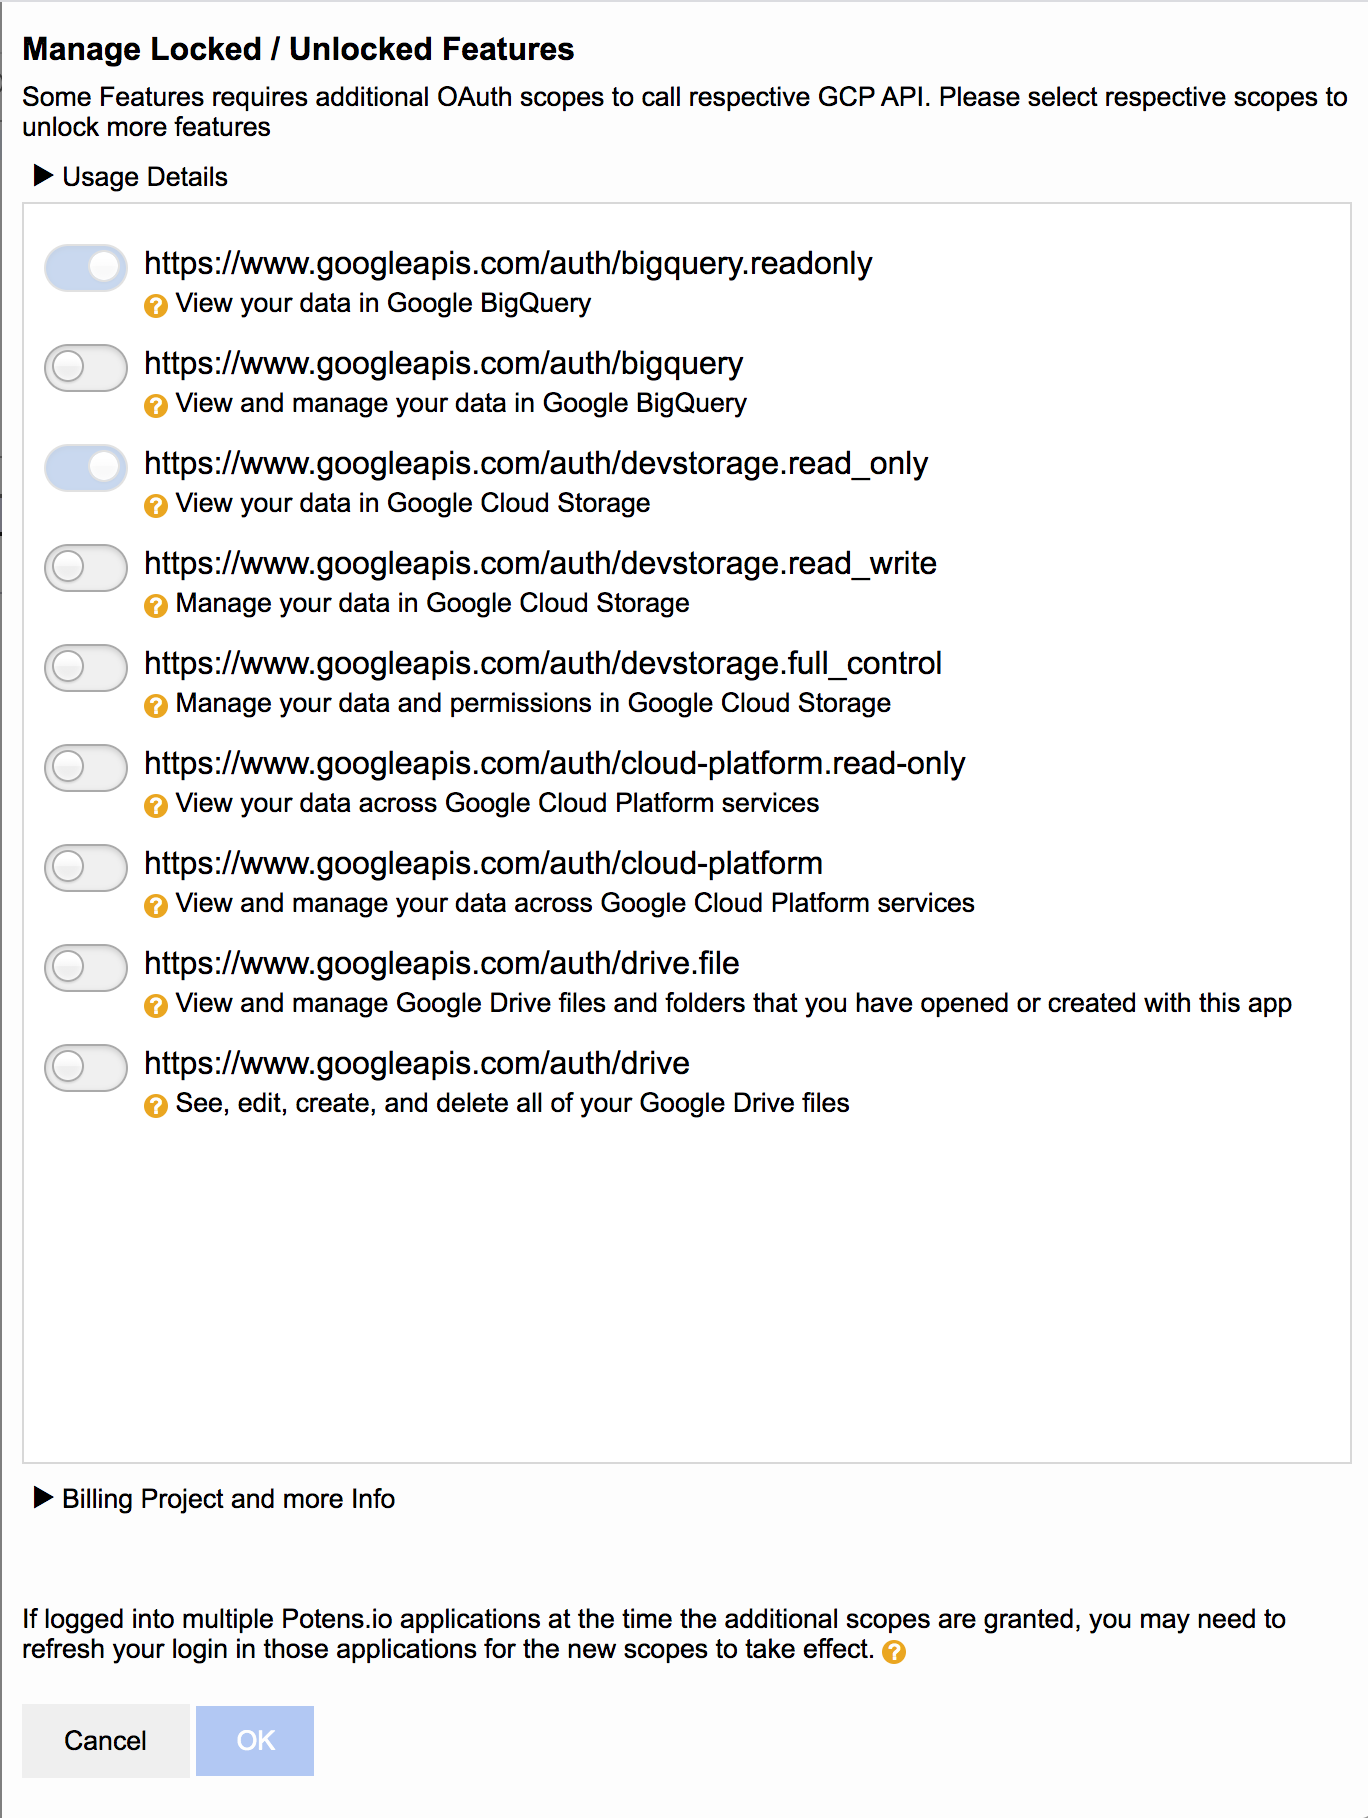
Unlock Features
Unlock Features is a component that lists all of the scopes used within Potens.io. The scopes are accompanied with a tooltip that shows what features they unlock. Users can access Unlock Features at any time and unlock features when needed.
In Magnus, Unlock Features can be accessed from a link on the home page.
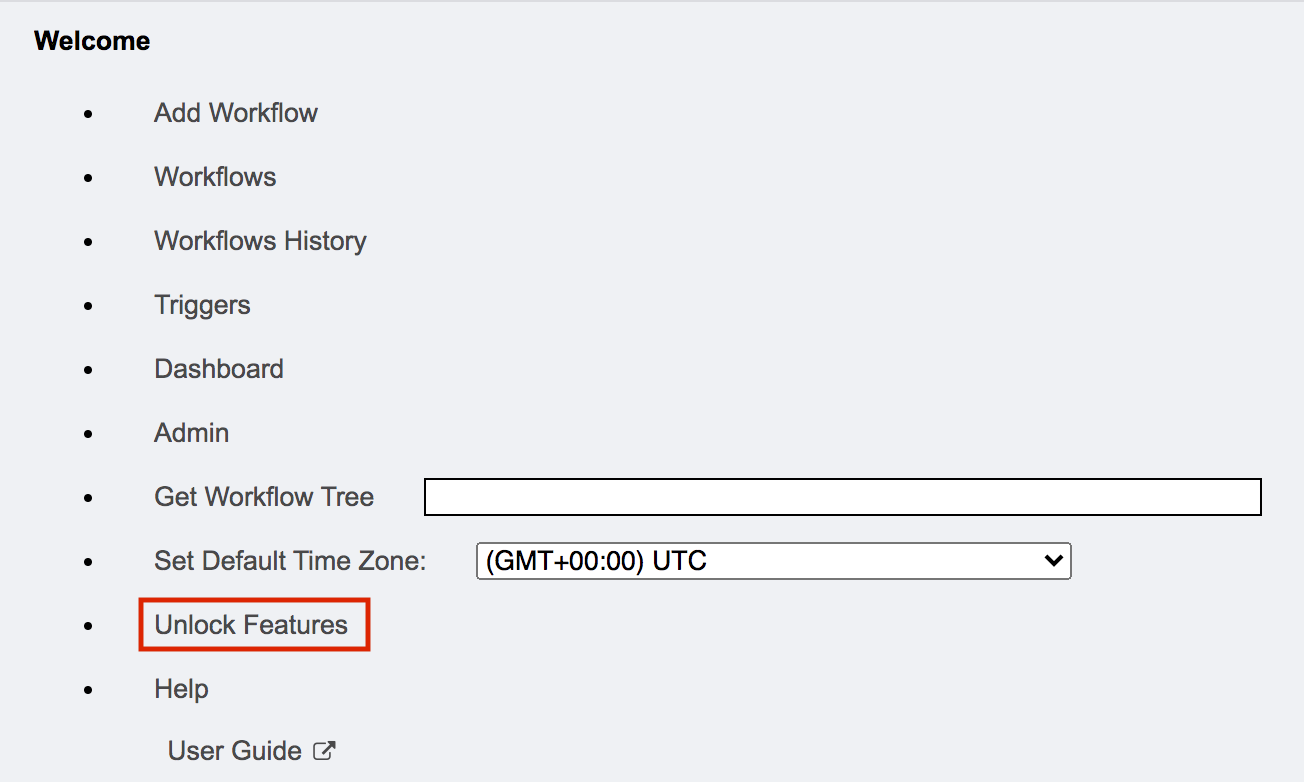
In Goliath, Unlock Features can be accessed from a link in Settings.
Unlock Features consists of two sections
- Usage Details
- Billing Project and more Details
Usage Details
Usage Details displays the list of scopes used in Potens.io and what scopes have been previously granted.
An icon, as represented below, indicates the corresponding scope has been previously granted.

An icon, as represented below, indicates the corresponding scope has not been granted.

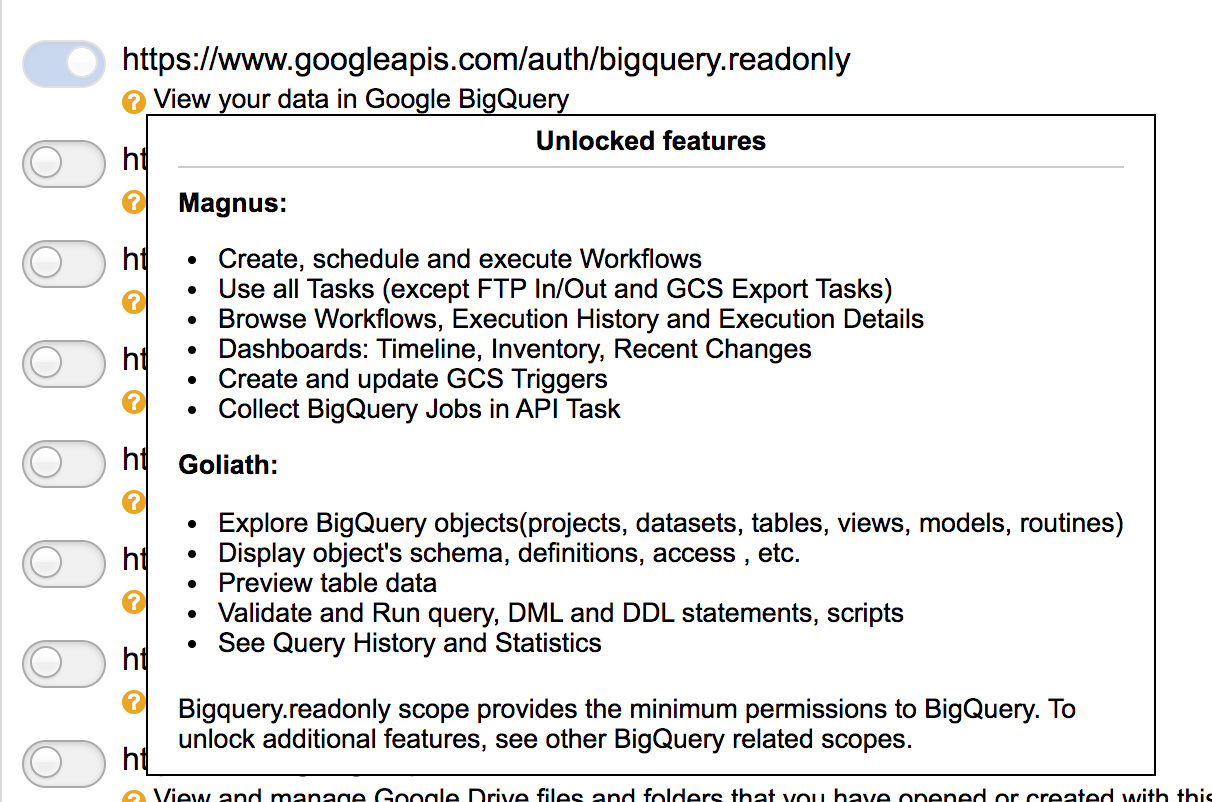
A tooltip is available under each scope listing the features that the scope unlocks. Hover over the tooltip icon to display the list.
Billing Project and more Info
Two sections make up this area
- Default billing project
- Scopes you have granted previously
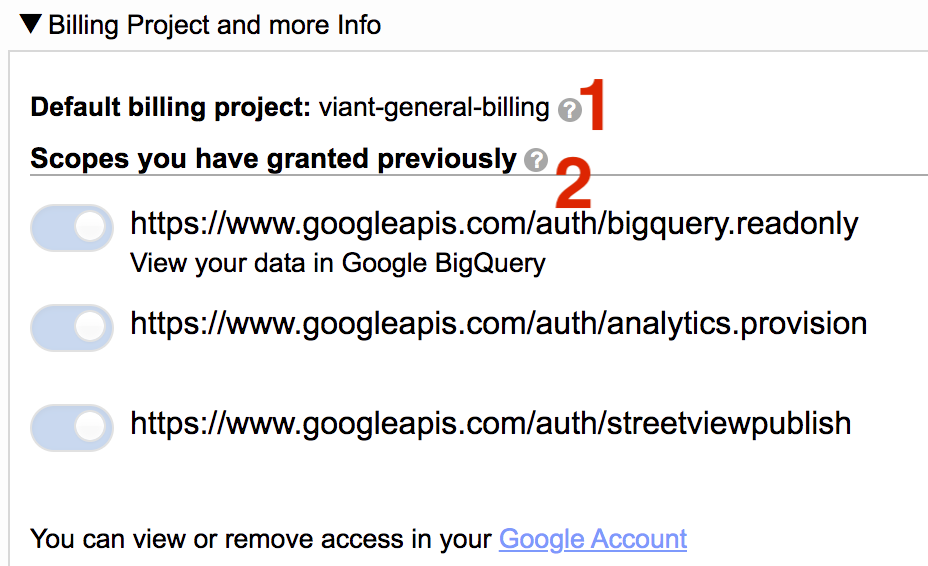
Default billing project
For trial users, a drop down will appear for projects the user has access to. Select from the list to set the project as default.
For organization users, the default project is displayed. The default is set by the user’s administrator.
Scopes you have granted previously
This list comprises of all the scopes the user has previously granted. In addition to the scopes used by Potens.io, all granted scopes are listed. For example, other scopes may be granted when using API Task. Those scopes would be listed here.
How to grant additional scopes
- Navigate to Unlock Features to open the panel.
- Identify the scope to add and click on corresponding icon.
- Click OK
- Google Sign In will prompt to accept the selections
- Sign into Google to approve permissions
Important Notes
Scopes Across Applications
Scopes are granted to the current application session. If multiple application sessions are open, close them, and relog in to ensure that the newly added scopes are applied.
Removing Scopes
Removing scopes can be done via Google MyAccount page. Removing scopes will invalidate any application session and result in unstable behavior and errors. To continue with Potens.io, close the application, and relog in. The user will start over with bigquery.readonly scope and can re-grant permissions via Incremental Authorization and Unlock Features. It may take up to a minute for the change to propagate.
Component Usage
An alternative to Incremental Authorization panel, which prompts for required permission as the action happens, is to use Unlock Features. Unlock Features lists all scopes used in the application and enables a user to grant what permissions they would like without having to be prompted during an action.
Previous Default Scopes
Organizations who are adding new users after incremental authorization has been released, in early December 2020, can recommend users to grant the following scopes.
- bigquery
- full_control
- cloud-platform
- drive scopes
These are the scopes that were previously requested during login. Granting them will provide all the permissions needed for Potens.io. After granting them the user will not encounter the Incremental Authorization panel.
Notify Workflow Delegates
It is the responsibility of the workflow creator/editor to inform owner/delegates of the scopes needed to run the workflow. Incremental Authorization does not automatically grant needed scopes to other users of the workflow. If a workflow, being created or edited, prompts for incremental authorization, that prompt is for the creator/editor only.
If a delegate of the workflow does not have the required scope and later tries to run or schedule it, the workflow will fail with insufficient permissions. They will need to access Unlock Features to grant the needed scopes.
To grant the needed scopes when a workflow fails with insufficient permissions
- Visit Workflows History
- In Workflows History, click Details
- In Workflow Run Details, identify the task that failed with Insufficient Permission
- Close Workflow Run Details
- Click on Home icon in upper left
- In Home page, click Unlock Features
- In Unlock Features, hover over the tooltip for each scope currently not granted and identify the task/action that failed from the feature list.
- Click the scope that grants permission for the task/action
- Click OK to add the scope
- Navigate to and run/schedule the workflow
- Repeat the steps for any additional Insufficient Permission errors encountered
Service accounts have all the permissions needed to run a workflow with any task. Granting additional scopes via Incremental Authorization is not required for service accounts.