Overview
Remote Workflow Execution allows Google service account to start a Magnus workflow asynchronously via HTTP.
Authentication is done via cryptographically signed JSON Web Tokens (JWTs).
JWT is an open standard for creating access tokens of certain claims (https://en.wikipedia.org/wiki/JSON_Web_Token).
The signing algorithm supported by Magnus' Remote Workflow Execution is SHA256withRSA.
This is the same signing algorithm used by Google when authenticating a service account in OAuth 2.0 authentication (https://developers.google.com/identity/protocols/OAuth2ServiceAccount).
Remote Workflow Execution can be done with any client/language that is able to do base64Url encoding, SHA256withRSA signing, and HTTP request.
Request
HTTP Request
POST https://[applicationURL]]/remote
Request Body
The maximum request size limit is 32 MB. Exceeding this limit will cause invalid error.
{
"jwt": string,
"c":"713aa58d",
"configuration": {
"runWorkflow": {
"l": string,
"parameters": [
{
"name": string,
"value": string or number or boolean
}
] ,
"billingProject": string,
"cascadeBillingProject": boolean
}
}
}
| Property name | Value | Description |
| jwt | string | [Required for direct HTTP request] JWT created using the Google service account that has been registered with Magnus |
| c | 713aa58d | [Required] Command for workflow run |
| configuration | nested object | [Required] Configuration of the request |
| configuration.runWorkflow | nested object | [Required] Run a workflow asynchronously |
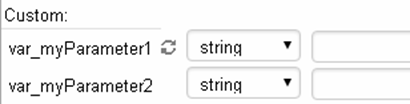
| configuration.runWorkflow.l | string | [Required] Encoded workflow ID User can obtain the encoded workflow ID from the permalink of the workflow:   |
| configuration.runWorkflow.parameters[] | list |
[Optional] The parameter overrides. The parameter var_myParameter2 can be overridden. But the parameter var_myParameter1 cannot be overridden since it is owned by the workflow. |
| configuration.runWorkflow.parameters[].name | string | [Required] The parameter name. It is case-sensitive; user must provide the parameter name as it appears in the Workflow Editor. |
| configuration.runWorkflow.parameters[].value | string | [Required] The parameter value. NULL is treated as empty string. |
| configuration.runWorkflow.billingProject | string | [Optional] The billing project to execute the workflow in. If not specified, the default billing project setting from the workflow will be applied. |
| configuration.runWorkflow.cascadeBillingProject | boolean |
[Optional] Specifies whether to cascade the billing project to child and descendent workflows. If set to true, during workflow execution, the running billing project ID will be passed down to child and descendent workflows. During the execution of the descendent workflows, the cascaded billing project will be used. This applies for descendent workflows that are executed via Execute Workflow Task or Remote Workflow Execution. The user who is running the workflows must have required permission in the cascaded billing project. The default value is false. |
Authorization
The Google service account that is used to create the JWT must be registered with Magnus beforehand. The service account's email address must end with .gserviceaccount.com. There are two ways to register a Google service account with Magnus. They are:
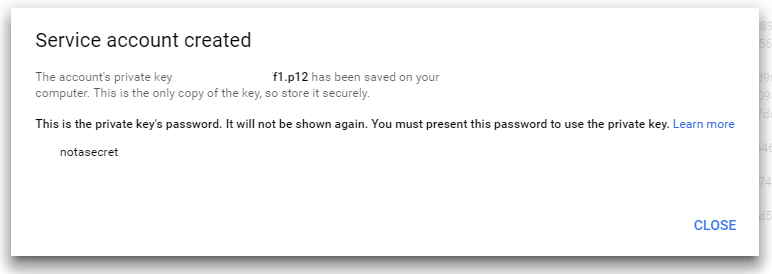
- Provide the email address, .p12 file, and the private key's password of the Google service account to your Potens.io administrator, or
- Provide the email address and private key JSON file of the Google service account to your Potens.io administrator.
Creating a JWT
A JWT is composed of three parts: a header, a claim set, and a signature. The header and claim set are base64Url encoded JSON objects. The JWT is composed by concatenating the header, claim set, and signature with a period character:
<base64Url encoded header>.<base64Url encoded claim set>.<base64Url encoded signature>
The base string that is used to compute the signature is:
<base64Url encoded header>.<base64Url encoded claim set>
Forming the JWT header:
The header consists of two required fields: the signing algorithm and the format. Magnus only accepts RSA SHA-256 algorithm and the JWT token format. So the JWT header is:
{"alg":"RS256","typ":"JWT"}
Its base64Url encoded representation is:
eyJhbGciOiJSUzI1NiIsInR5cCI6IkpXVCJ9
Forming the JWT claim set:
The required claims in the JWT claim set are:
| Name | Description |
| iss | [Required] The email address of the service account |
| iat | [Required] The time the JWT was issued, specified as seconds since 00:00:00 UTC, January 1, 1970. |
| exp | [Required] The expiration time of the JWT token, specified as seconds since 00:00:00 UTC, January 1, 1970. The value has a maximum of 1 hour after the issued time (iat). |
Here is an example of a JWT claim set:
{
"iss":"test@developer.gserviceaccount.com",
"exp":1484335282,
"iat":1484331682
}
Its base64Url encoded representation is:
ewoiaXNzIjoidGVzdEBkZXZlbG9wZXIuZ3NlcnZpY2VhY2NvdW50LmNvbSIsCiJleHAiOjE0ODQzMzUyODIsCiJpYXQiOjE0ODQzMzE2ODIKfQ
Computing the signature:
The input to compute the signature is the UTF-8 byte array of:
<base64Url encoded header>.<base64Url encoded claim set>
Sign the byte array using SHA256withRSA with the private key (located in the .p12 or JSON file) of the service account. Then base64Url encode the signature.
The JWT is then composed by concatenating the header, claim set, and signature with the period character:
<base64Url encoded header>.<base64Url encoded claim set>.<base64Url encoded signature>
Here is an example of a JWT before base64Url encoding (with line breaks added for clarity):
{"alg":"RS256","typ":"JWT"}.
{
"iss":"test@developer.gserviceaccount.com",
"exp":1484335282,
"iat":1484331682
}.
[signature bytes]
The resulting JWT is:
eyJhbGciOiJSUzI1NiIsInR5cCI6IkpXVCJ9.ewoiaXNzIjoiMTMxODQ4ODU0NzMxLWU2ZXAzaXA5MTg4cDNjbjlnaW9odWdoY3UxZ3I1dTY3QGRldmVsb3Blci5nc2VydmljZWFjY291bnQuY29tIiwKInNjb3BlIjoiaHR0cHM6Ly93d3cuZ29vZ2xlYXBpcy5jb20vYXV0aC9iaWdxdWVyeSBodHRwczovL3d3dy5nb29nbGVhcGlzLmNvbS9hdXRoL2RldnN0b3JhZ2UuZnVsbF9jb250cm9sIiwKImF1ZCI6Imh0dHBzOi8vd3d3Lmdvb2dsZWFwaXMuY29tL29hdXRoMi92NC90b2tlbiIsCiJleHAiOjE0ODQzMzY5MDksCiJpYXQiOjE0ODQzMzMzMDkKfQ.jEPxxcsdGdV2W0nt7nN8L5ZexxxxnN8sdsxxxxxxjEPGdV2W0nt7nN8L5ZexxxnN8xxxxx
Response
If the workflow has started successfully, the following response body will be returned:
{
"status":"ok",
"result": {
"workflowId":"<workflowId>",
"historyId":"<historyId>"
}
}
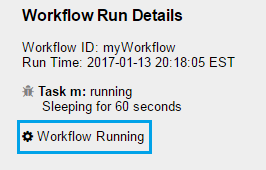
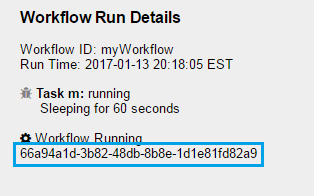
User can then check the progress of the workflow execution in Magnus History Browser. The historyId of the workflow execution can be accessed by the following steps in History Browser:
- Click Workflows History
- Click on the Details icon

- Click on the status icon on the bottom:
- The historyId is revealed:
If the workflow has failed to start, this response body will be returned:
{
"status":"failed",
"error":{
"reason":"<reason>",
"message":"<message>"
}
}
Please see the Errors section for the list of error.
Workflow Execution Permission
The Google service account must be the owner or delegate of the workflow in order to execute the workflow. The workflow will be run under the Google service account (unless the workflow is locked to run as owner always).
Concurrency
As for Manual Run, only one instance of the workflow can be run at any time.
To overcome this limitation, you can use Remote Workflow Execution v2, or you can use Execute Workflow Task and have multiple proxy Workflows which will call your Workflow of interest via Execute Workflow Task, as described in detail here.
In this case your service account should be owner or preferably delegate of proxy workflow and same service account should be in Shared With list of your Workflow of Interest
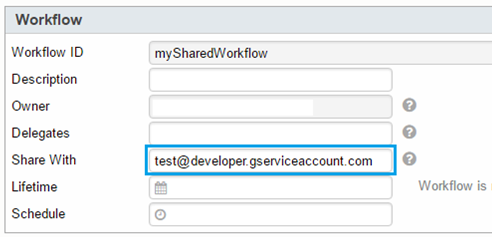
For example:
- Create a workflow that is shared with the Google service account:
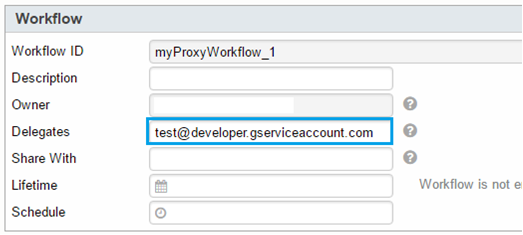
- Create the first proxy workflow:
- Add the Google service account as a delegate:
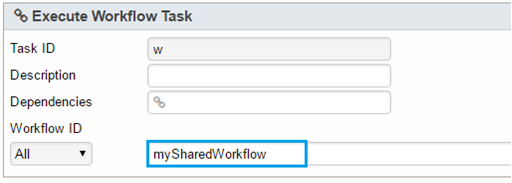
- Add an Execute Workflow Task. Select the shared workflow from the drop down list:
- Save the workflow.
- Add the Google service account as a delegate:
- Repeat step #2 to create as many proxy workflows (myProxyWorkflow_2, …, myProxyWorkflow_N) as needed.
- Concurrently remote execute the proxy workflows:
- Remote Workflow Execution on myProxyWorkflow_1
- Remote Workflow Execution on myProxyWorkflow_2,
- …
- Remote Workflow Exeuction on myProxyWorkflow_N
Errors
| Error reason | HTTP code | Description |
| invalid | 400 |
This error is returned when:
|
| notFound | 404 | This error is returned when the workflow is not found |
| accessDenied | 403 | This error is returned when the Google service account does not have permission to execute the workflow |
| backendError | 500 | This error is returned when there is backend error in Magnus |