This article provides users with a general guide to the features listed.
These features may have been updated or superseded by additions found in the release notes.
Read the content below to become familiar with the feature and review the release notes to get the latest iteration.
Overview
Navigator lists accessible datasets for the current project as well as respective objects (tables, views, models, routines) and their schemas(fields).
It also allows to filter datasets by name and labels; group and sort tables.
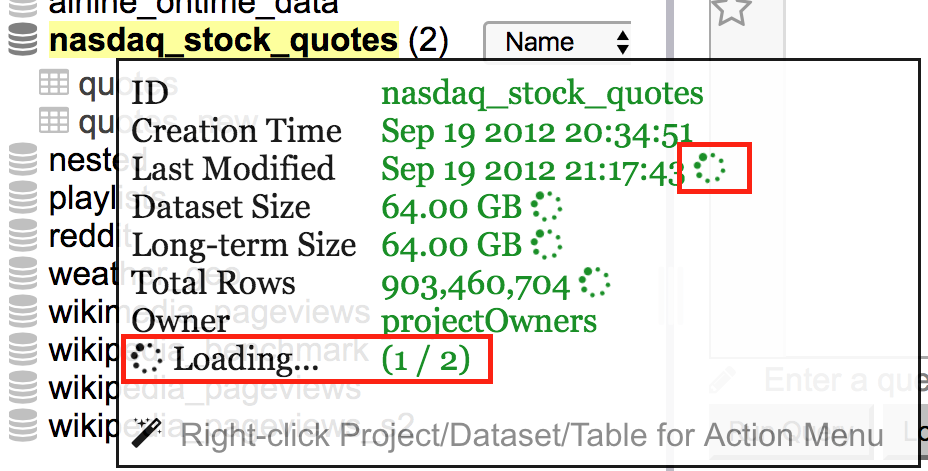
Hovering over Dataset or Table shows respective Info PopUp.
Right click on Billing/Data Project Title or Dataset /Table/View/Model/Routine shows Contextual Menu with all available actions for that Object or alternatively left click on more options icon.
See quick details below
Billing Project
|
|
|
Note: Free trial Users with no cloud platform scope will see a list of all their associated projects (both billing and non-billing). Users, in an organization, with no cloud platform scope will see the default project assigned to them by their administrator. Once cloud platform scope has been granted the list will be updated to including those projects that are qualified as billing.
Data Project
|
|
Clicking on the project header displays the Project Browser. |
Filtering
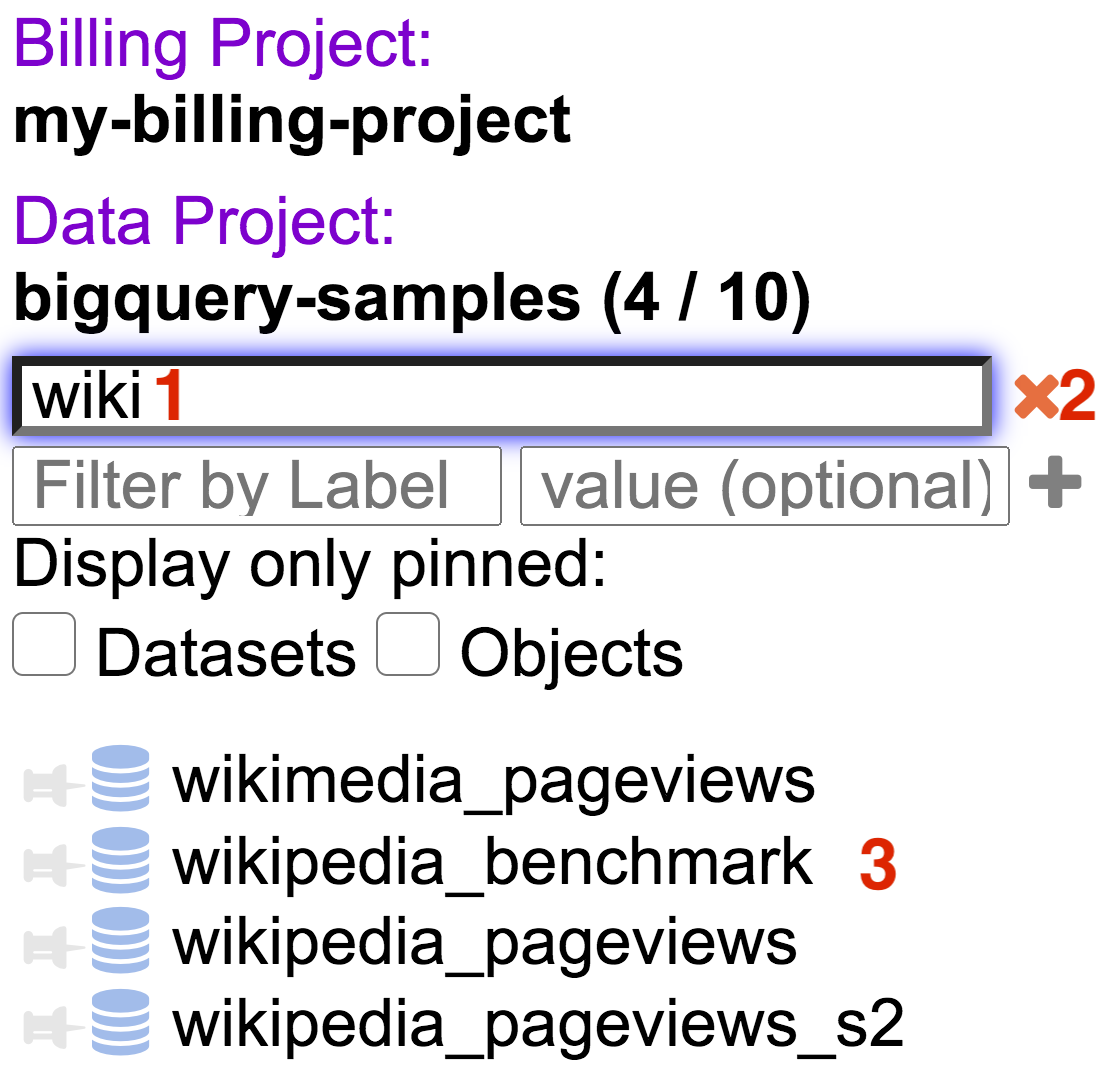
Filter by Dataset ID
|
|
Datasets can be filtered by ID
|
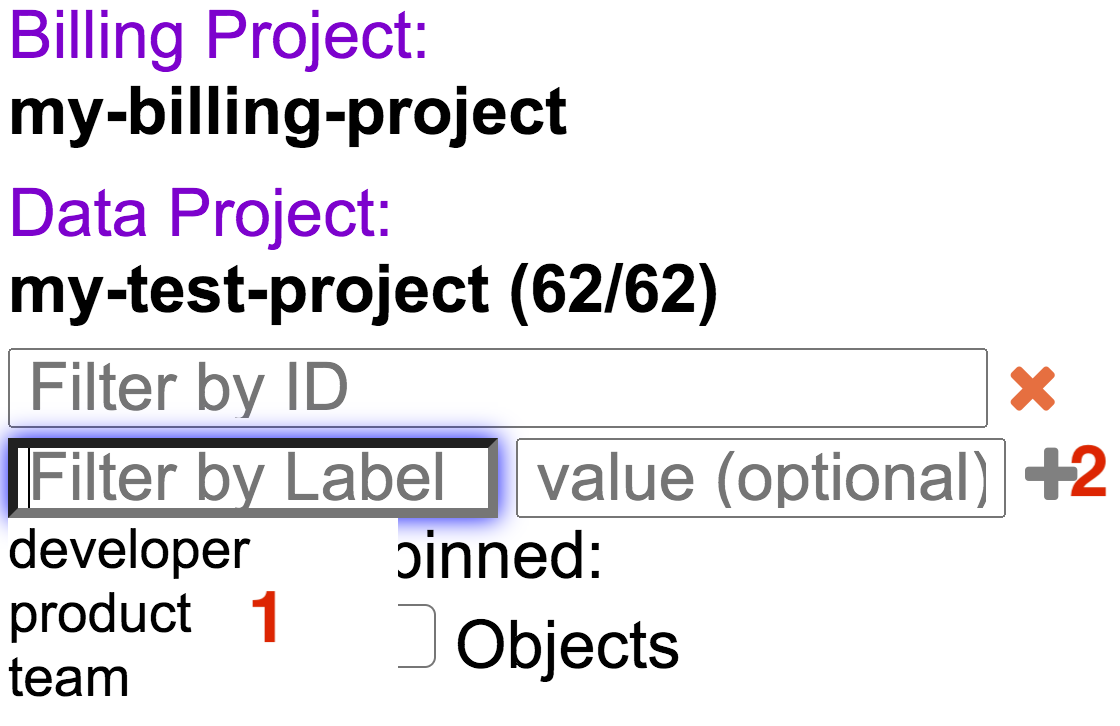
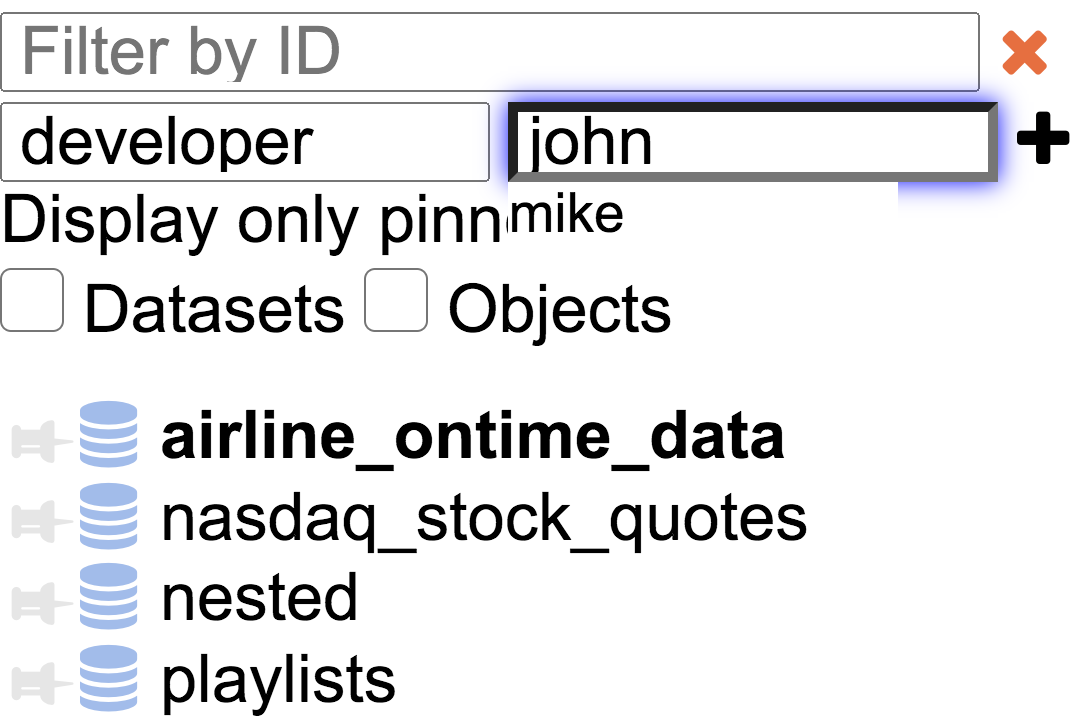
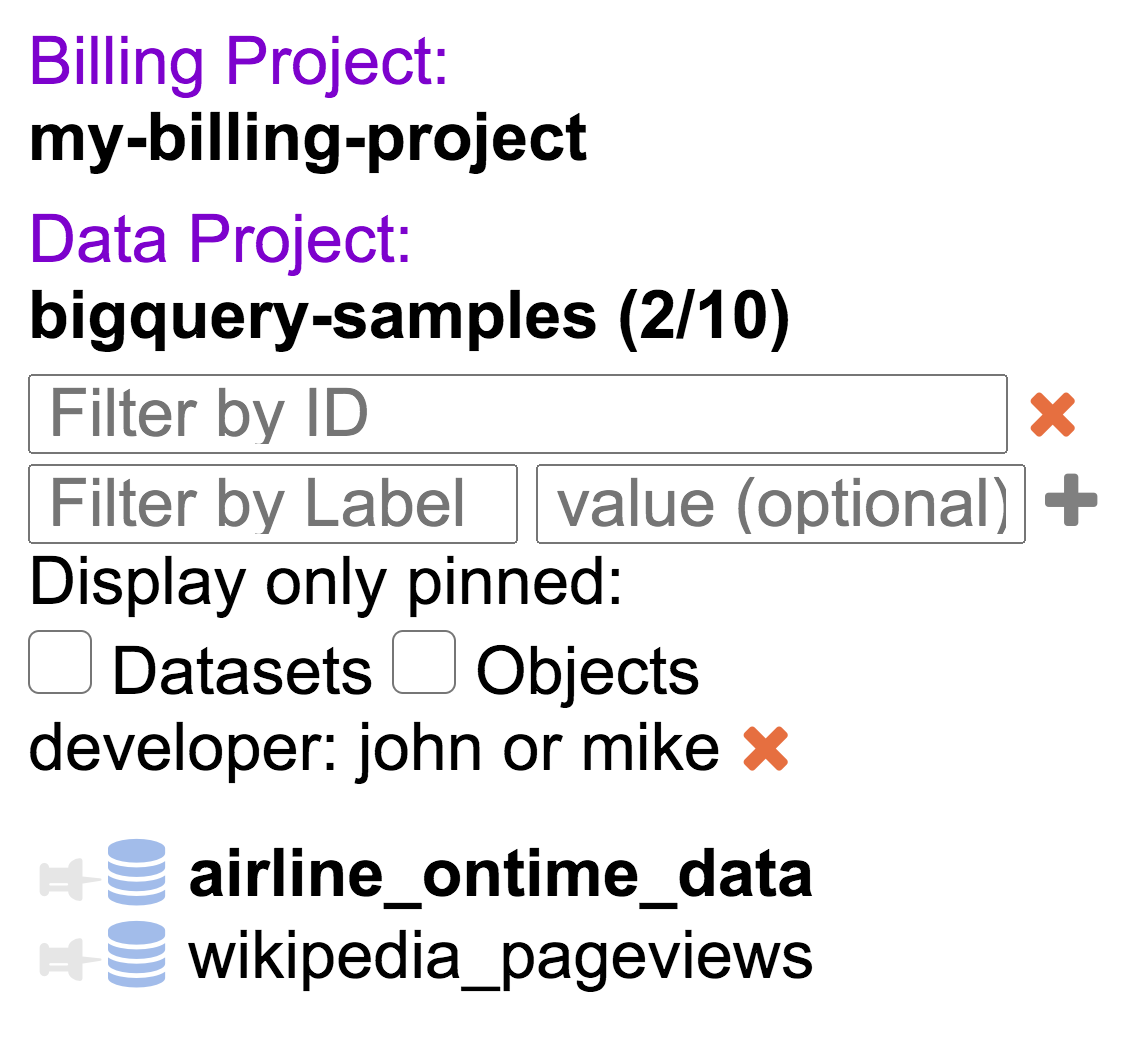
Filter by Labels
|
|
Datasets can be filtered by label. Labels are key value pairs that can be assigned to datasets to help organize and identify datasets.
Datasets can be filtered by ID and Labels at the same time |
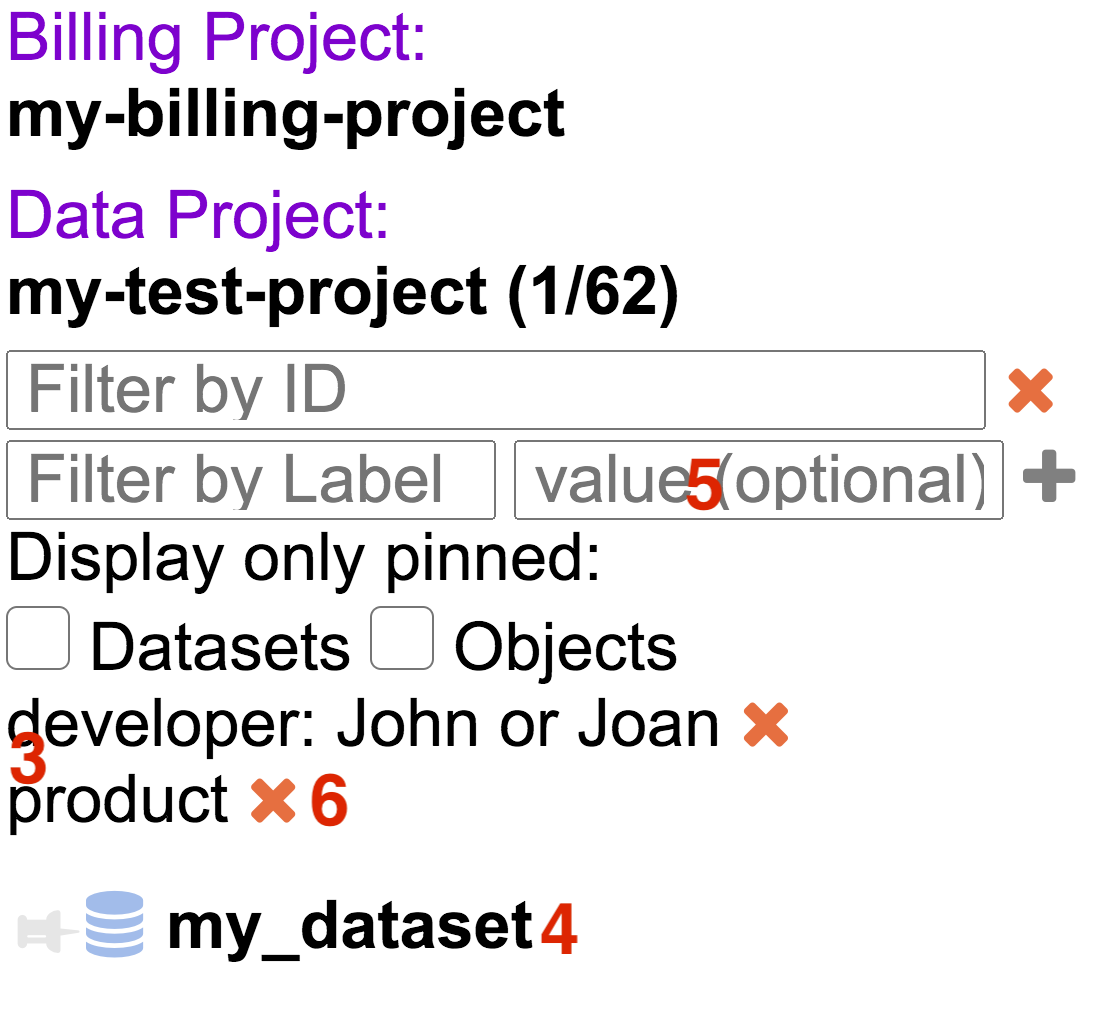
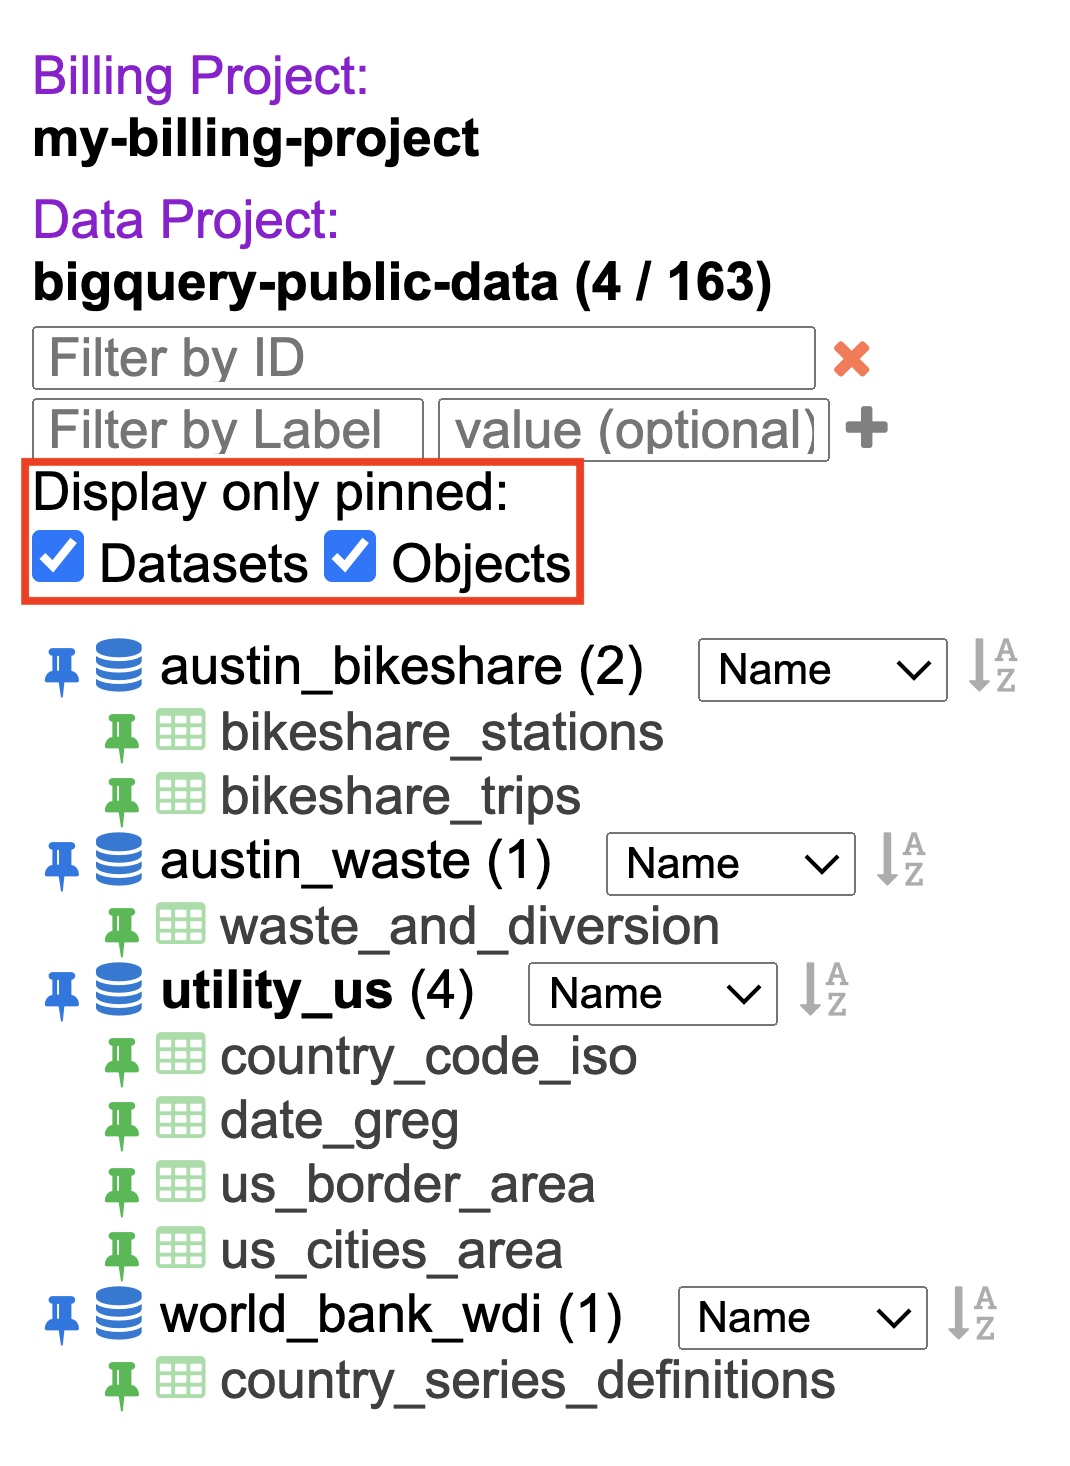
Filter by Pin/Unpin
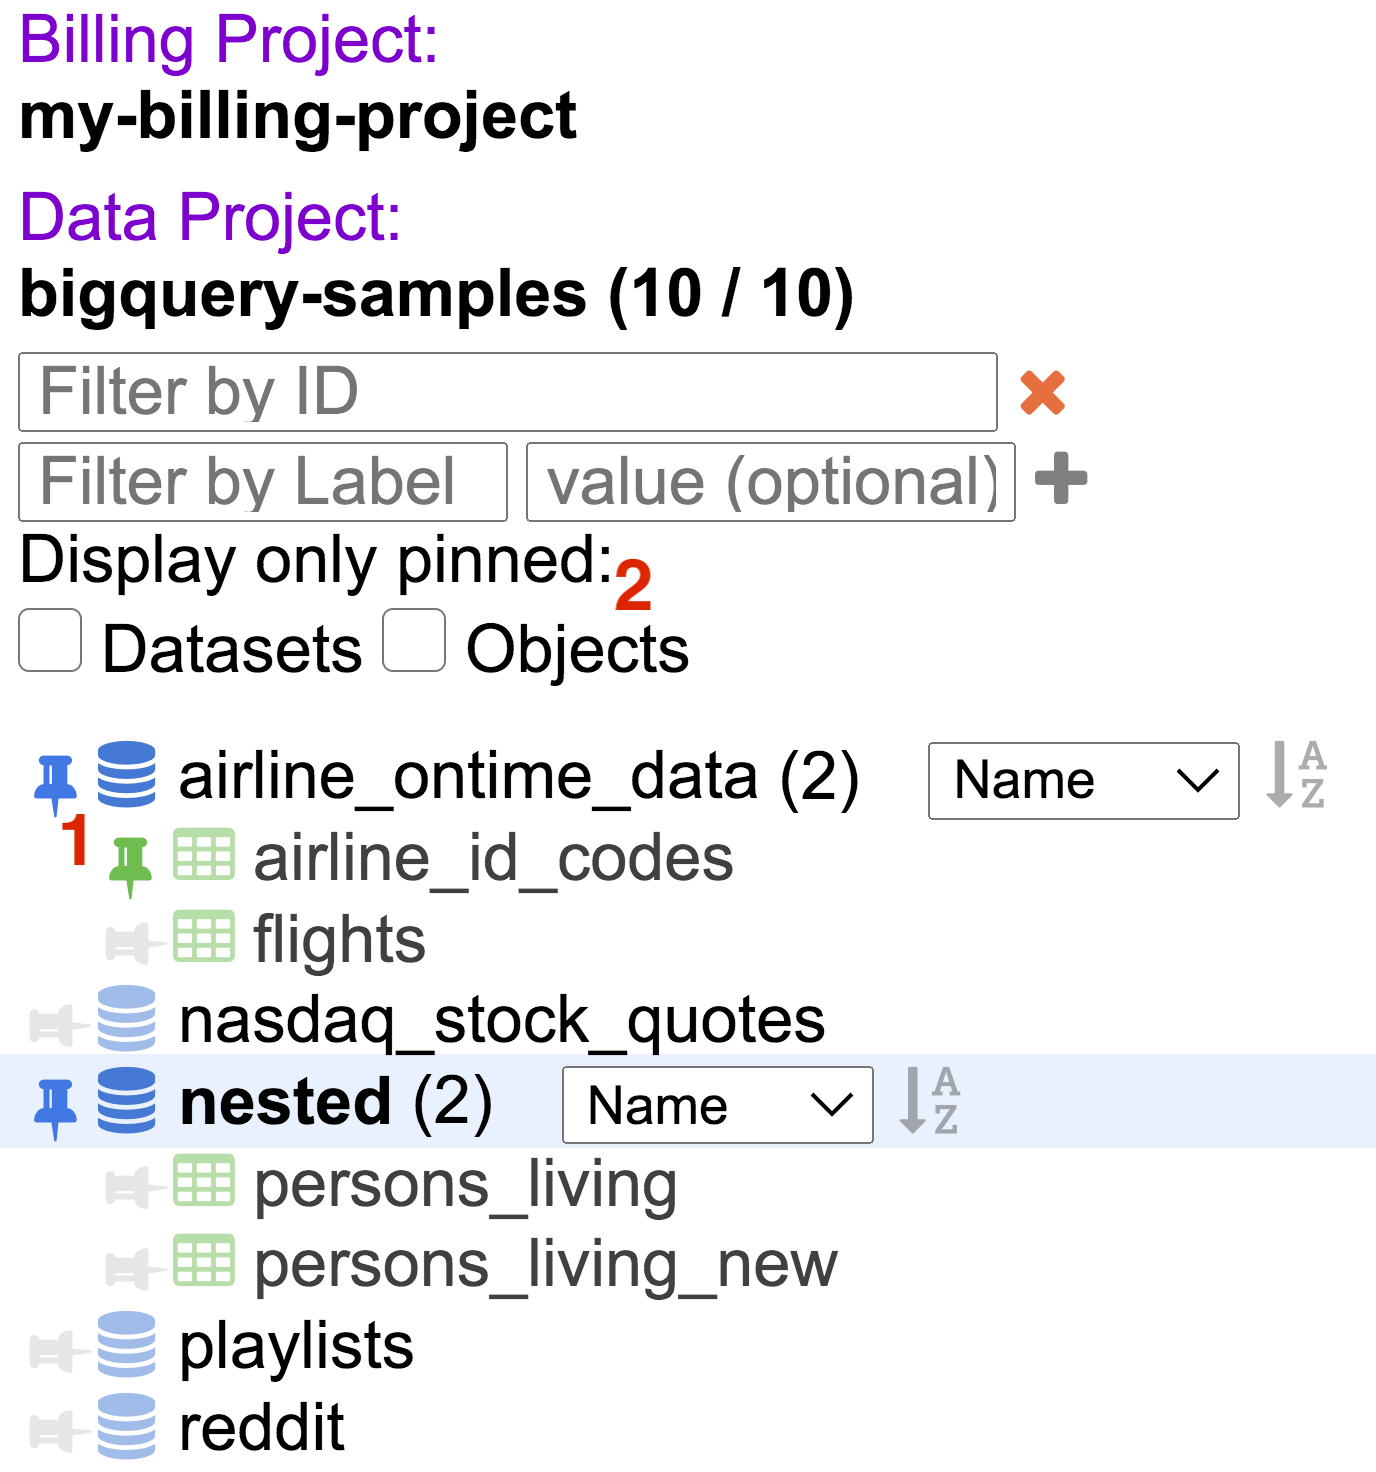 |
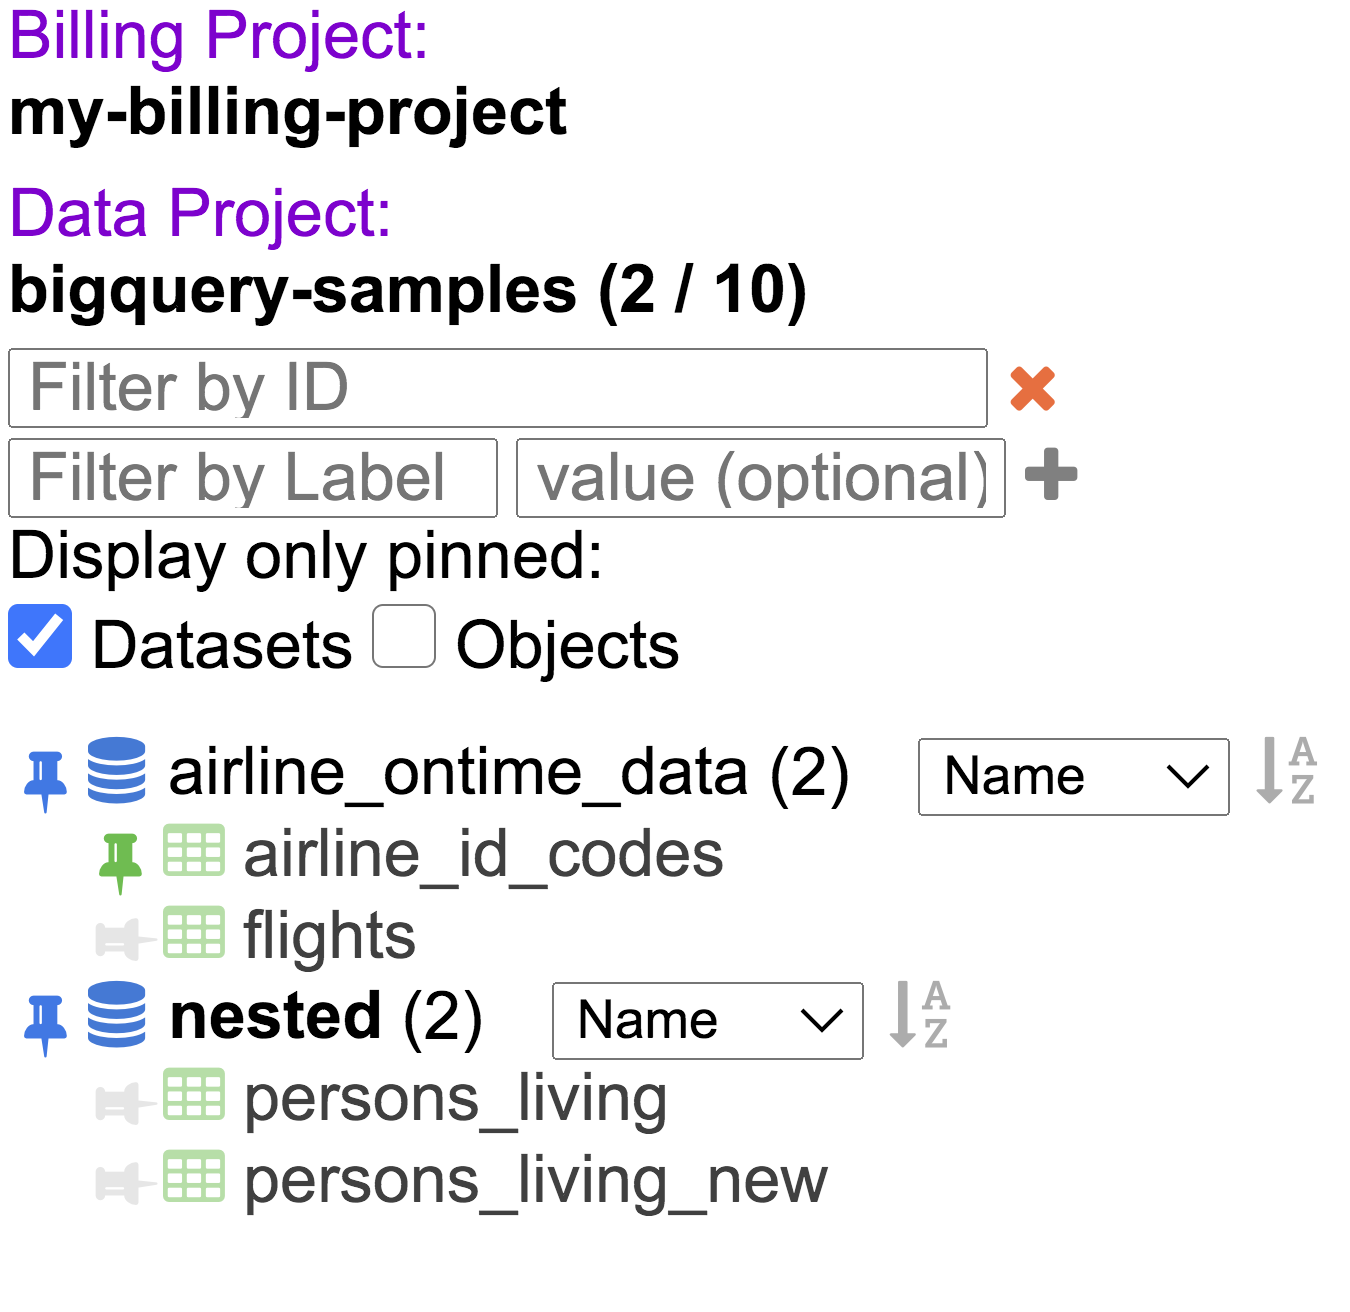
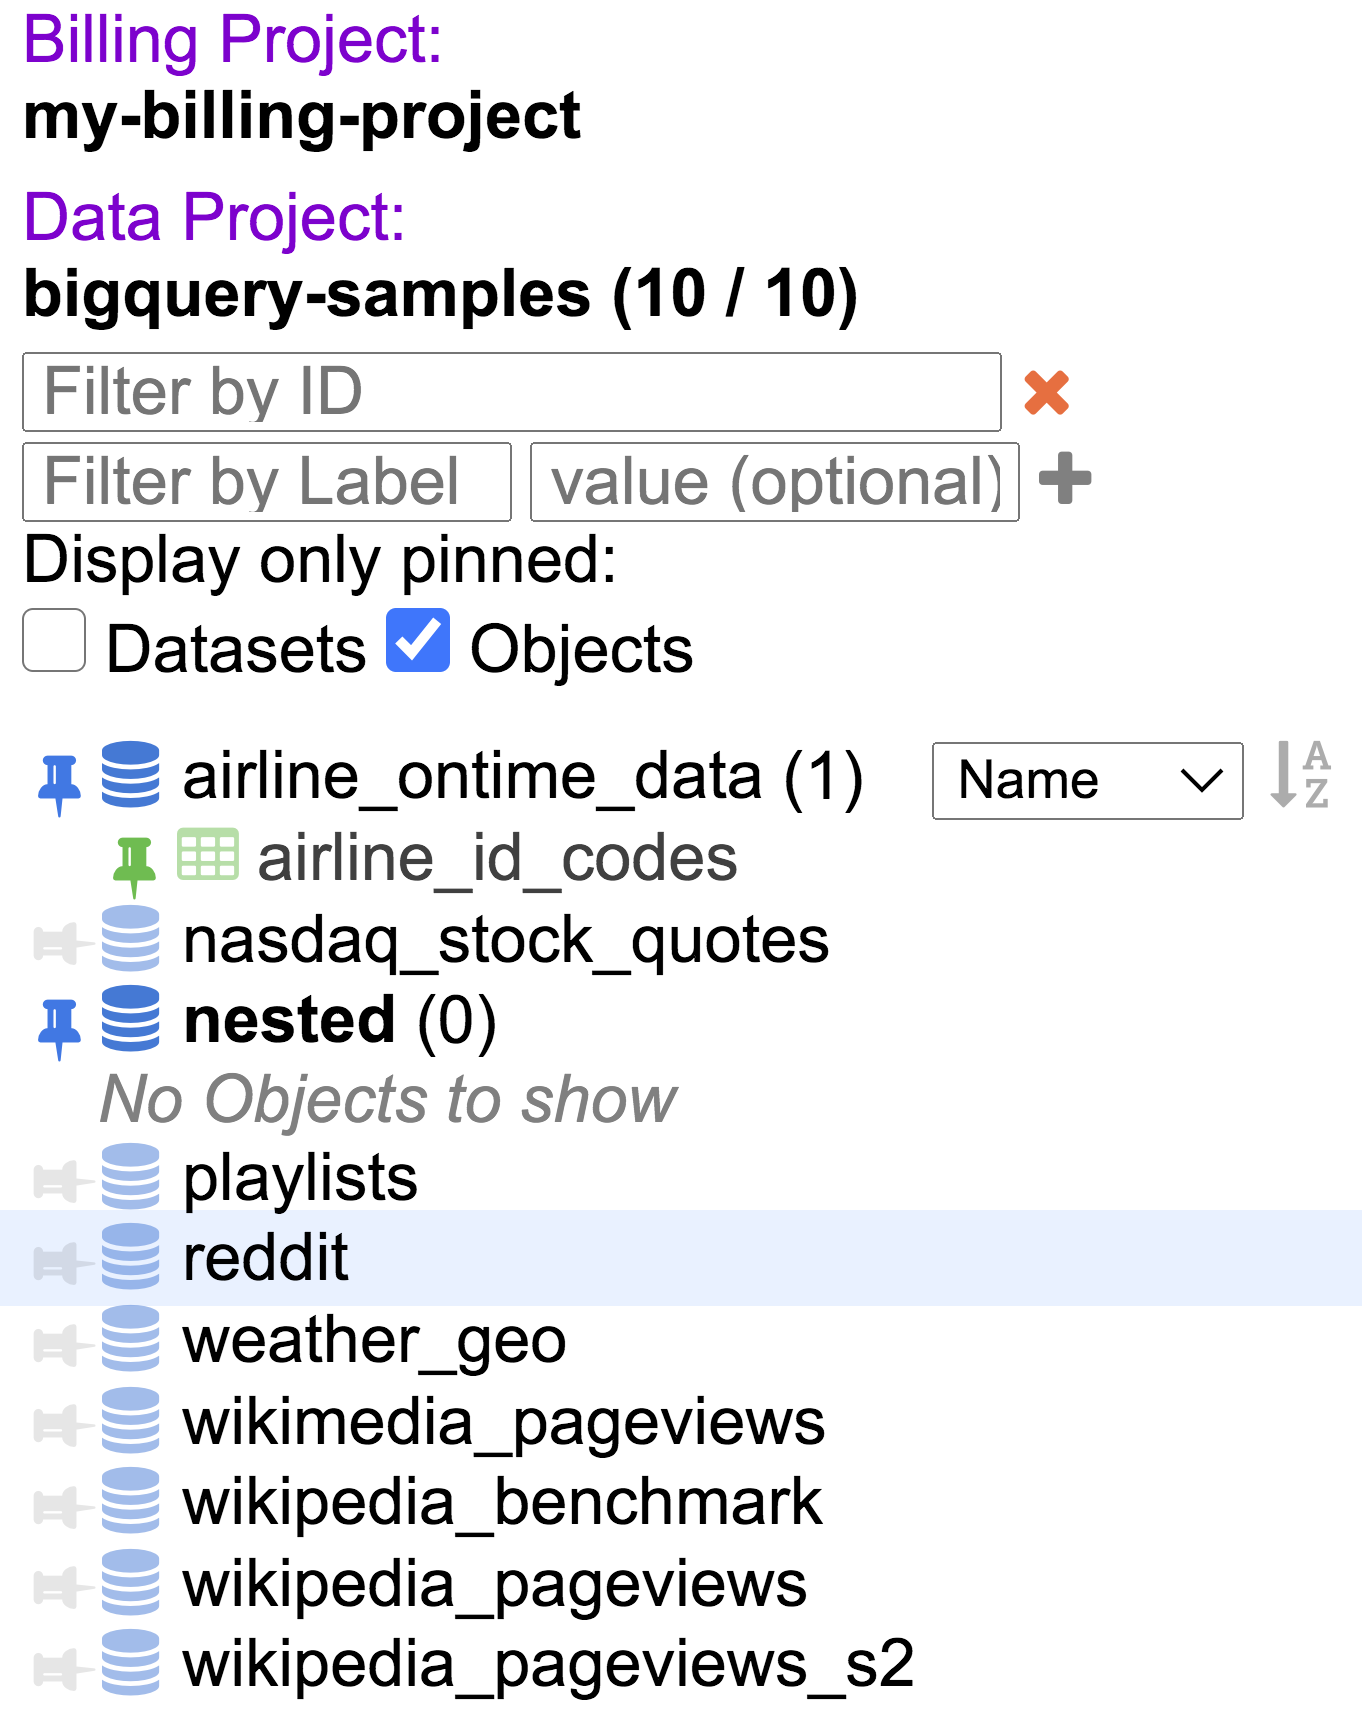
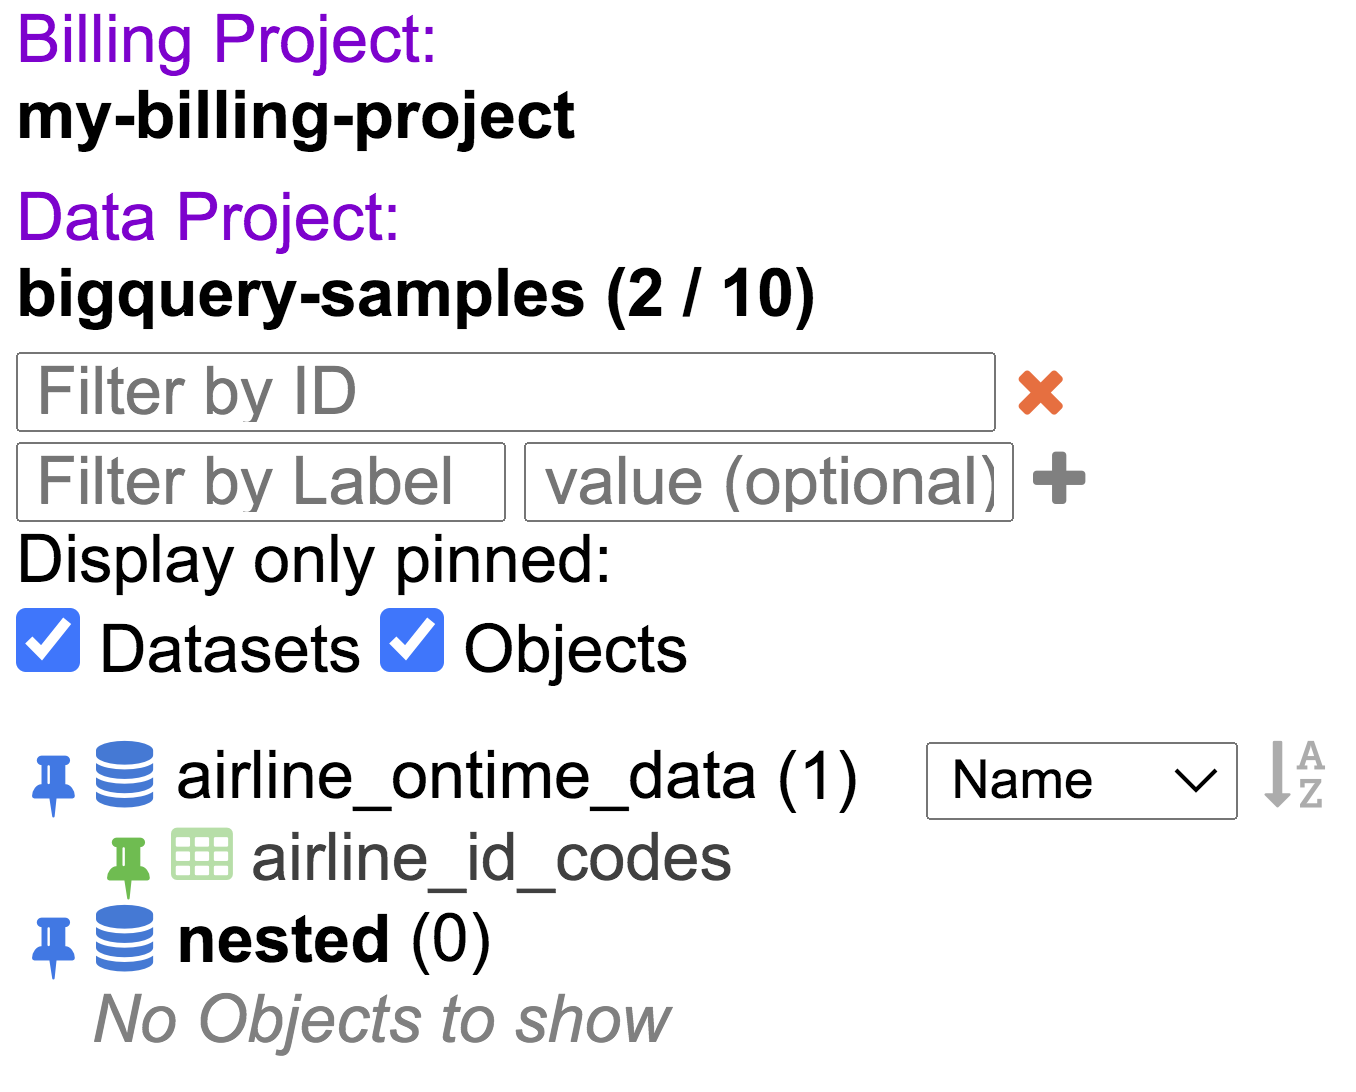
Datasets and dataset objects can be filtered by pinning. An item can be flagged to pin/unpin and clicking on Display only pinned will filter by Datasets and/or Objects.
Checking Datasets display only those datasets that are pinned.
Checking Objects displays only those dataset objects that are pinned.
Checking Datasets and Objects displays only those datasets and objects that have been pinned.
|
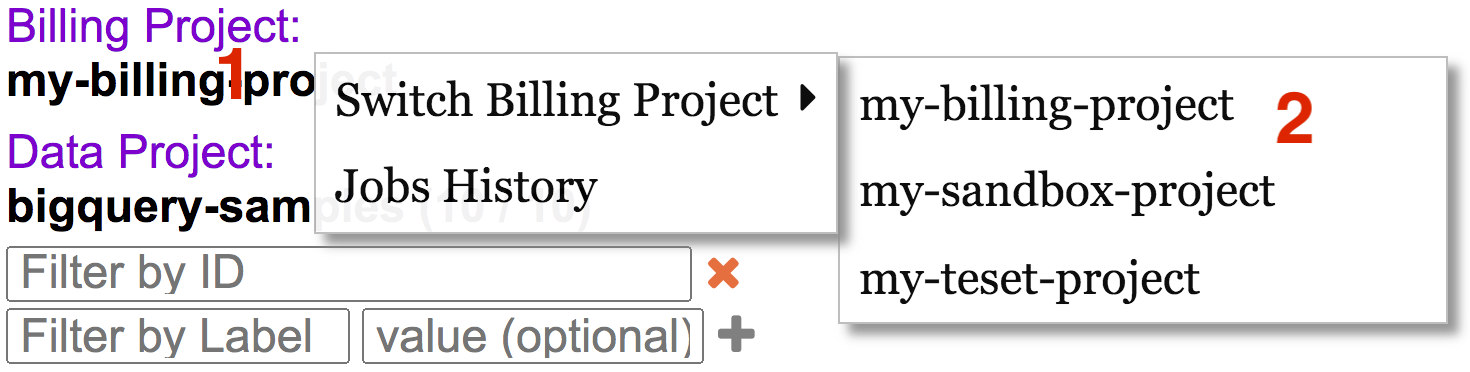
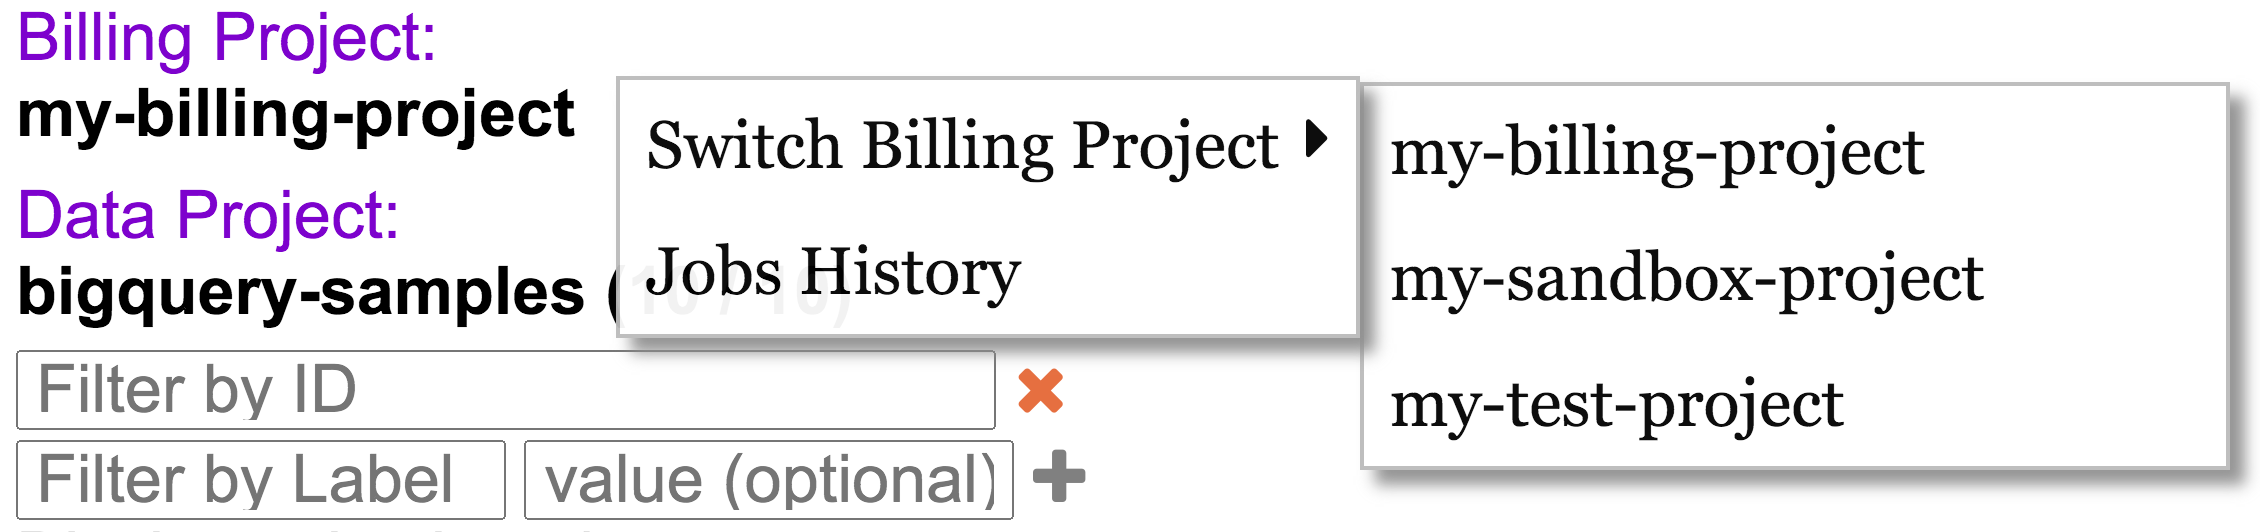
Billing Project Context Menu
|
|
Right click on the project name or left click more options icon in Nav to display the context menu.
Switch Billing Project
|
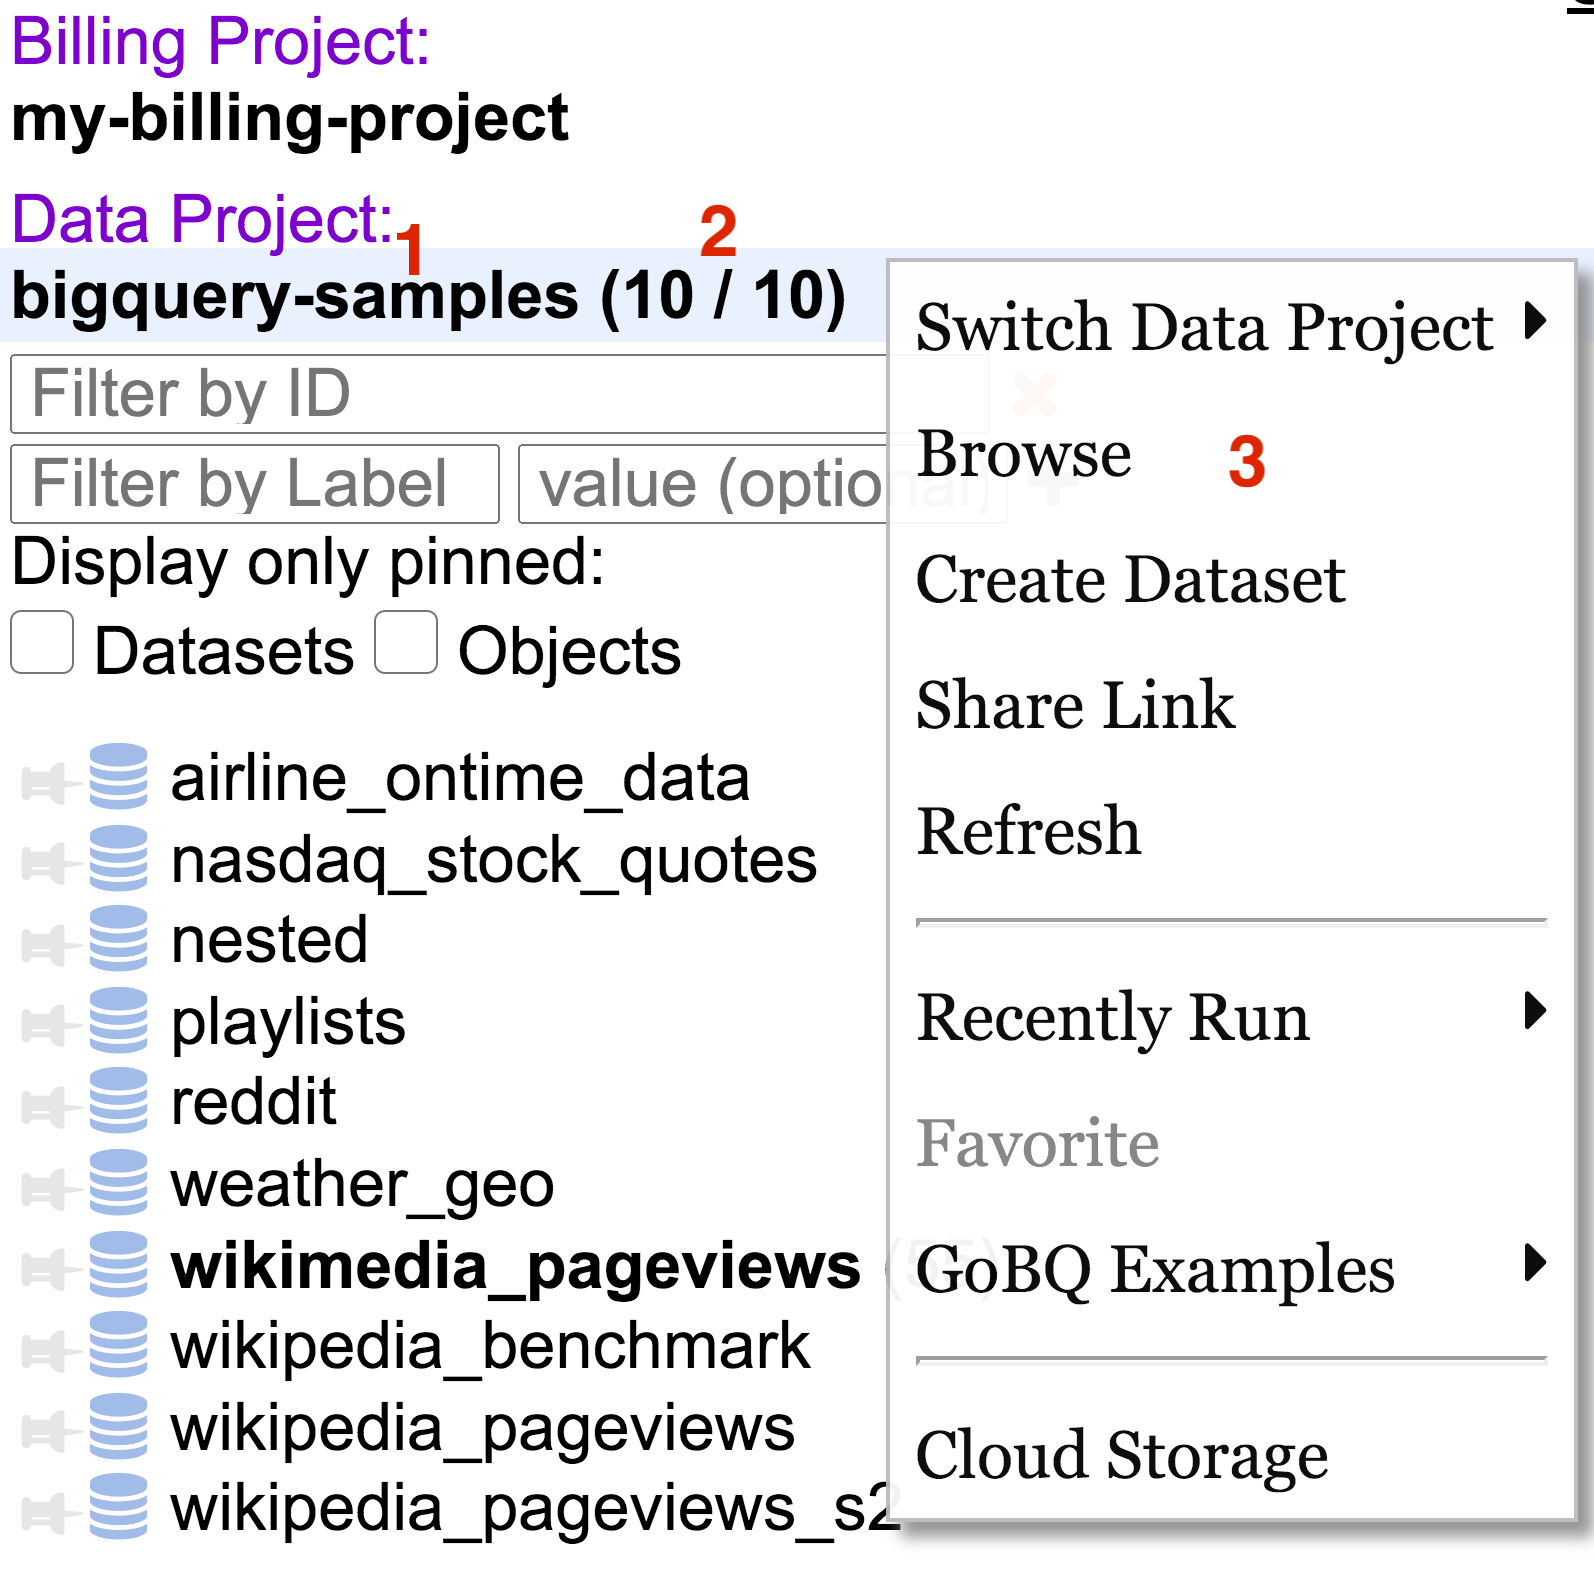
Data Project Context Menu
|
|
Right click on the project name or left click more options icon in Nav to display the context menu.
|
Switch Data Project
|
Switch Data Project contains a list of projects user has access to
|
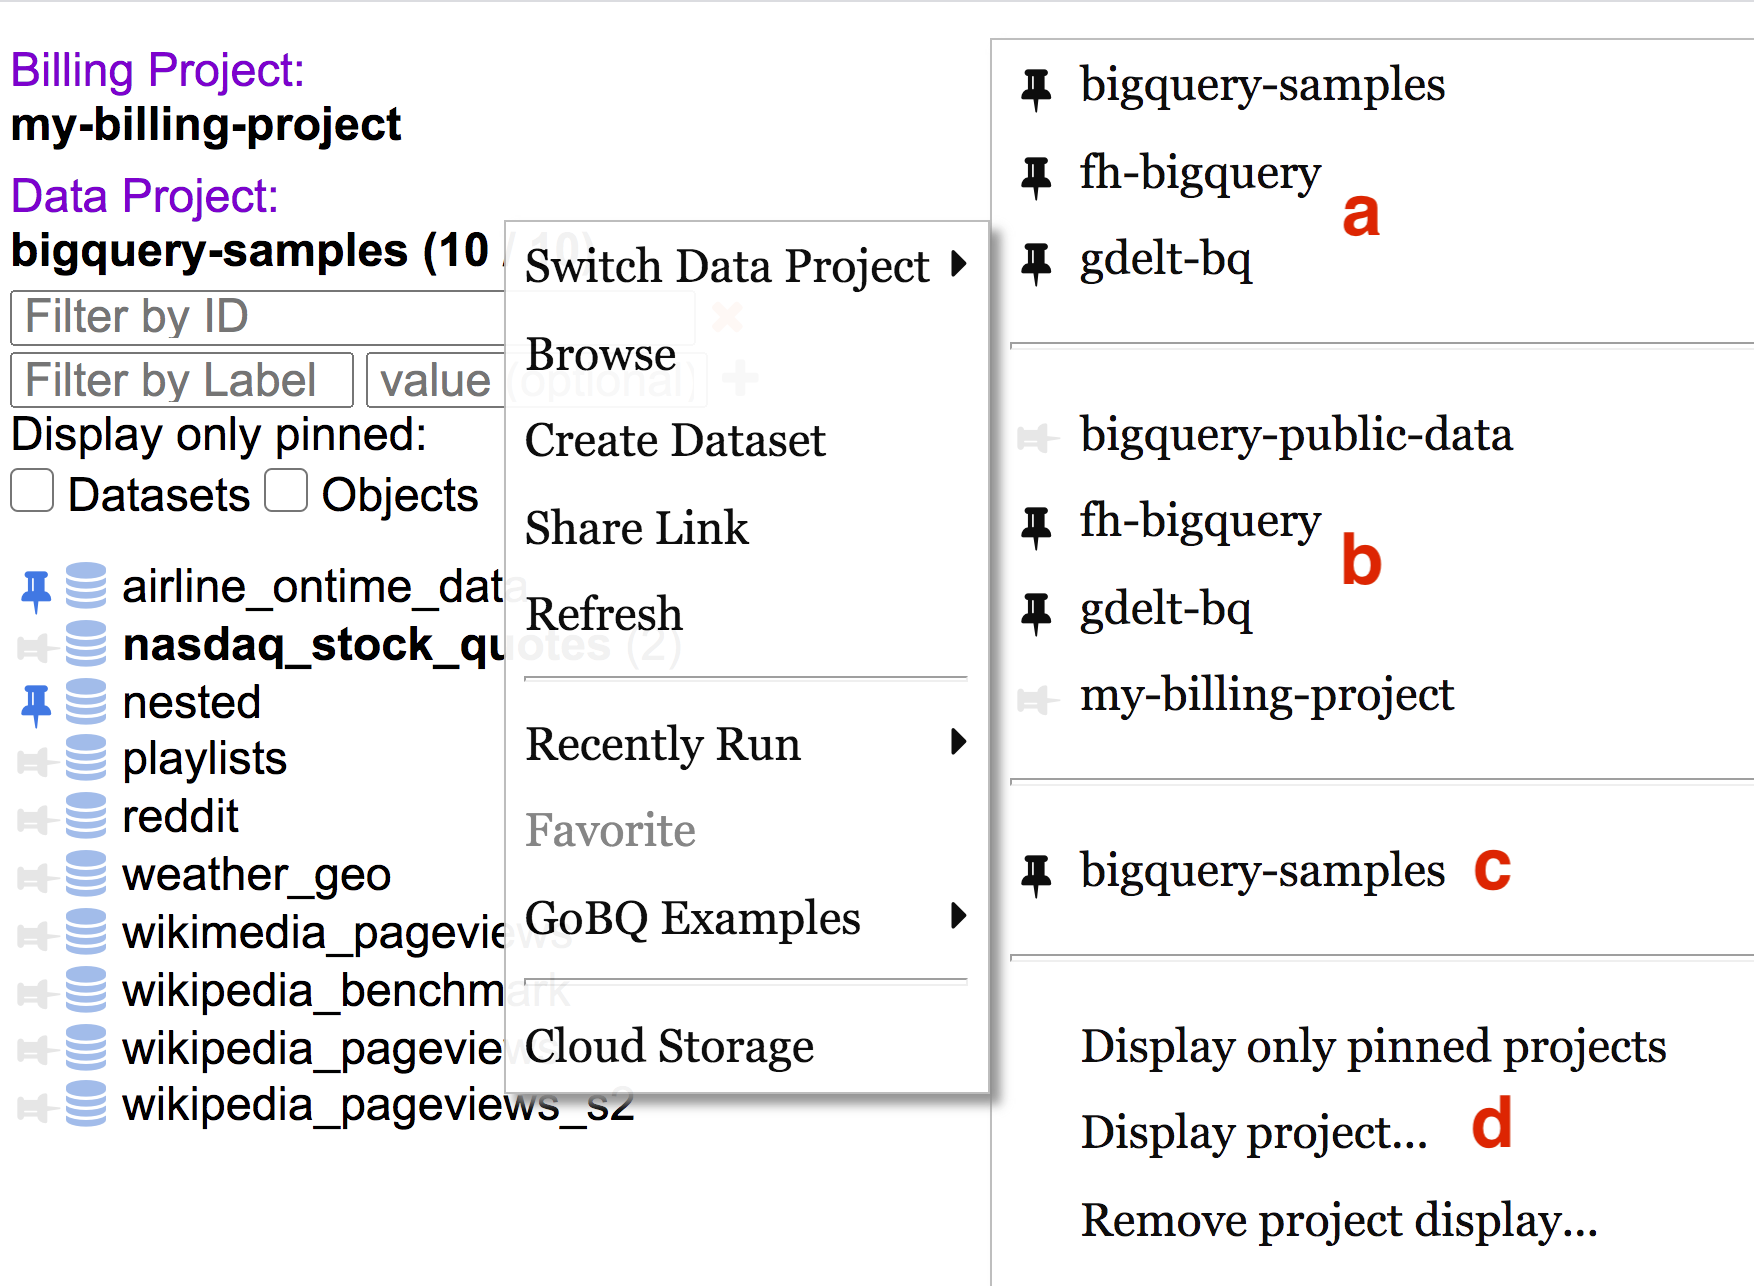
Data Project ListData Project list may contain up to 5 sections. a. Pinned projects. b. List projects user has been granted any project role. A project will not be listed if a user has not been granted any project role. Permissions granted only on dataset or table are not a project role. c. If a user has not been granted any project role and has only been granted permissions on a dataset or table they will need to manually add the project to Goliath. The project will not automatically appear in section #a. Section #a only lists projects where the user has been granted any project role. See #a above. To add a project, click on Display project. Projects added via Display project will display in this section. Another section (not pictured) lists temporarily added projects. This section includes projects that are available for session only. This section is normally populated when a shared link was used for a project the user does not have in list b or c. d. Display only pinned projects toggles displaying only those projects in section a. Add/Remove project options add or remove custom projects for use with Goliath.
Switch Data Project
Add Data Project
Remove Data Project
|
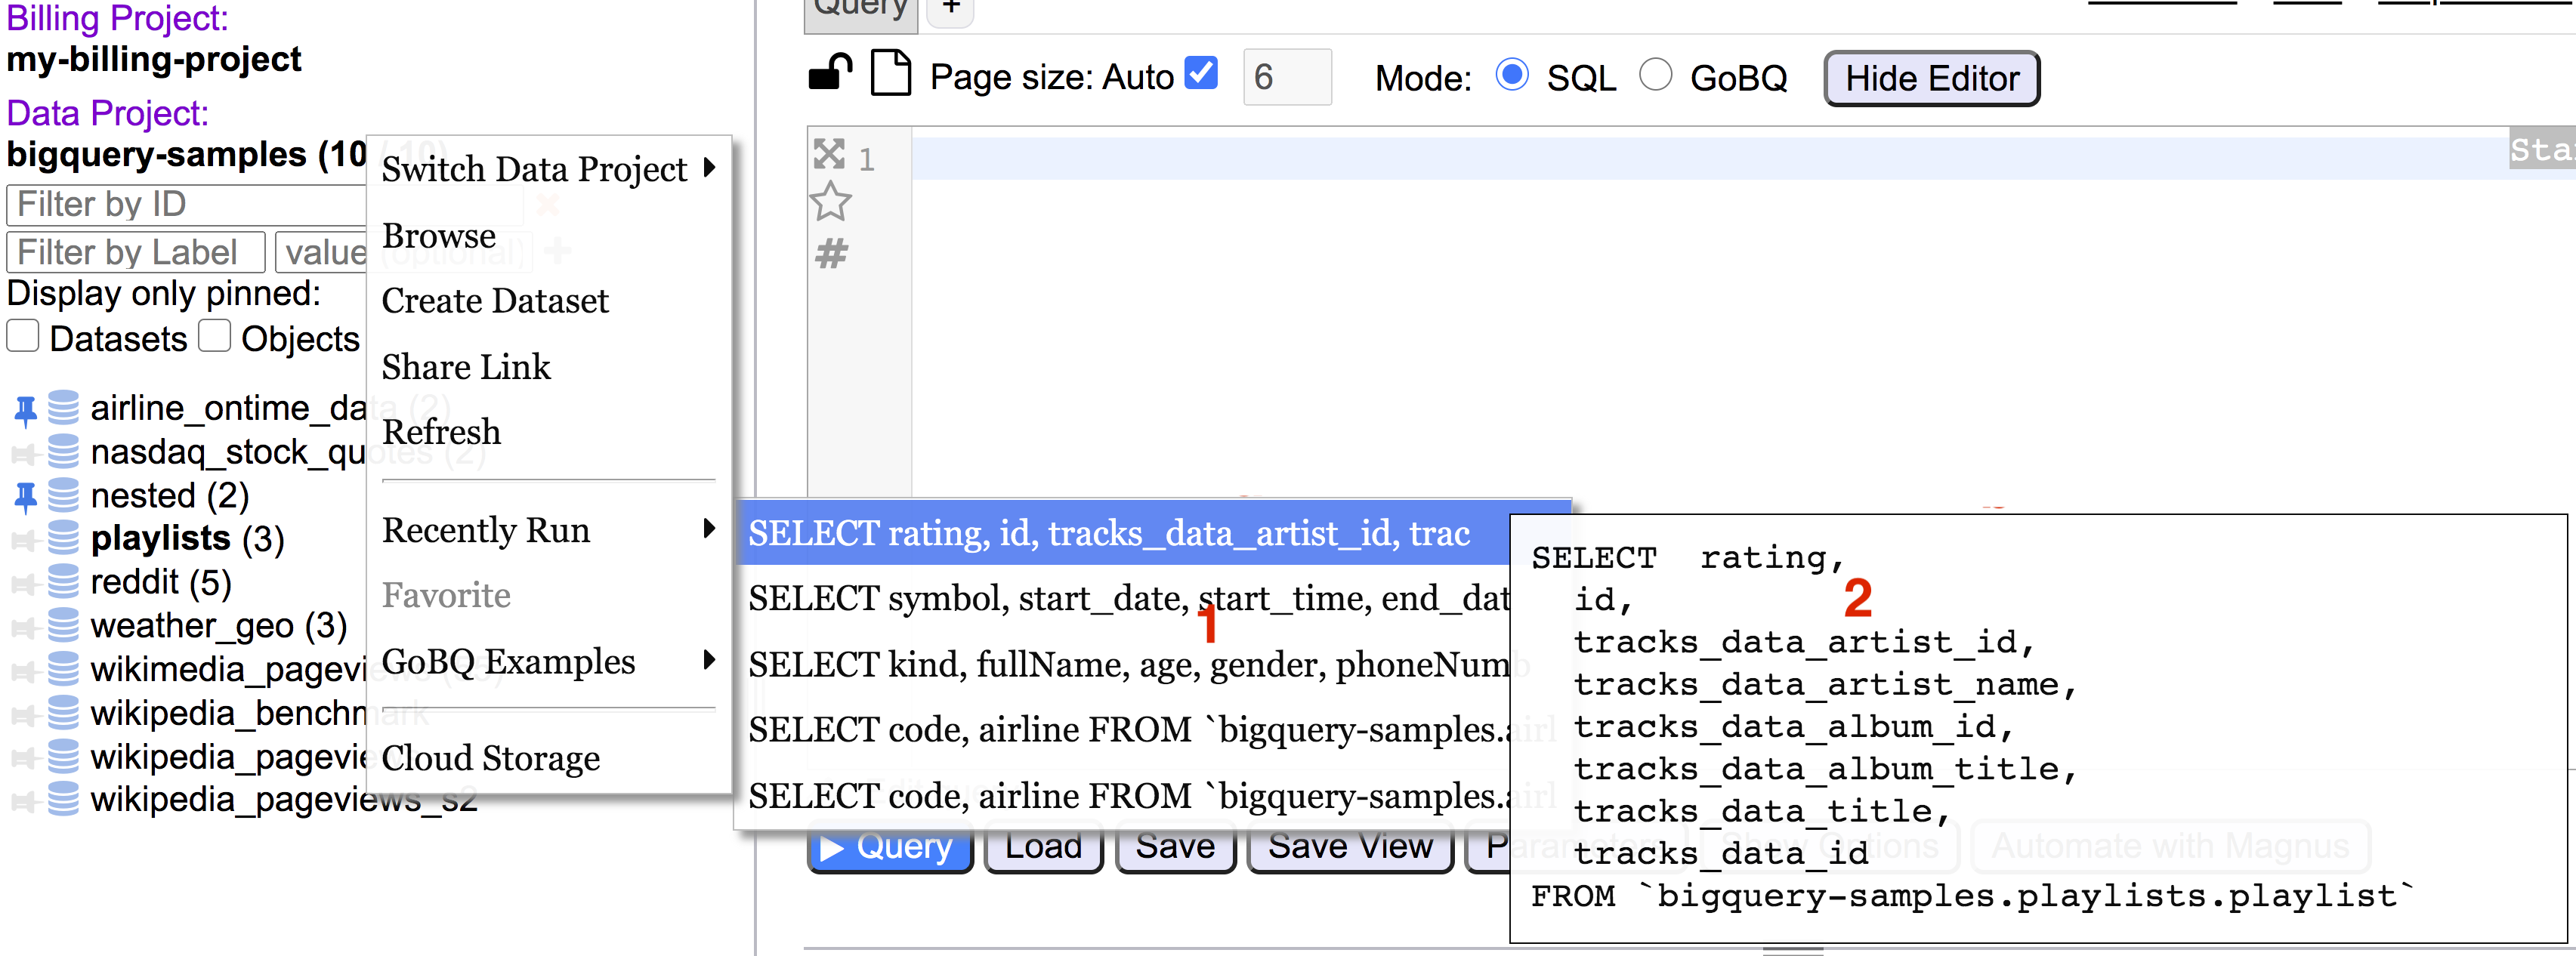
Recently Run
|
|
|
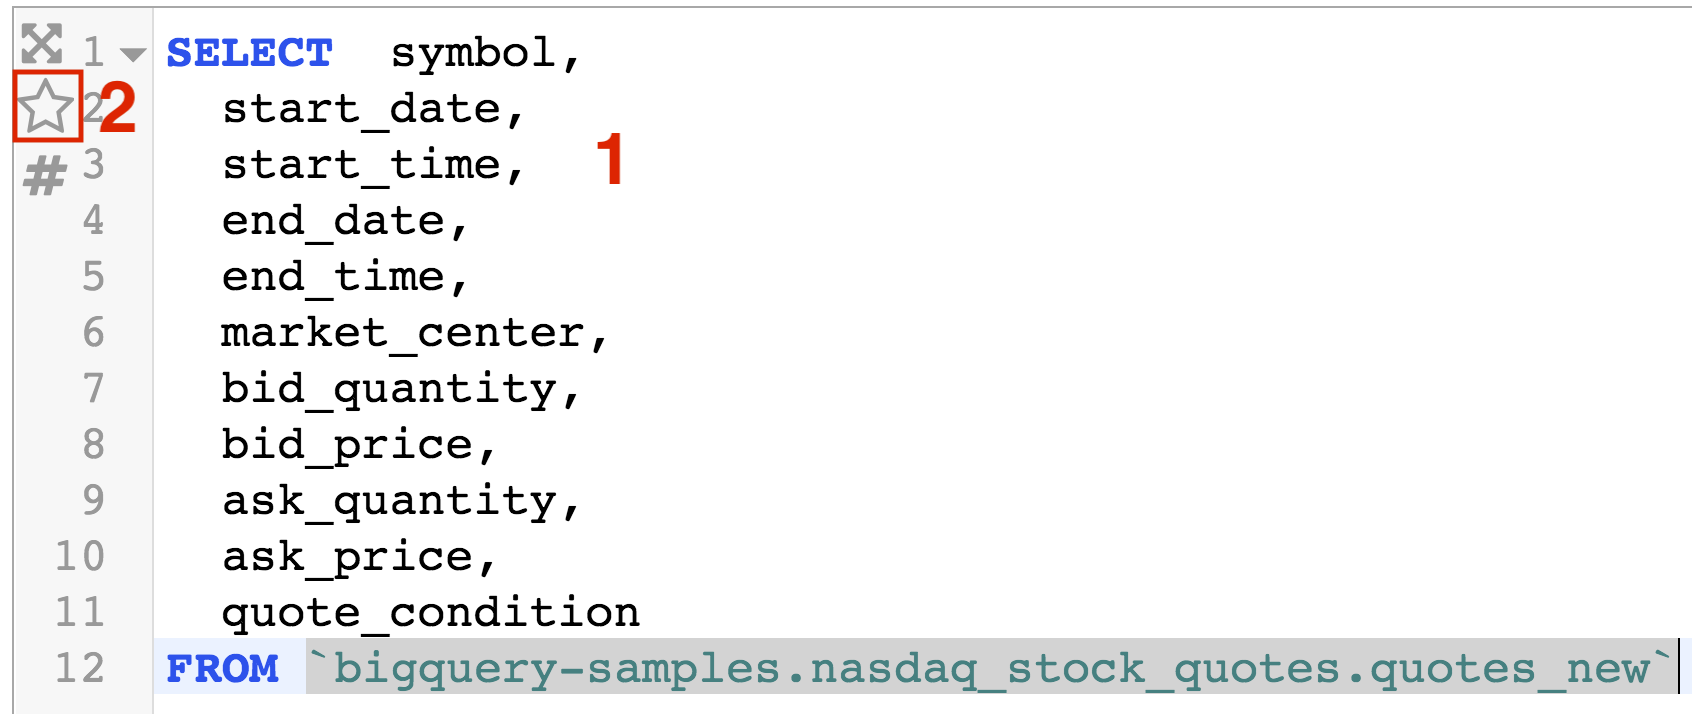
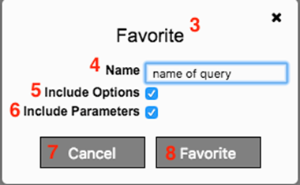
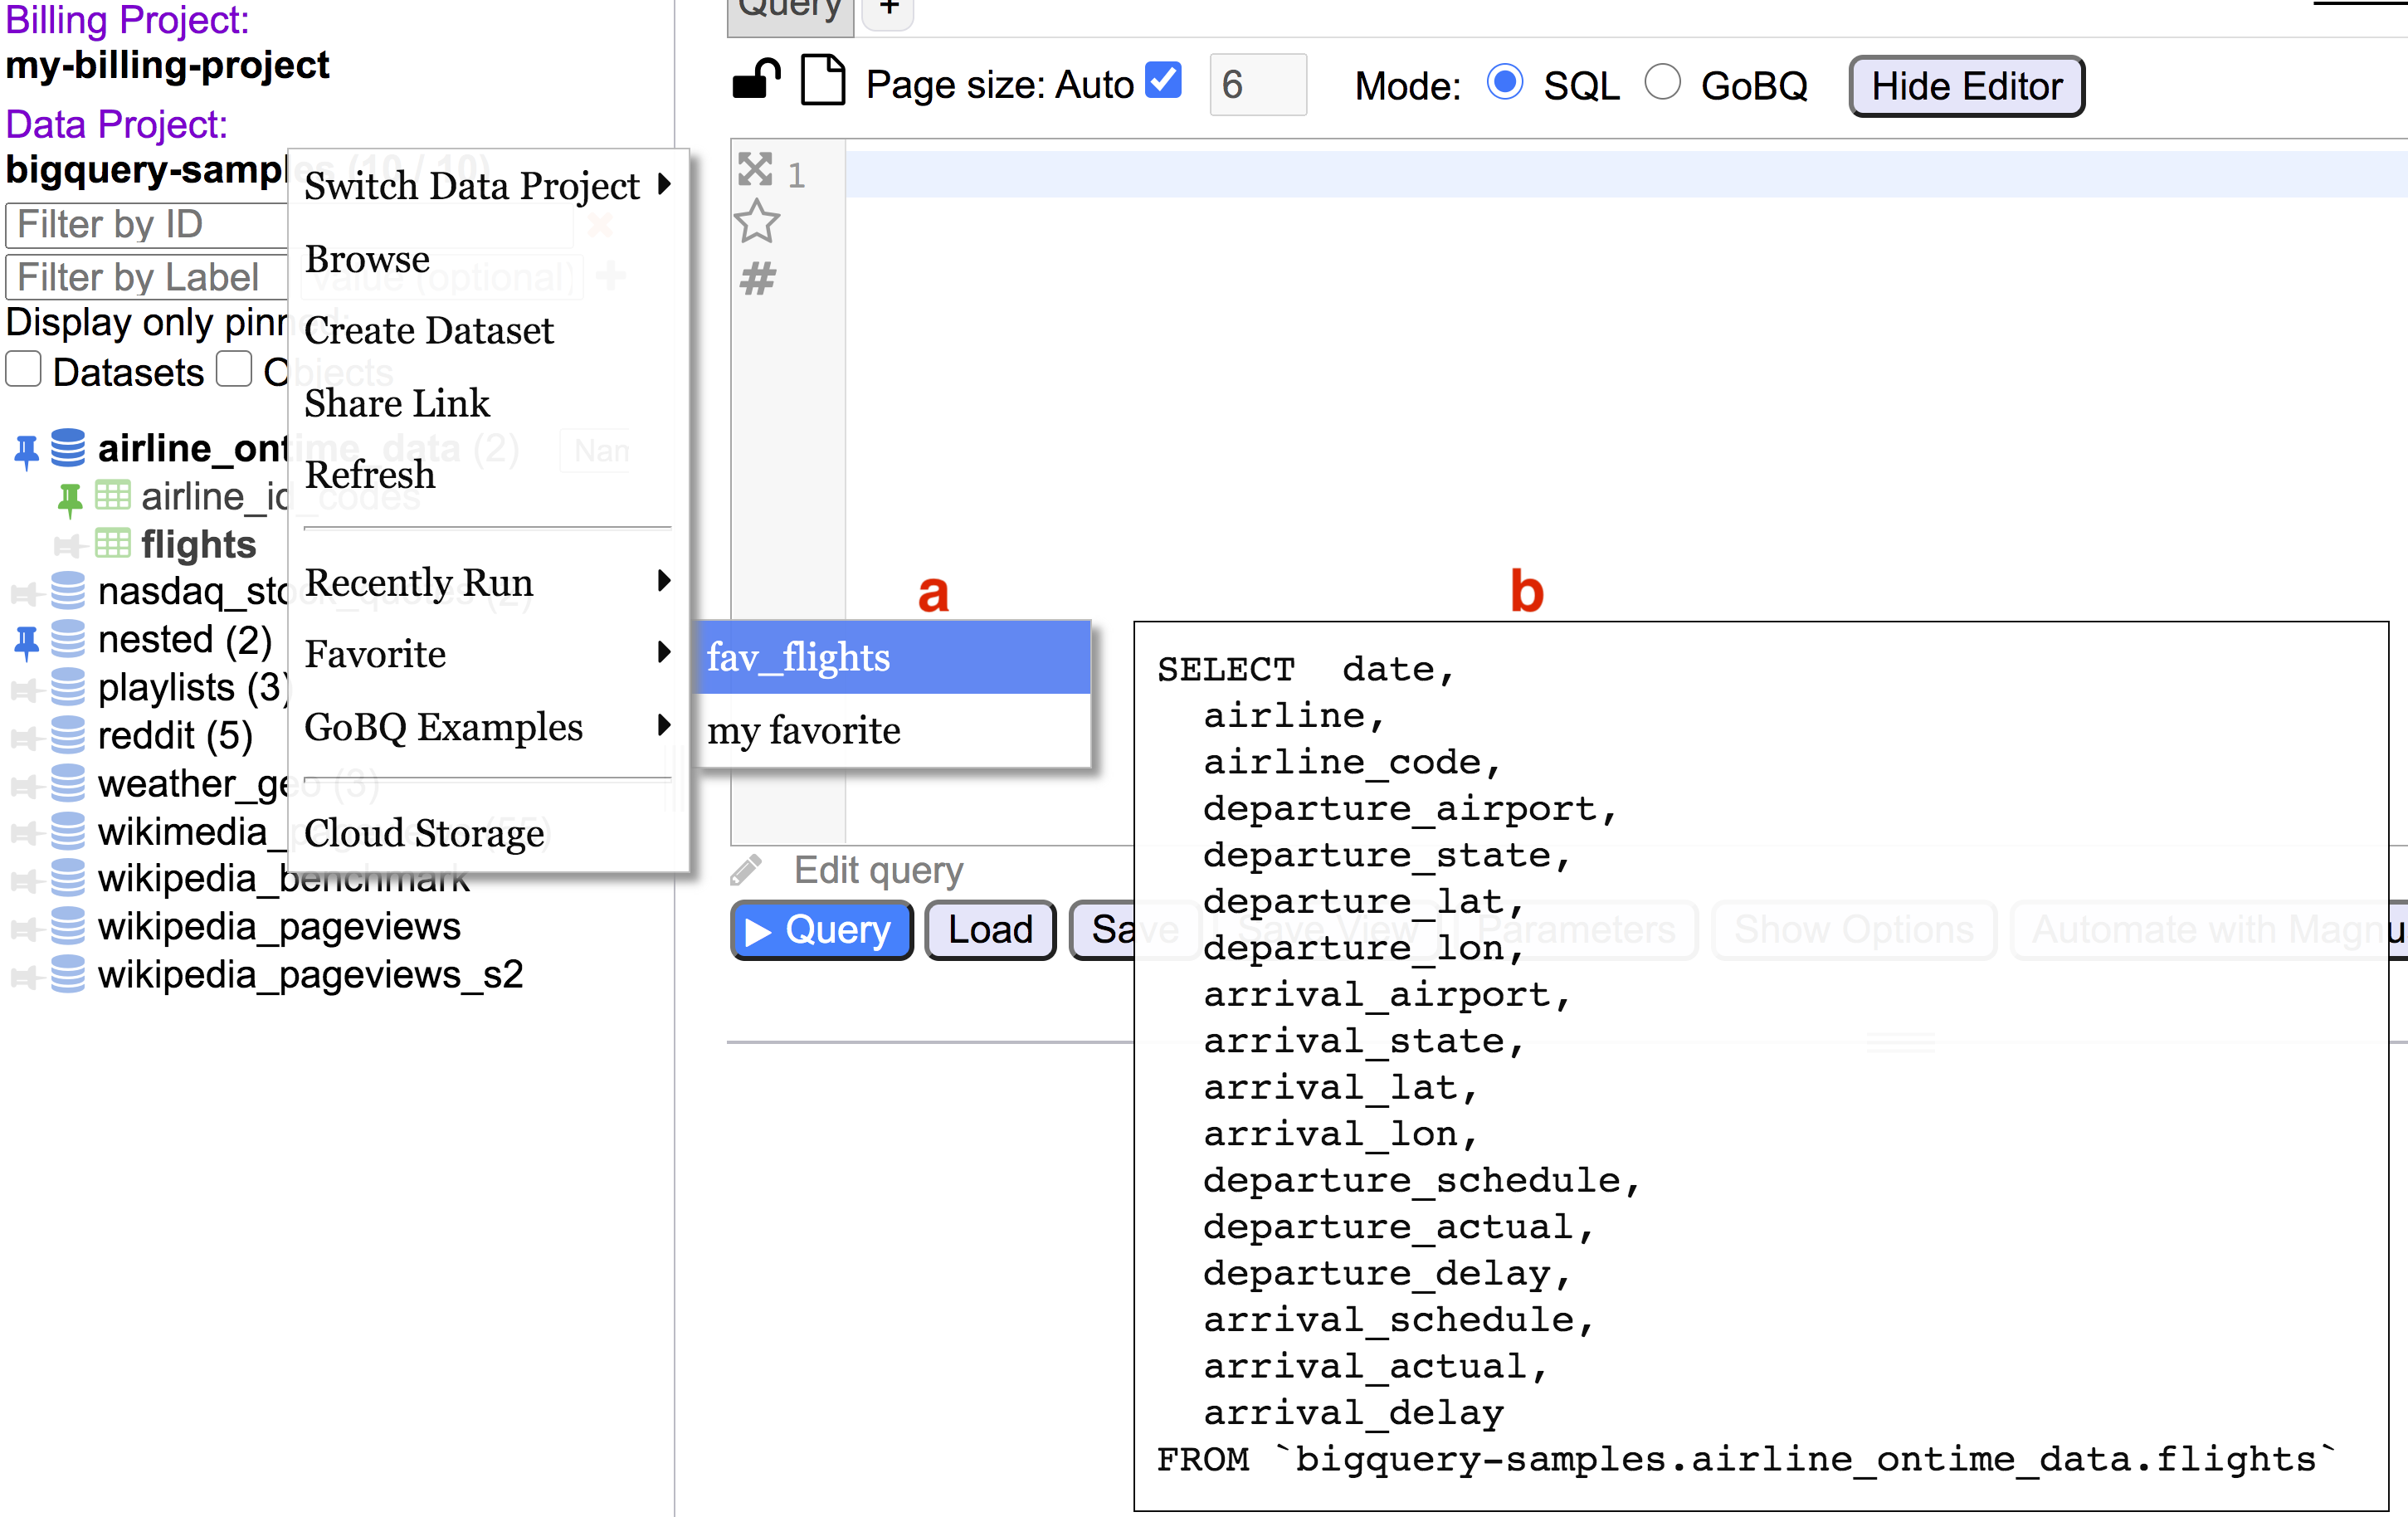
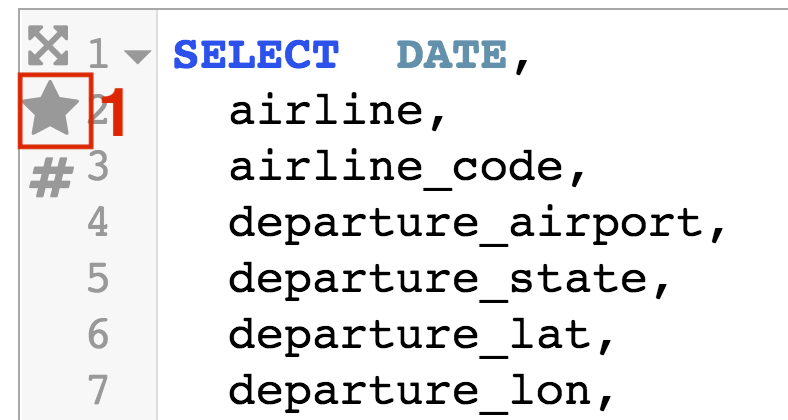
Favorite
|
|
Any Query or GoBQ Script can be marked as favorite. To mark as Favorite
|
|
|
Favorite List a. Favorites are listed in Favorite context menu. Left clicking a favorite will load the it into the workspace b. Hovering over a favorite name will display apreview of the query |
|
|
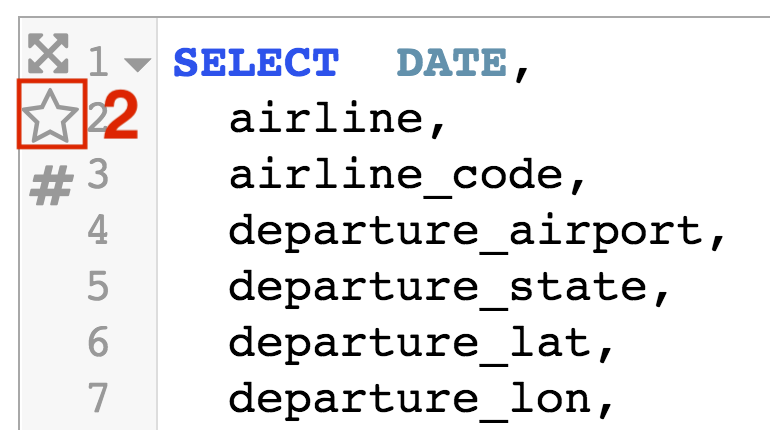
Delete Favorite
To delete Favorite:
|
GoBQ Examples
|
|
GoBQ examples are templated scripts that can be used as starting points for developing robust scripts that interact with BigQuery and Cloud Storage. Additional information can be found in wiki section User Manual > GoBQ.
|
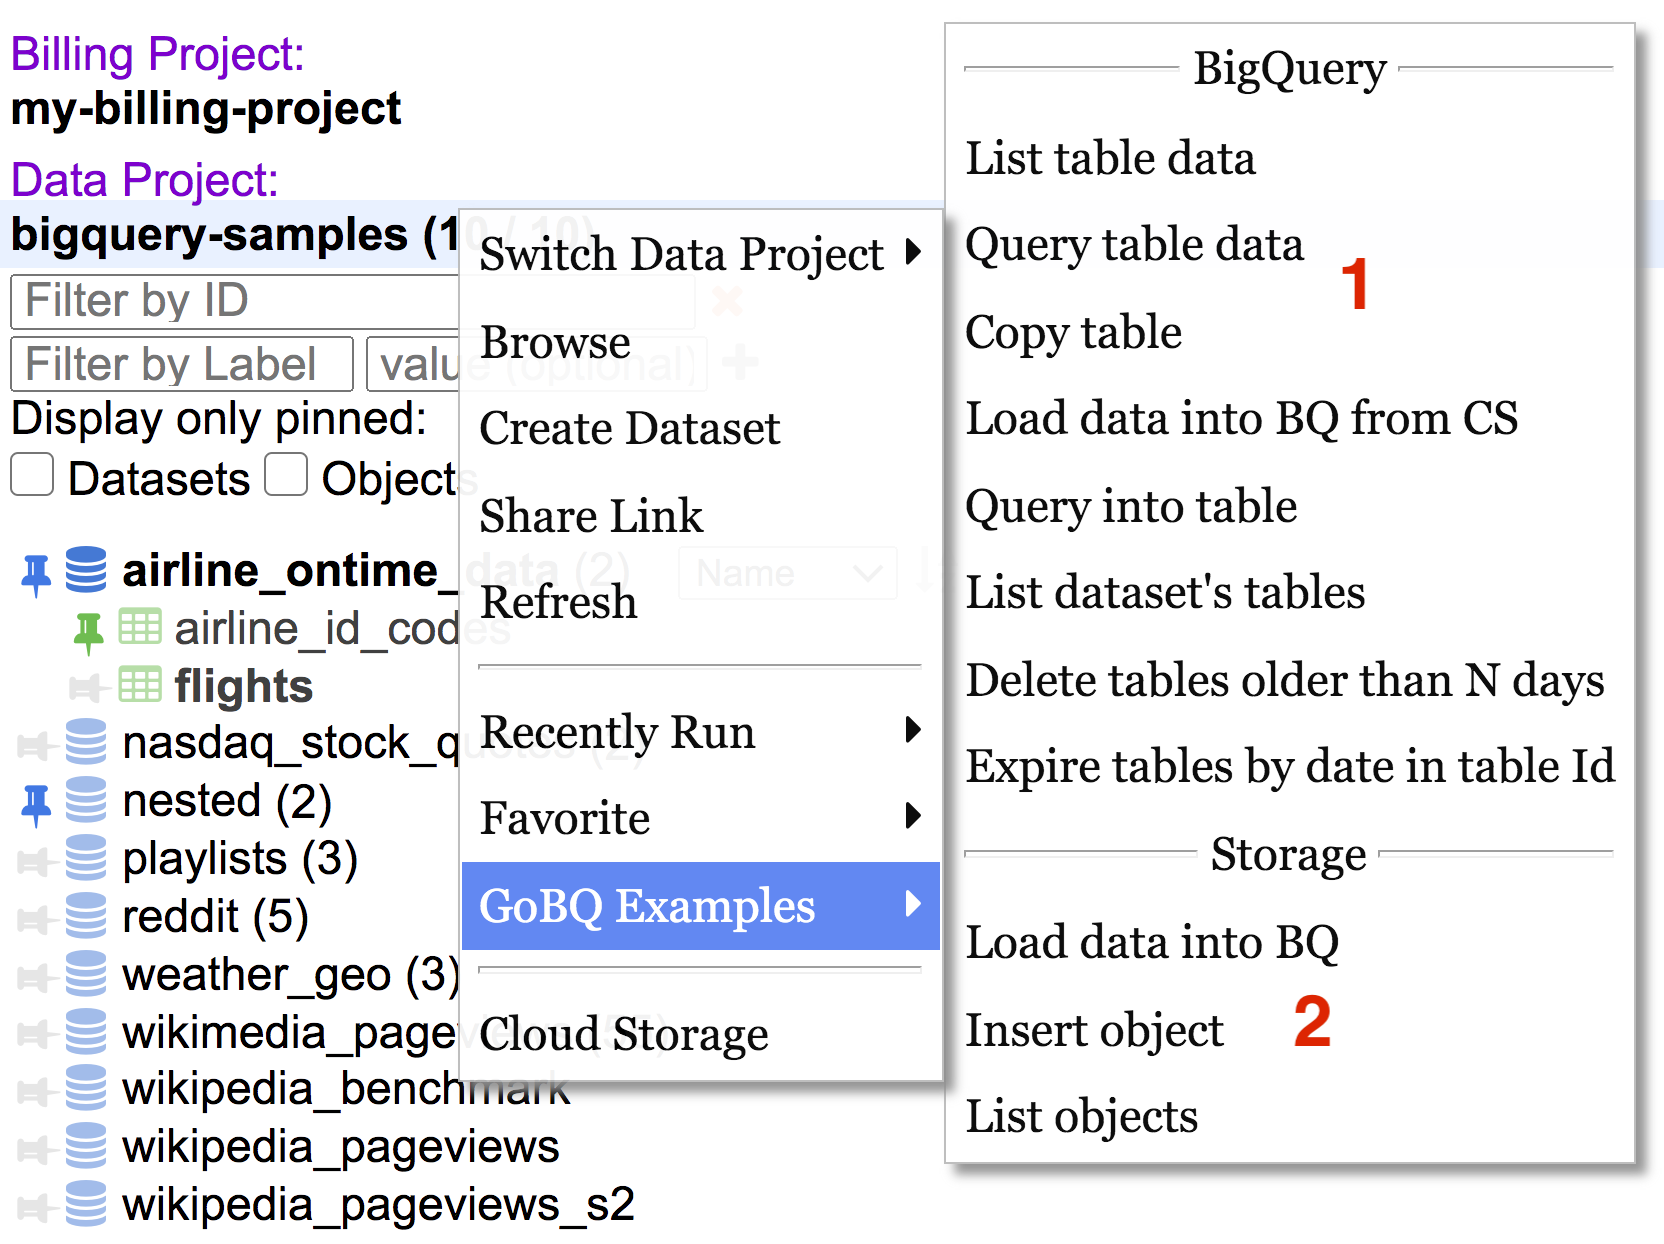
Create Dataset
|
|
Create Dataset Dialog prompts for information used to create a new dataset
|
Datasets
Dataset Info
|
|
Hover over a dataset to display dataset information
|
|
|
When a dataset is open both tables and table metadata are collected. While table metadata is gathered a loading icon will display along with a the number of tables processed out of total tables. Once table metadata is complete the loading icons and number of tables processed out of total tables are removed. |
Dataset Context Menu
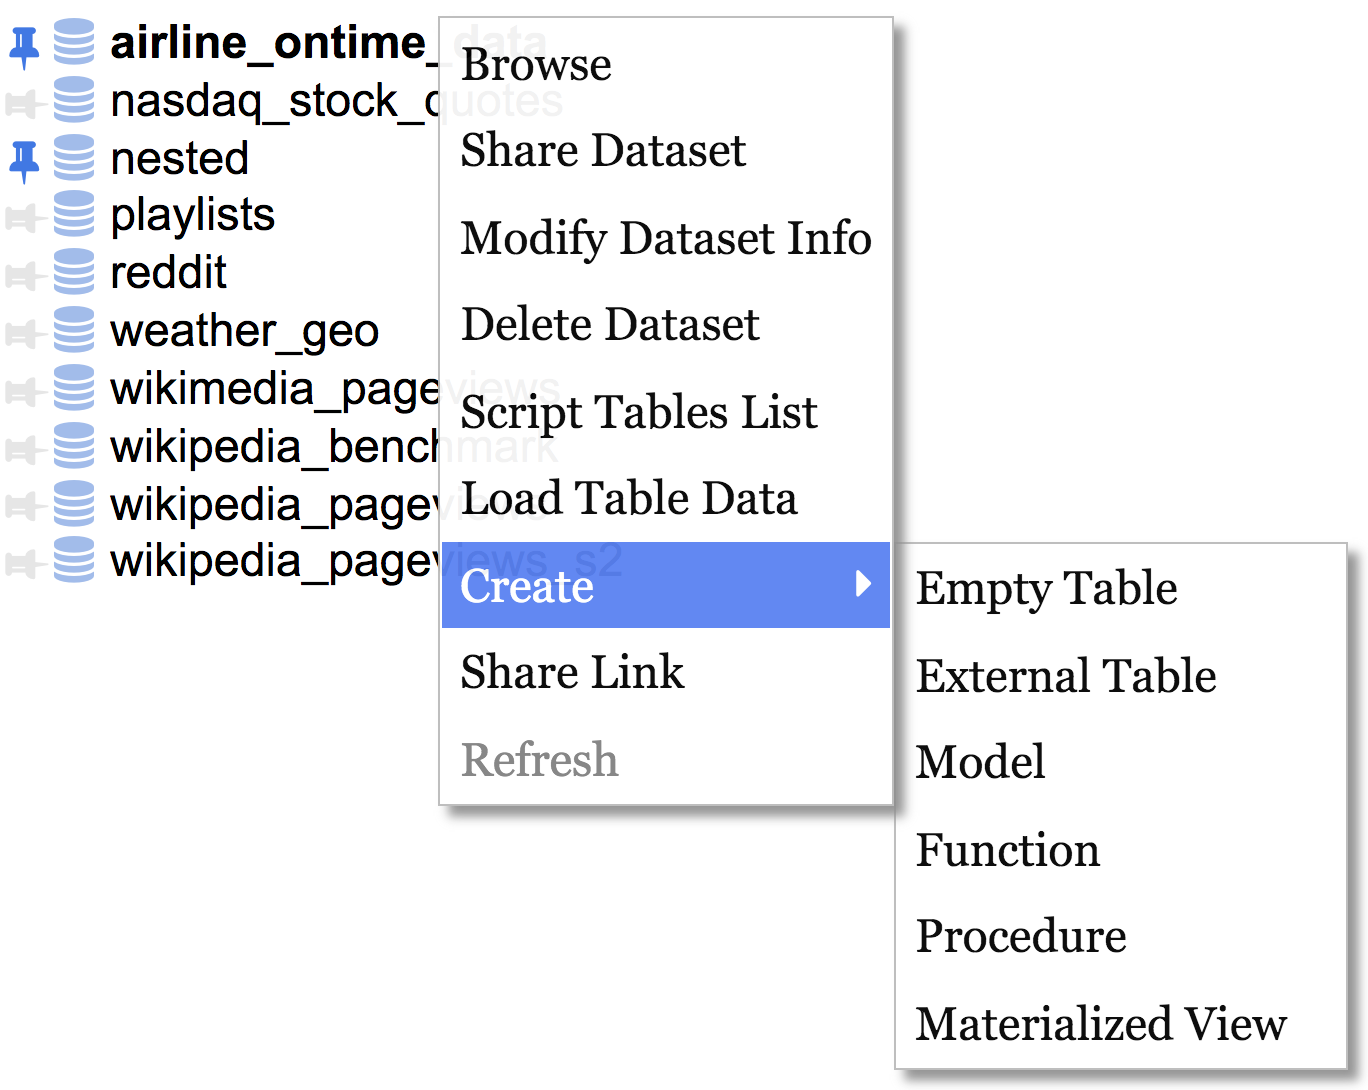
Dataset Context Menu is accessed by right-clicking on dataset name or left clicking on other options menu icon.
|
Item |
Action |
||||||||
Browse |
Displays Dataset Browser |
||||||||
Share Dataset
|
Modify Access List 1. Project where dataset is located a. Select entity type
|
||||||||
Modify Dataset Info |
Modify description, expiration, labels
|
||||||||
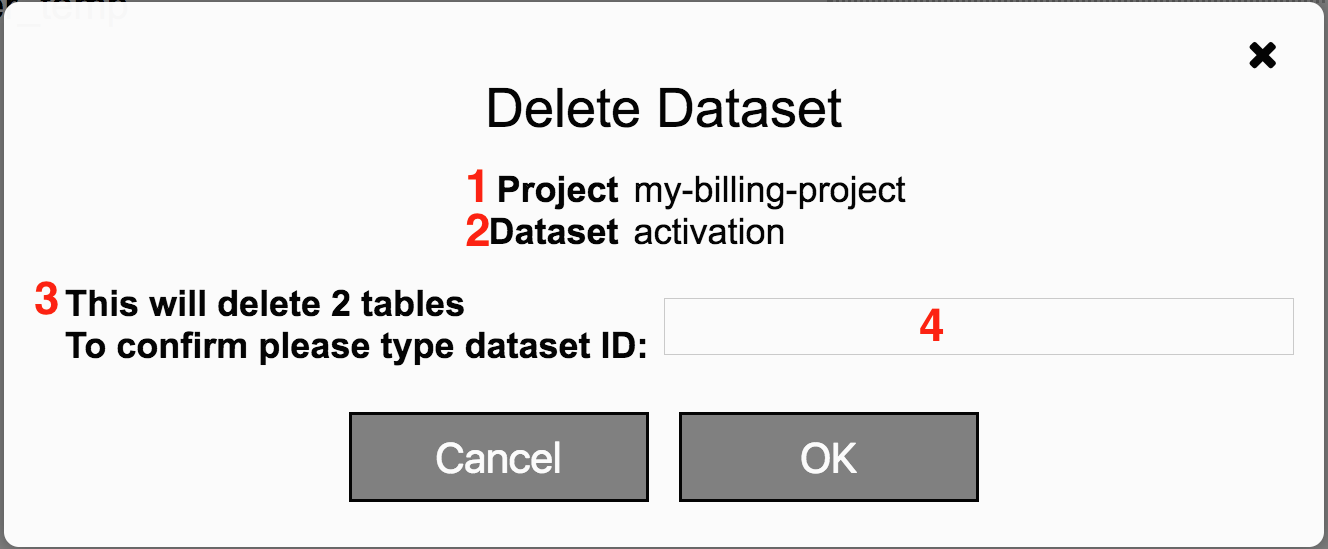
Delete Dataset
|
|
||||||||
Script Tables List |
Insert script list into query text area |
||||||||
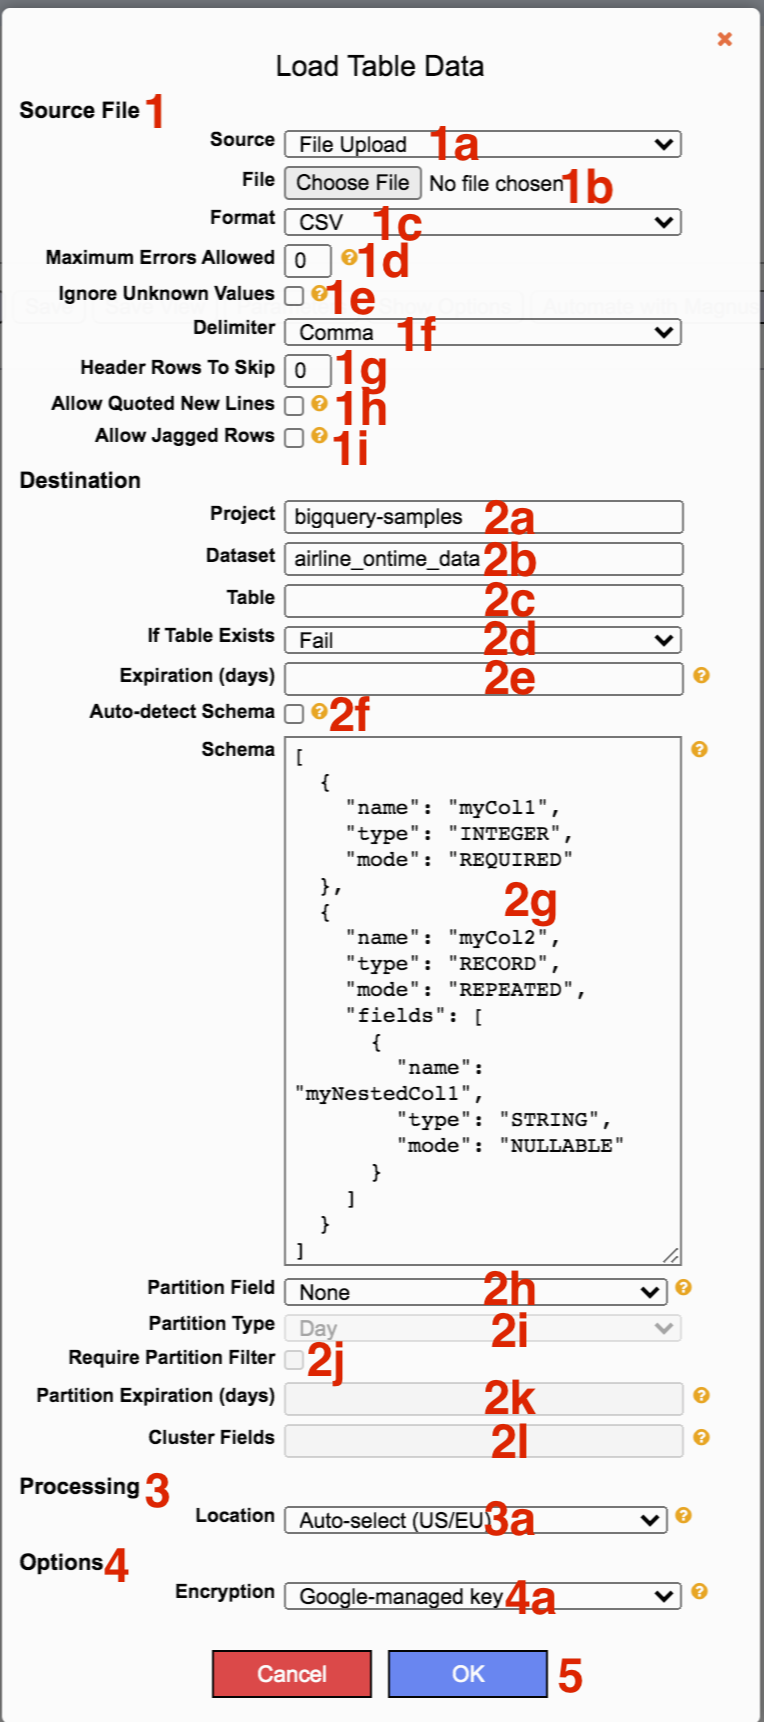
Load Table Data
|
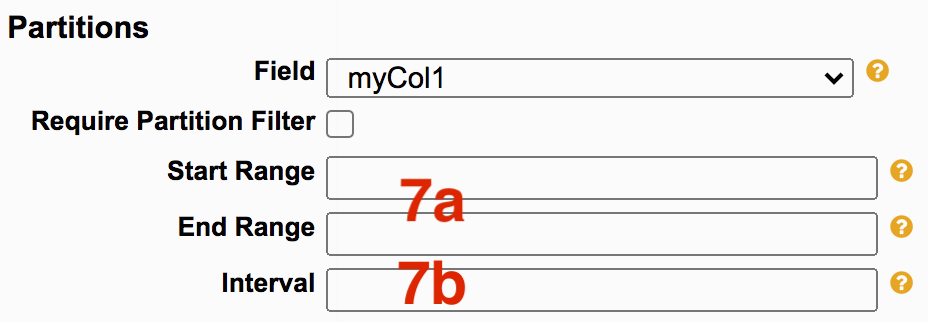
Load data from a local file or cloud storage to GBQ destination When loading data from a local file the size limit is 100 MB for Latin1 encoded files and 10 MB for non-Latin1 encoded files. 1. To load table data begin with the Source File section which contains options for handling the data file a. Select where you want to load data from (local file or Google Cloud Storage) b. Select the file you want to upload (either local or Google Cloud Storage location) c. Specify the format (CSV, JSON, AVRO) d. Add a numeric value to indicate how many errors are acceptable for the load before the job should fail e. Check this box to ignore entries in source that do not match data schema in destination. These values will be ignored and not loaded f. Select the delimiter of the source file (Comma, Tab, Pipe, Other). If Other is selected enter the custom delimiter g. Enter a number of rows to skip, such as headers, that are not to be loaded h. Check if data contains new lines within quotes i. Check to ignore missing optional columns 2. Continue by specifying the destination table configuration a. Project where the table will be created b. Dataset where the table will be created c. Enter the name of the table d. Select from drop down what should happen if the table exists (Fail, Append to it, Overwrite it) e. Enter a number value to indicate how many days before table expires. f. Check to have the system auto-determine the schema based on source file. g. If auto-detect schema is unchecked manually type the schema of the table to be created. Format is JSON and must have name and type h. Select Partition Type which specifies partitioning with None being no partition and Day being partition by day. See Partitioned Tables. i. If a partition type is specified select from drop down to specify partition field j. Check to require queries to include a partition filter k. Add expiration, in days, for partition. If no partition expiration then leave blank. l. Enter up to four column names, separated by commas, to indicate clustering of data. 3. Processing Location identifies where the job will be processed. a. Location options. 4. Options includes Encryption a. Encryption options include Google managed-key and Customer managed-key. Data is automatically encrypted using Google-managed key by default. To set encryption using a Google Cloud key, select Customer-managed key and provide the Cloud KMS key to use. 5. Submit by clicking OK. |
||||||||
Create Empty Table |
Creates an empty table To create an empty table, fill out the information.
|
||||||||
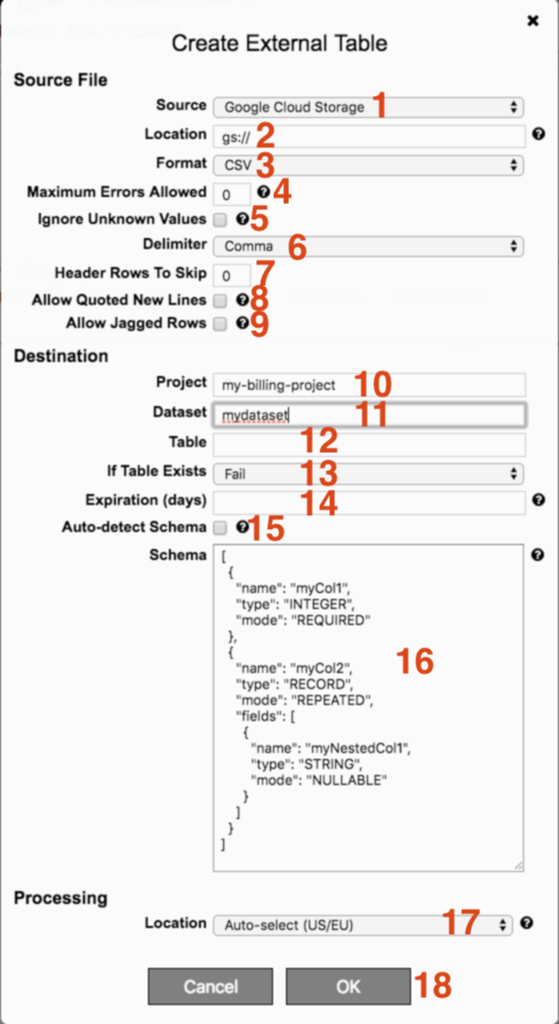
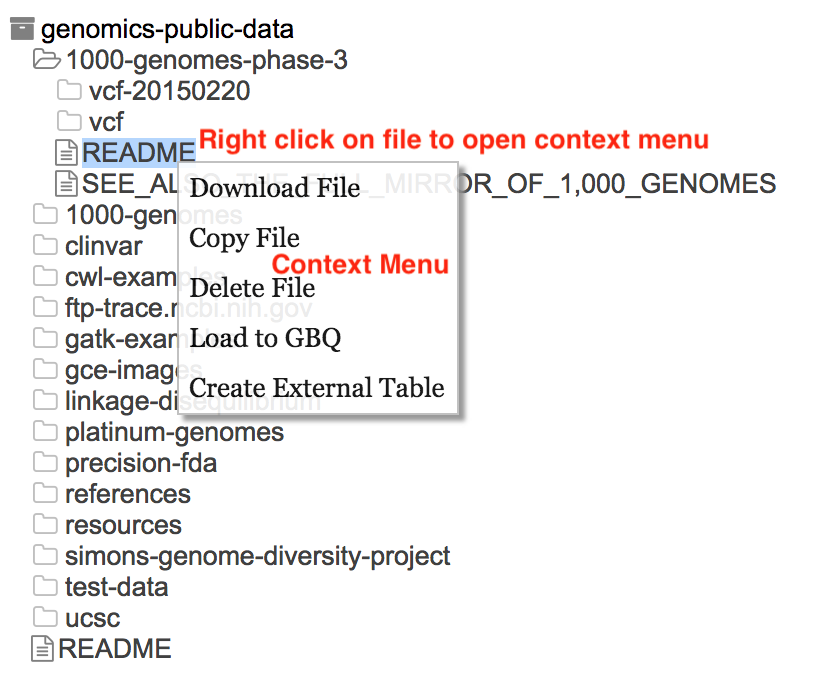
Create External Table
|
Creates an external table To create an external table fill out the information.
|
||||||||
Create Model |
Click to insert template into text area to create a model. |
||||||||
Create Function |
Click to insert template into text area to create a function. |
||||||||
Create Procedure |
Click to insert template into text area to create a procedure. |
||||||||
Create Materialized View |
Click to insert template into text area to create a materialized view. |
||||||||
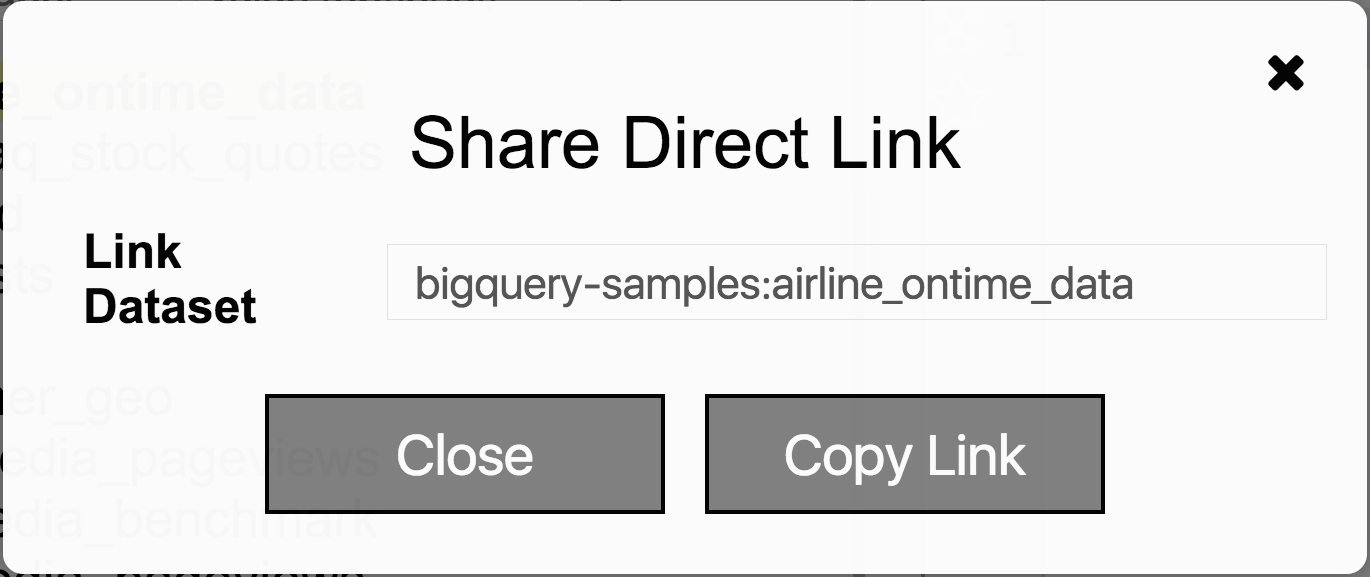
Share Link
|
Shares a direct link to dataset by copying URL to clipboard. | ||||||||
Refresh |
Refreshes list of tables. |
Table
Grouping & Sorting
Tables are listed under their respective dataset.
Tables are sorted by case sensitive name.
Table list is paged. Currently datasets with greater than 2,000 items are paged.
An additional page of 2,000 is loaded by clicking on Show More.
Table names ending in date formats such as YYYYMMDD are consolidated by year and month depending on their quantity.
Currently if only one table meets the format criteria it is not consolidated and will instead display the full name.
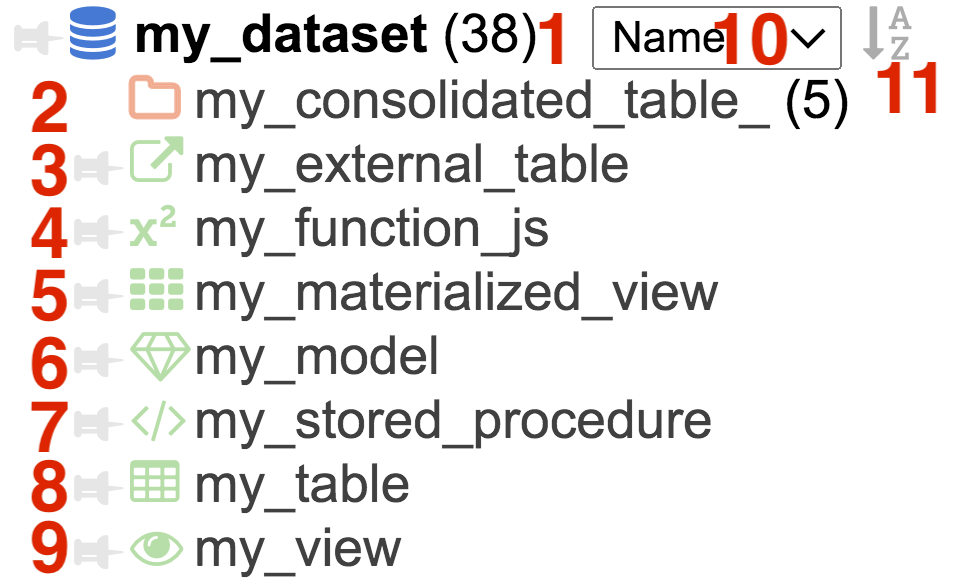
Tables are prepended with an icon:
| Icon | Represents |
|
|
Table |
 |
External Table |
|
|
View |
 |
Materialized View |
|
|
Folder for grouped tables |
|
|
Model |
 |
Procedure |
 |
Function |


Expanding tables
Columns are displayed by left clicking on a table to expand it.
Folders also have a context menu (right-click)
| Menu Item | Action |
| Expand | Expands selected node |
| Collapse | Closes selected node |
|
|
Expanding datasets (left click) displays a list of tables associated with the dataset.
Note: For Sort Option Name the top level name is sorted only. Children of consolidated tables are not sorted. |
Table's Schema
|
|
Insert the column to query text area by double clicking column |
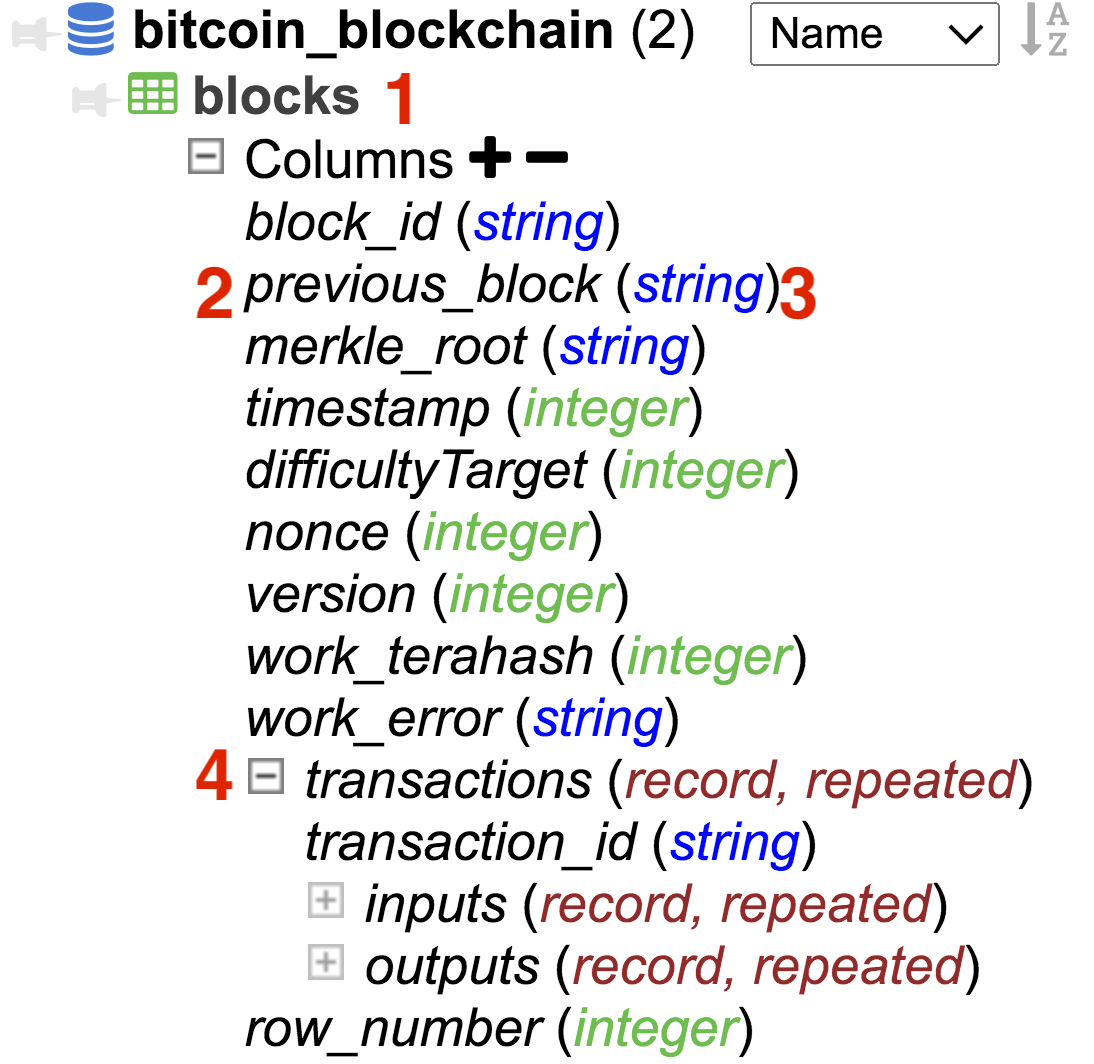
Table Info
|
|
Hover over a table to display popup information
|
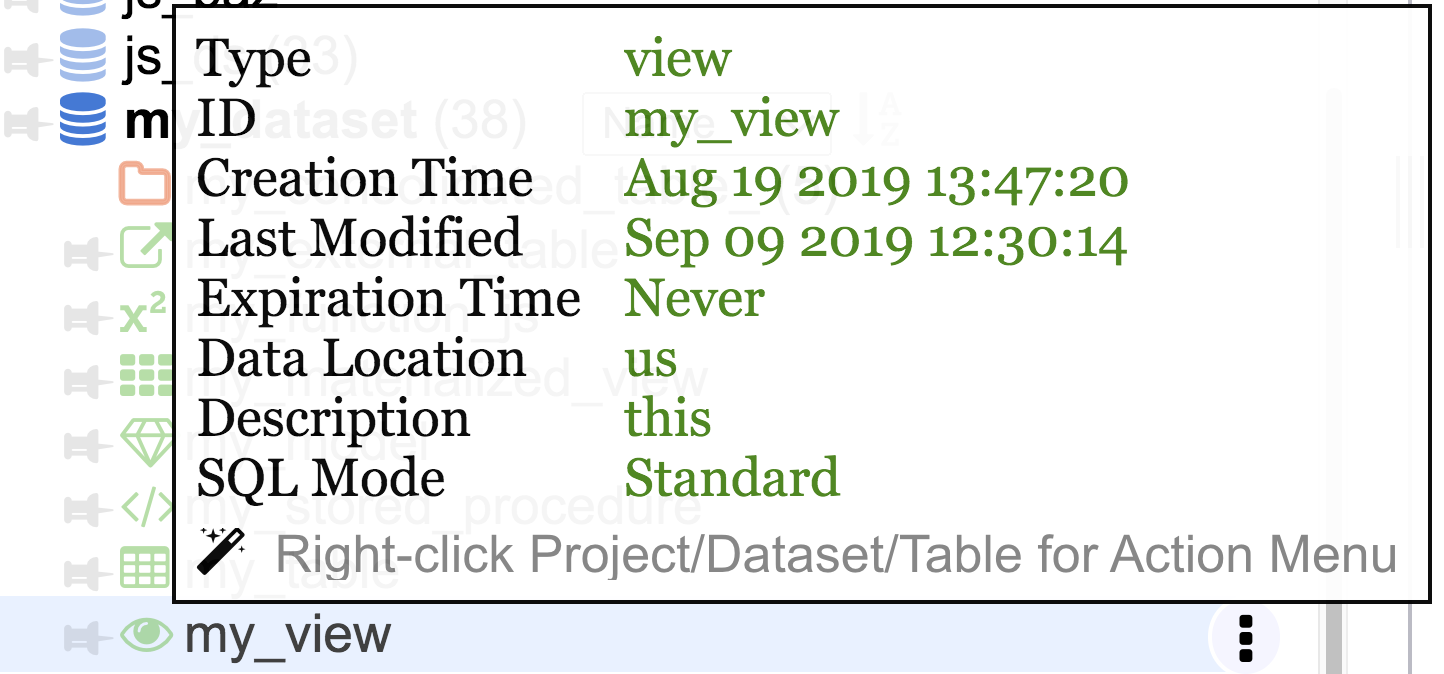
View Info
|
|
Hover over a view to display popup information
|
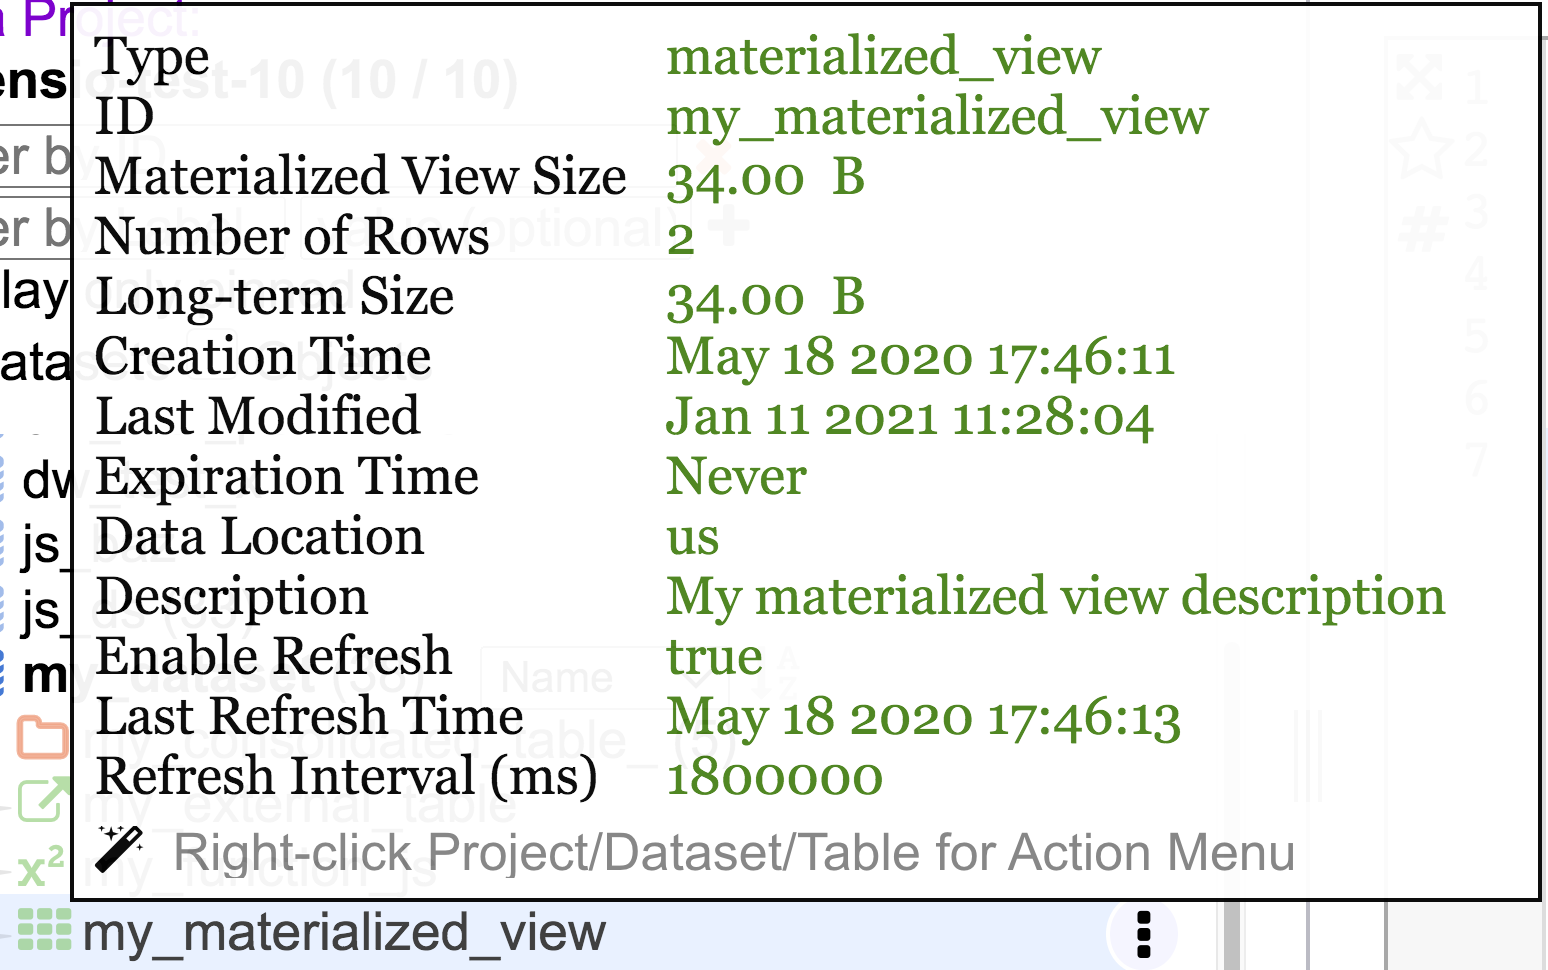
Materialized View Info
|
|
Hover over a materialized view to display popup information
|
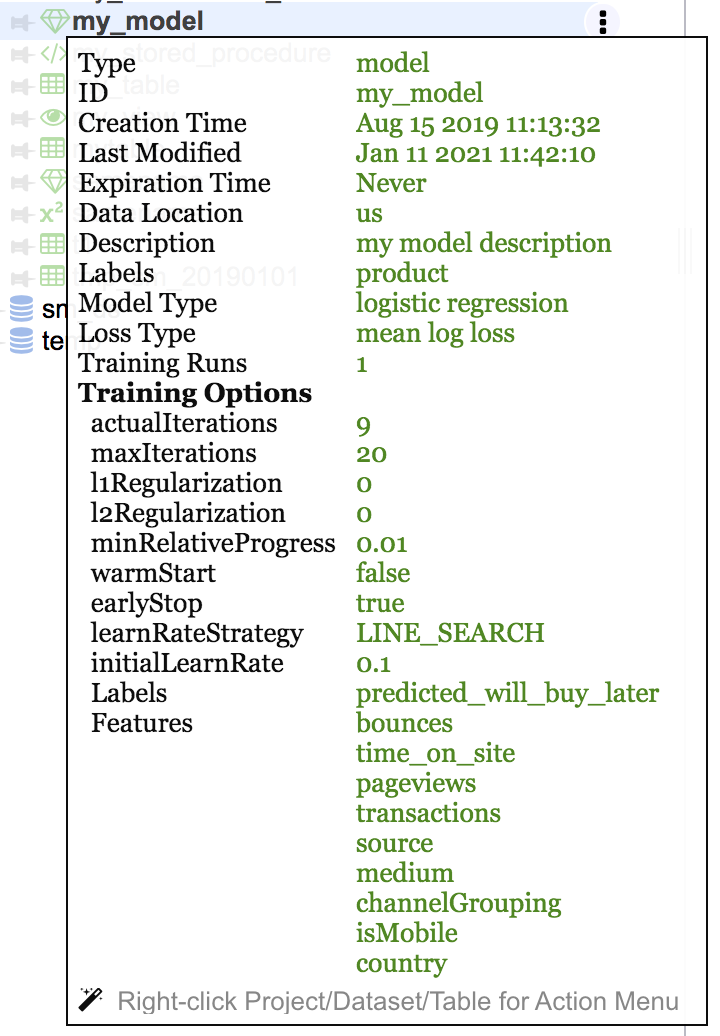
Model Info
|
|
Hover over a model to display popup information
|
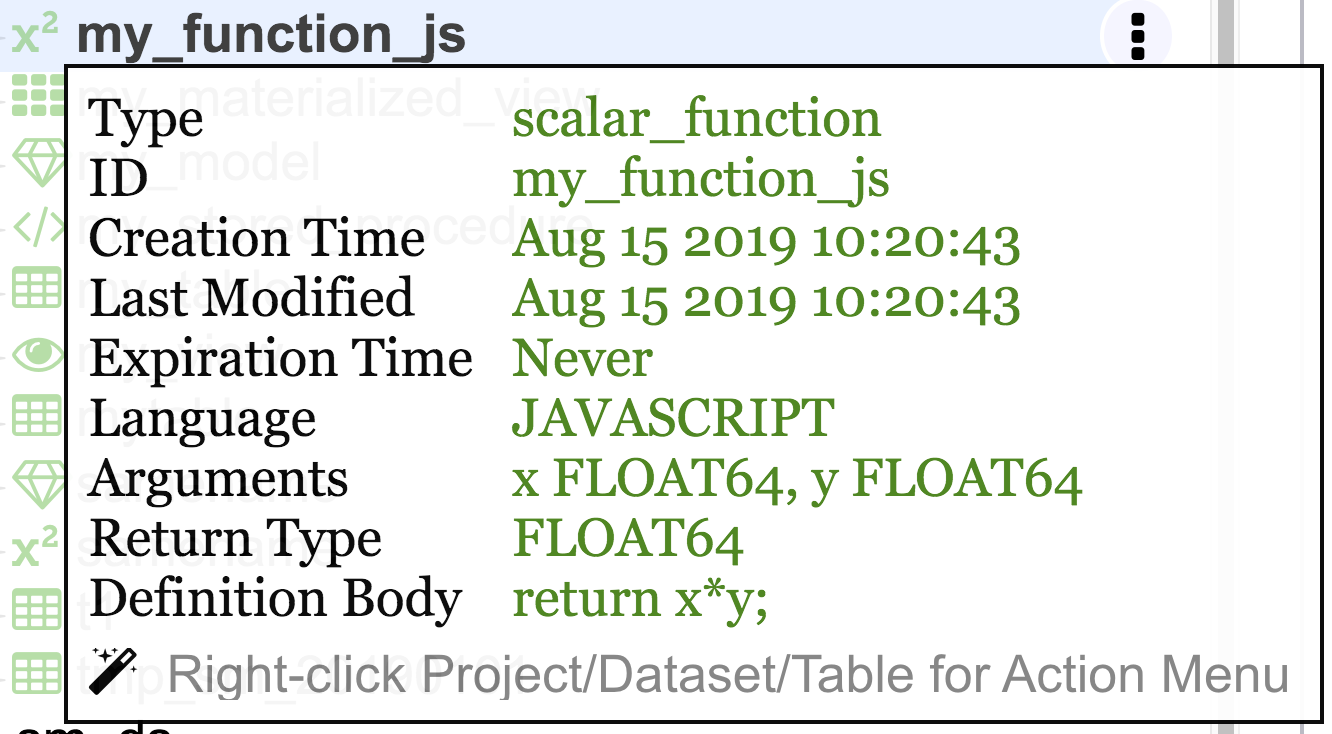
Function Info
|
|
Hover over a view to display popup information
|
Procedure Info
|
|
Hover over a view to display popup information
|

Table Context Menu
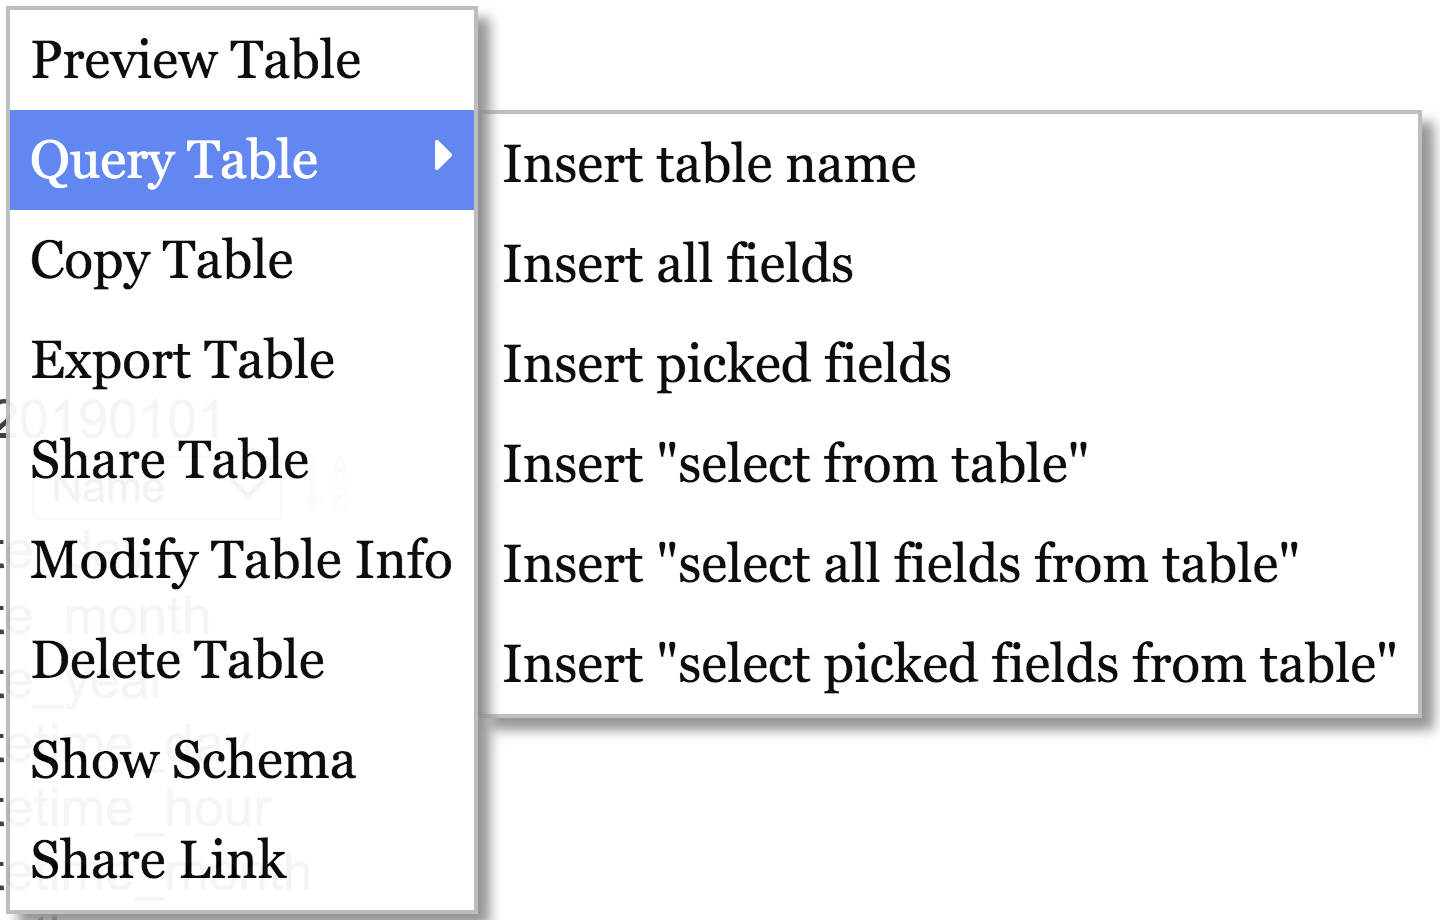
Table Context Menu is accessed by right-clicking on table name
|
Menu Item |
Action |
Preview Table |
Switches to Preview Mode and displays table's data for user to explore |
Query Table |
|
|
Query Table > Insert table |
Inserts table to query area at cursor |
|
Query Table > Insert all fields |
Inserts all table fields to query area at cursor |
|
Query Table > Insert picked fields |
Inserts selected fields from list to query area at cursor |
|
Query Table > Insert “select from table” |
Inserts select from selected table query. The type of insert depends on the option selected under User Settings > Default Insert. Options include overwrite, insert at cursor, insert at end of page, or insert in a new tab. |
|
Query Table > Insert “select all fields from table” |
Inserts selection of all columns from table. The type of insert depends on the option selected under User Settings > Default Insert. Options include overwrite, insert at cursor, insert at end of page, or insert in a new tab. |
|
Query Table > Insert “select picked fields from table” |
Inserts selected columns from table. The type of insert depends on the option selected under User Settings > Default Insert. Options include overwrite, insert at cursor, insert at end of page, or insert in a new tab. |
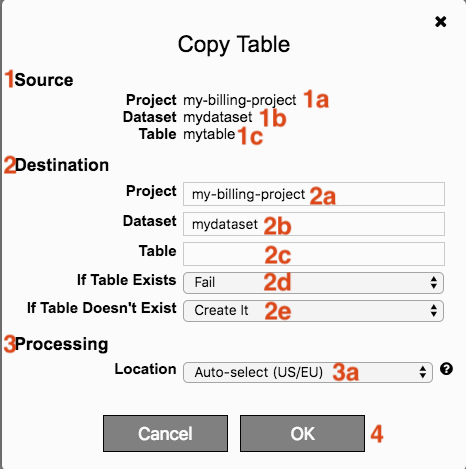
Copy Table
|
Copy selected table to new destination 1. To copy a table confirm source information is correct a. Project where table is 2. Fill in information for Destination a. Add Project where table is to be copied to 3. Processing Location a. Identifies where the job will be processed. Options include US, EU, and asia-northeast. 4. Click OK to submit request |
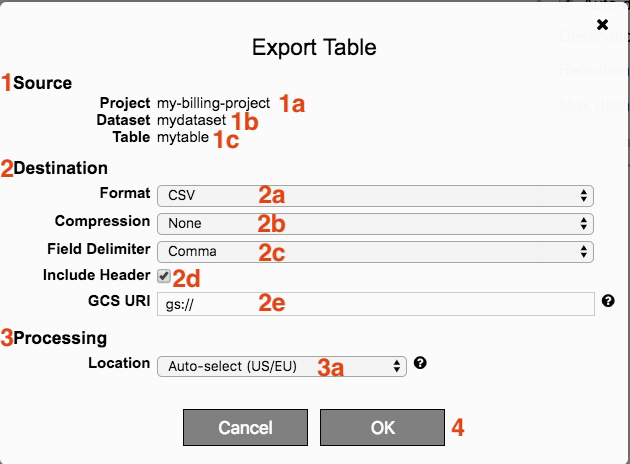
Export Table
|
Export table to cloud storage 1. To export a table to cloud storage confirm source information is correct a. Project where table is 2. Fill in information for Destination a. Select format to export to (CSV, JSON, AVRO) 3. Processing Location a. Identifies where the job will be processed. Options include US, EU, and asia-northeast. 4. Click OK to submit request |
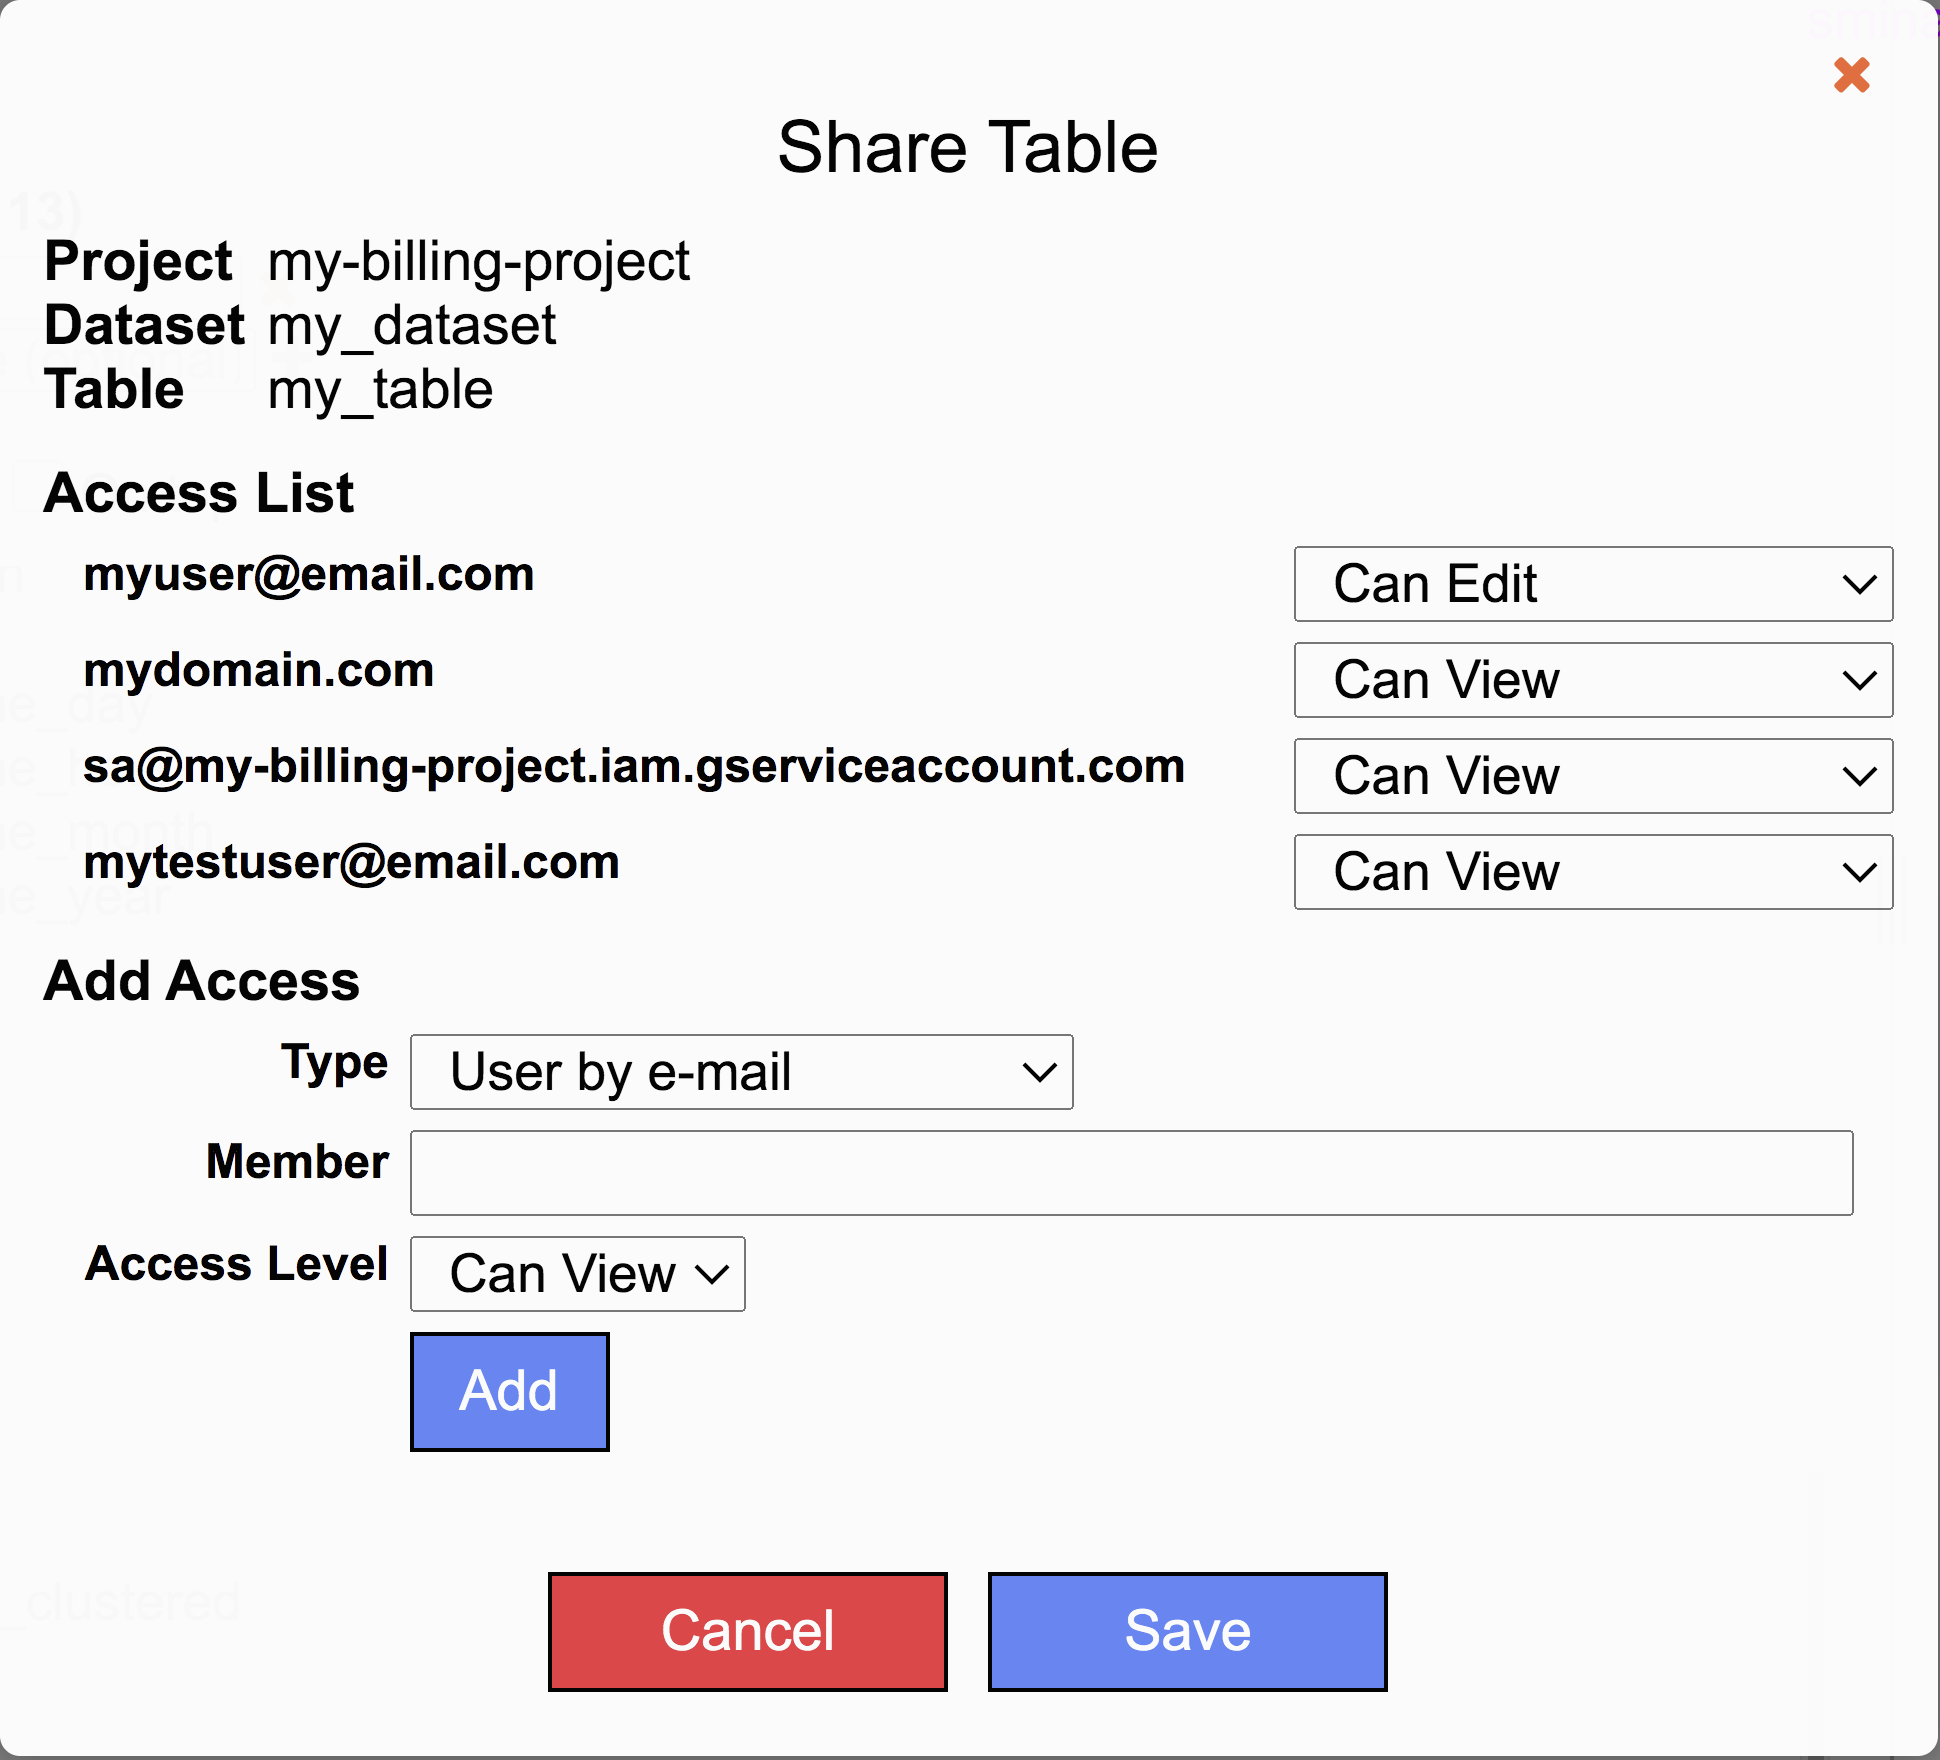
Share Table |
Share table with users.
Access List displays those who have access to the table. Add Access allows members to be added to the share. Type options include User by e-mail, Group by e-mail, Domain, All Authenticated Users, and Service Account. Access Level options include Can View, Can Edit, Is Owner, and Remove Access. |
Modify Table Info |
Modify table description, retention, and labels. A table’s description, retention, and labels can be modified
|
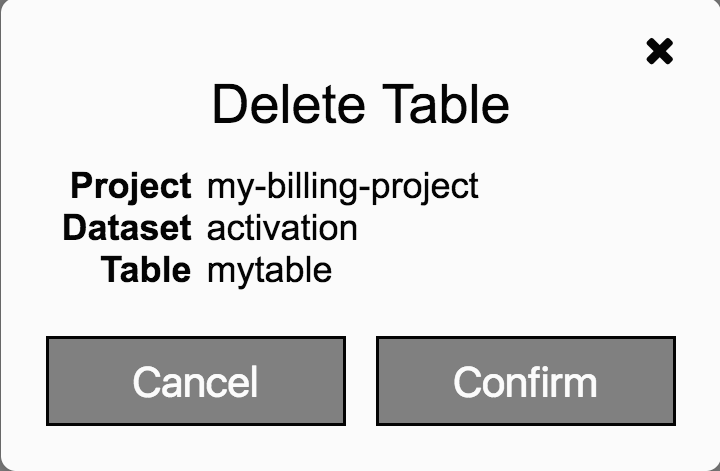
Delete Table
|
To delete a table verify the correct table is selected and then click Confirm |
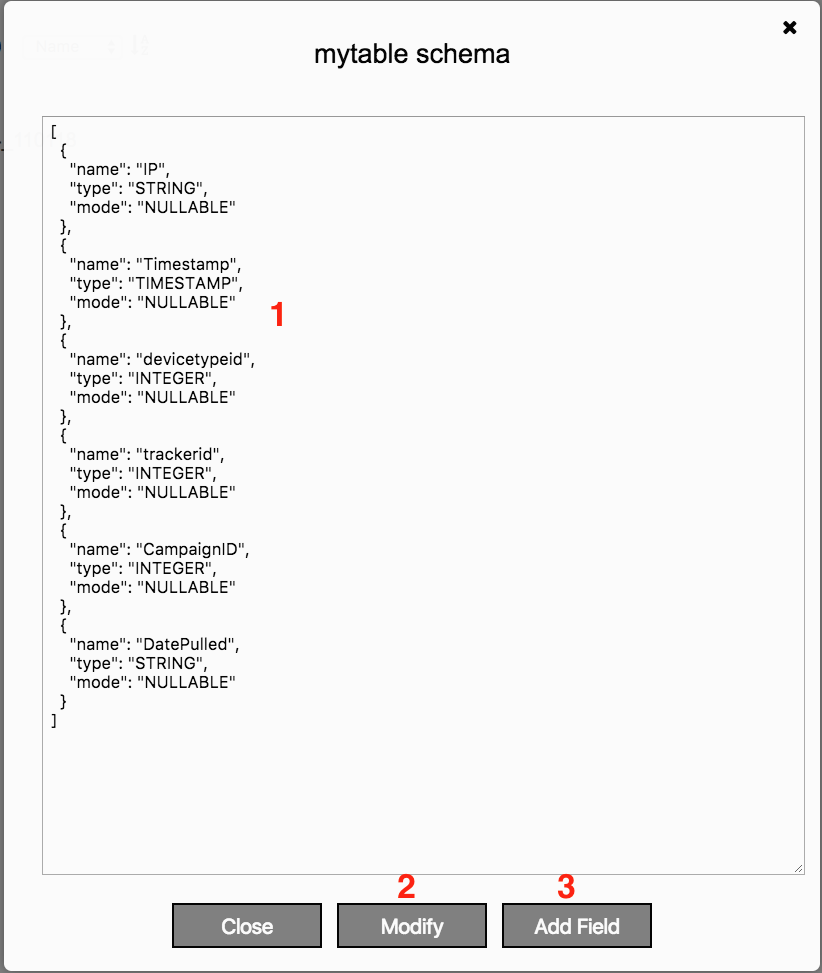
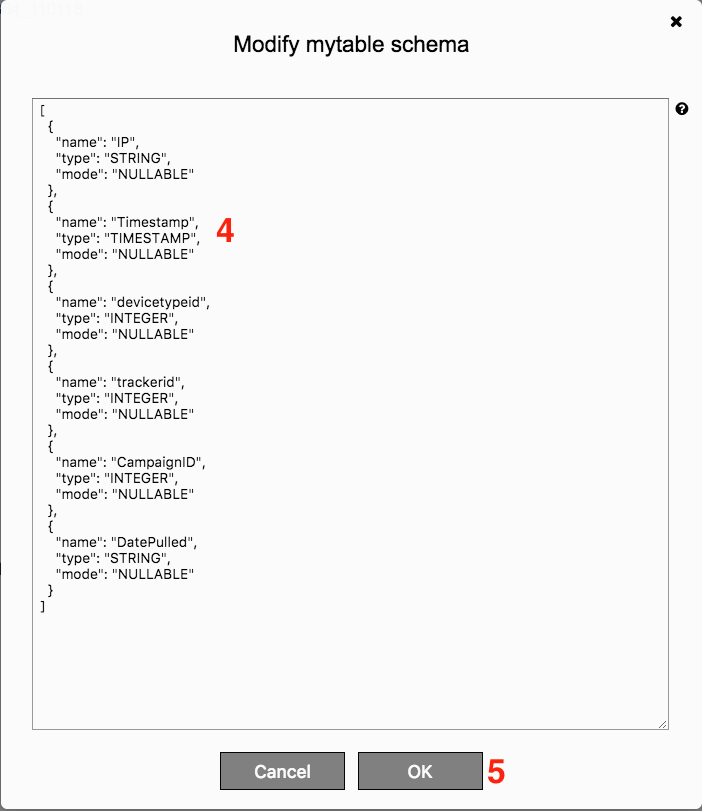
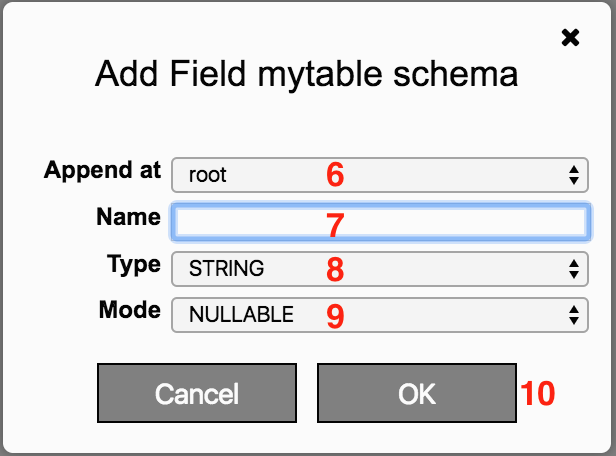
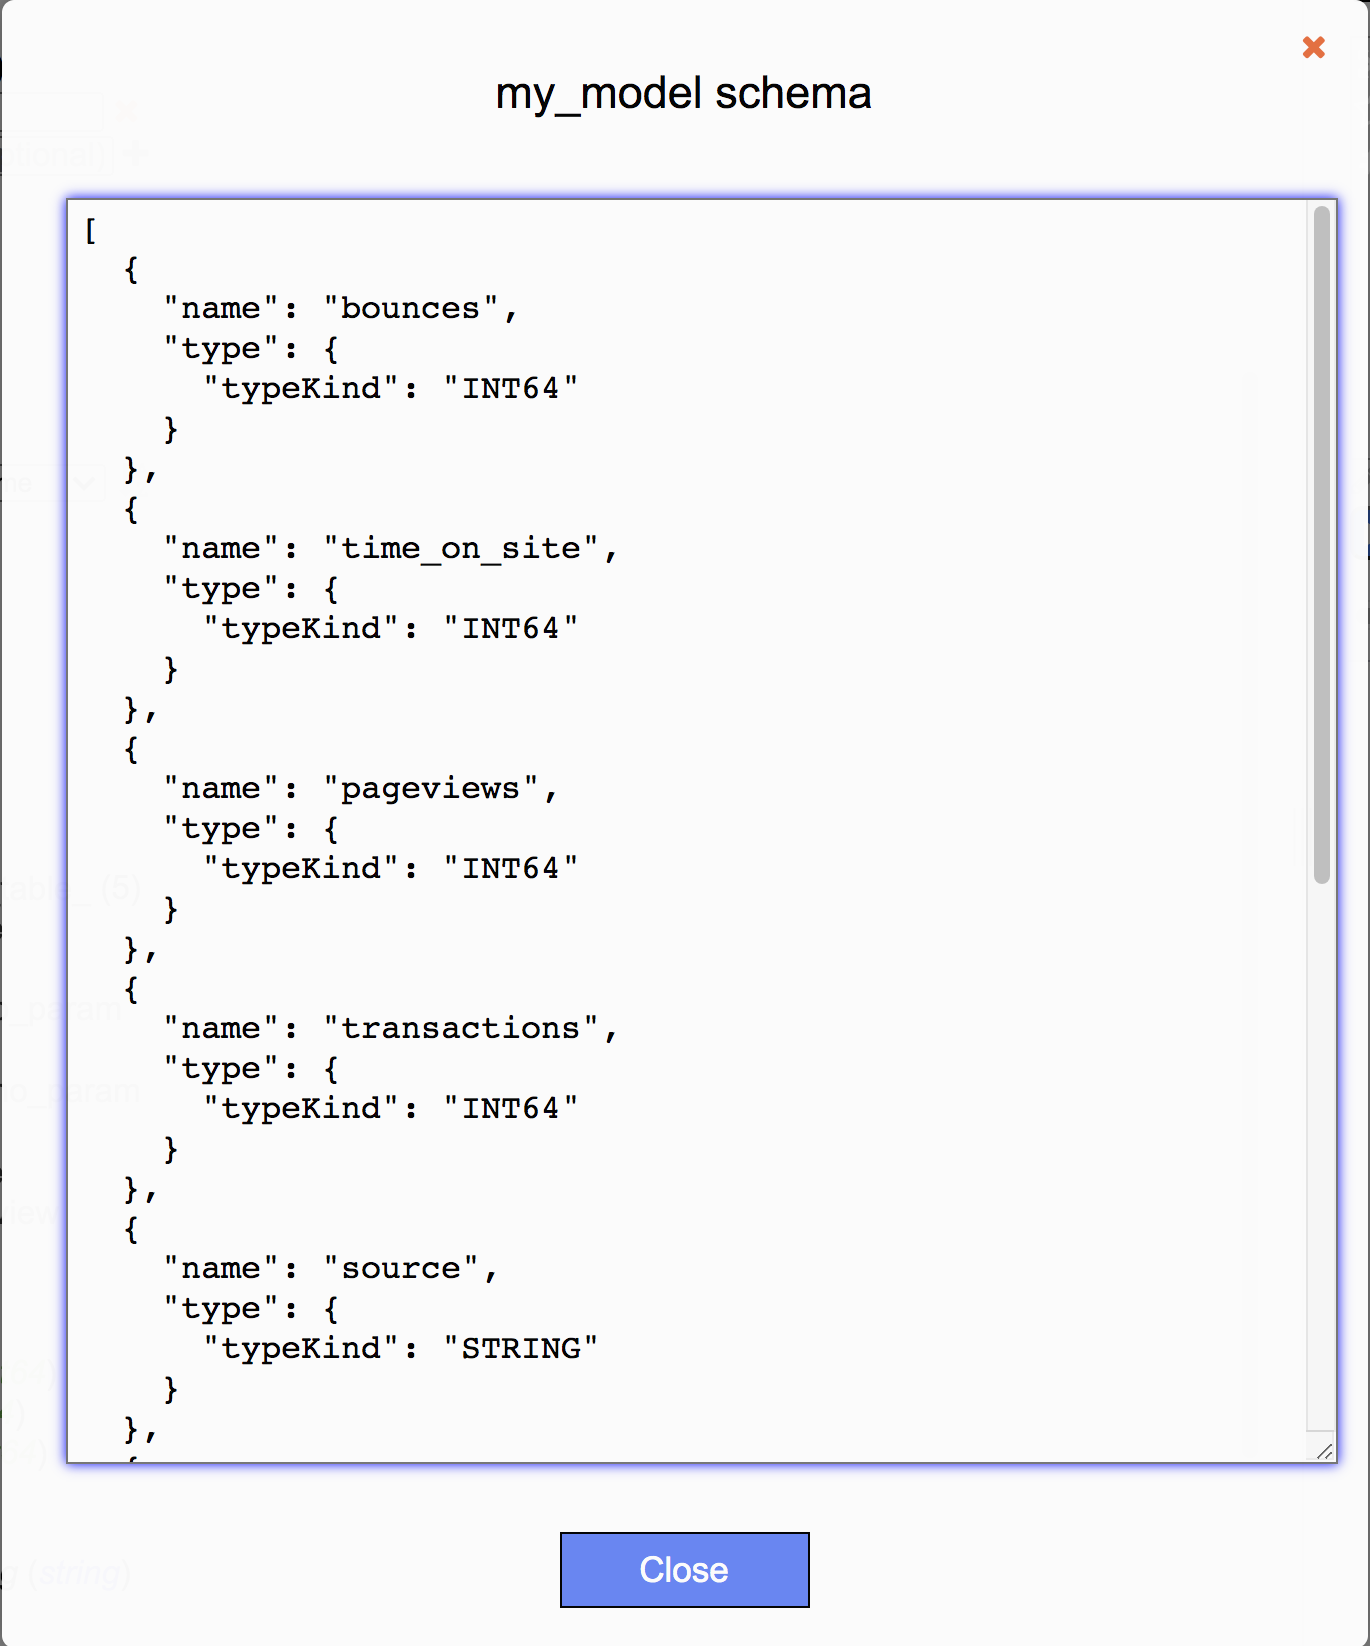
Show Schema
|
Display table schema, modify, or add new field
|
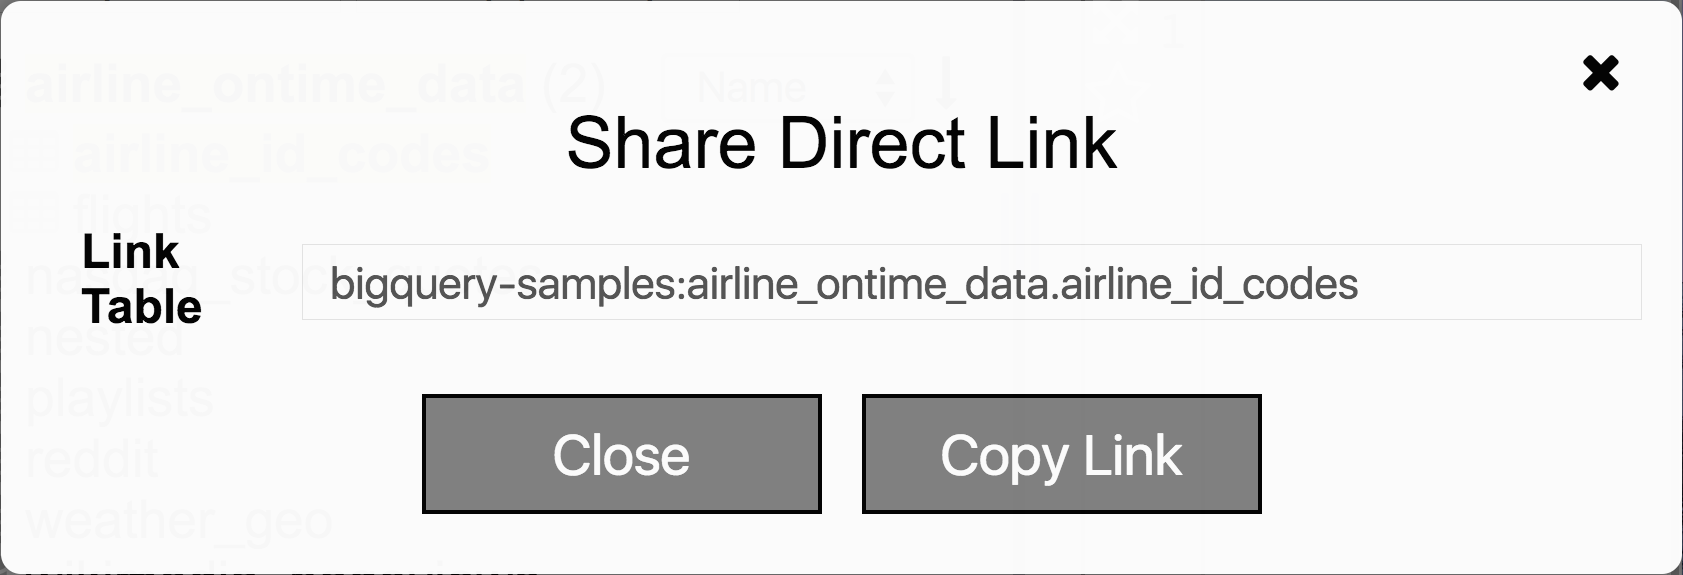
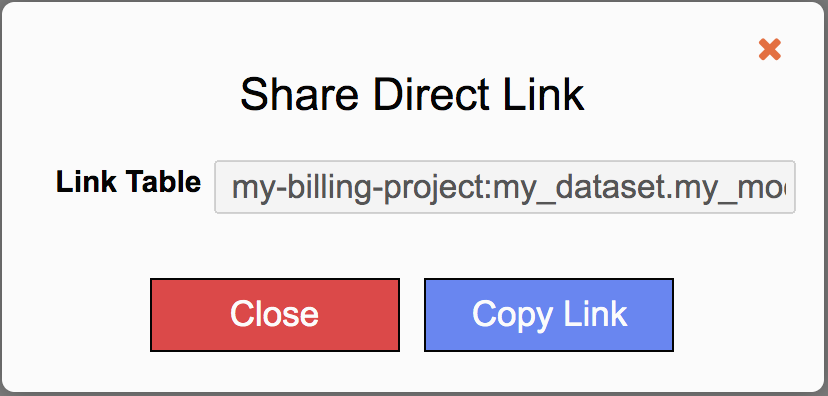
Share Link
|
Click on Copy Link to copy URL to clipboard that links directly to table |
View Context Menu
View Context Menu is accessed by right-clicking on view name
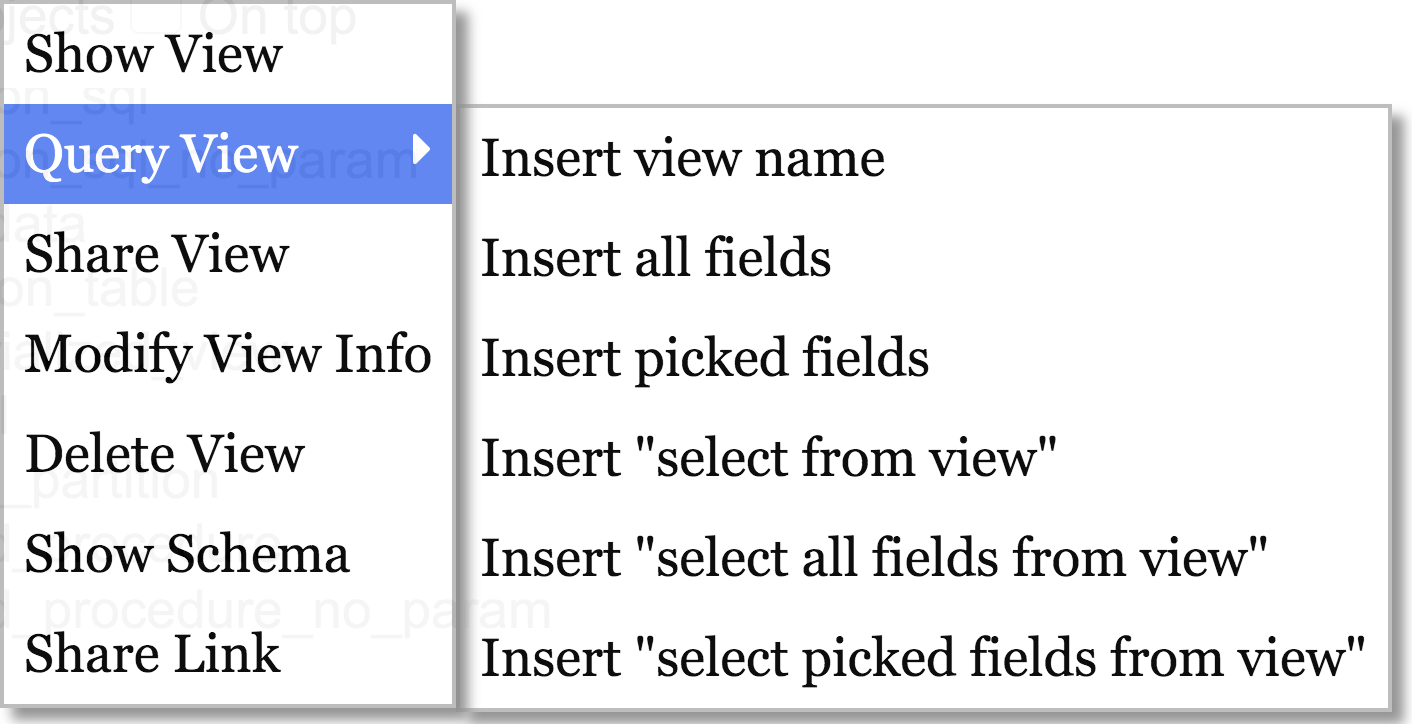
| Menu Item | Action |
| Show View | Inserts view query to text area. Not available in preview mode |
|
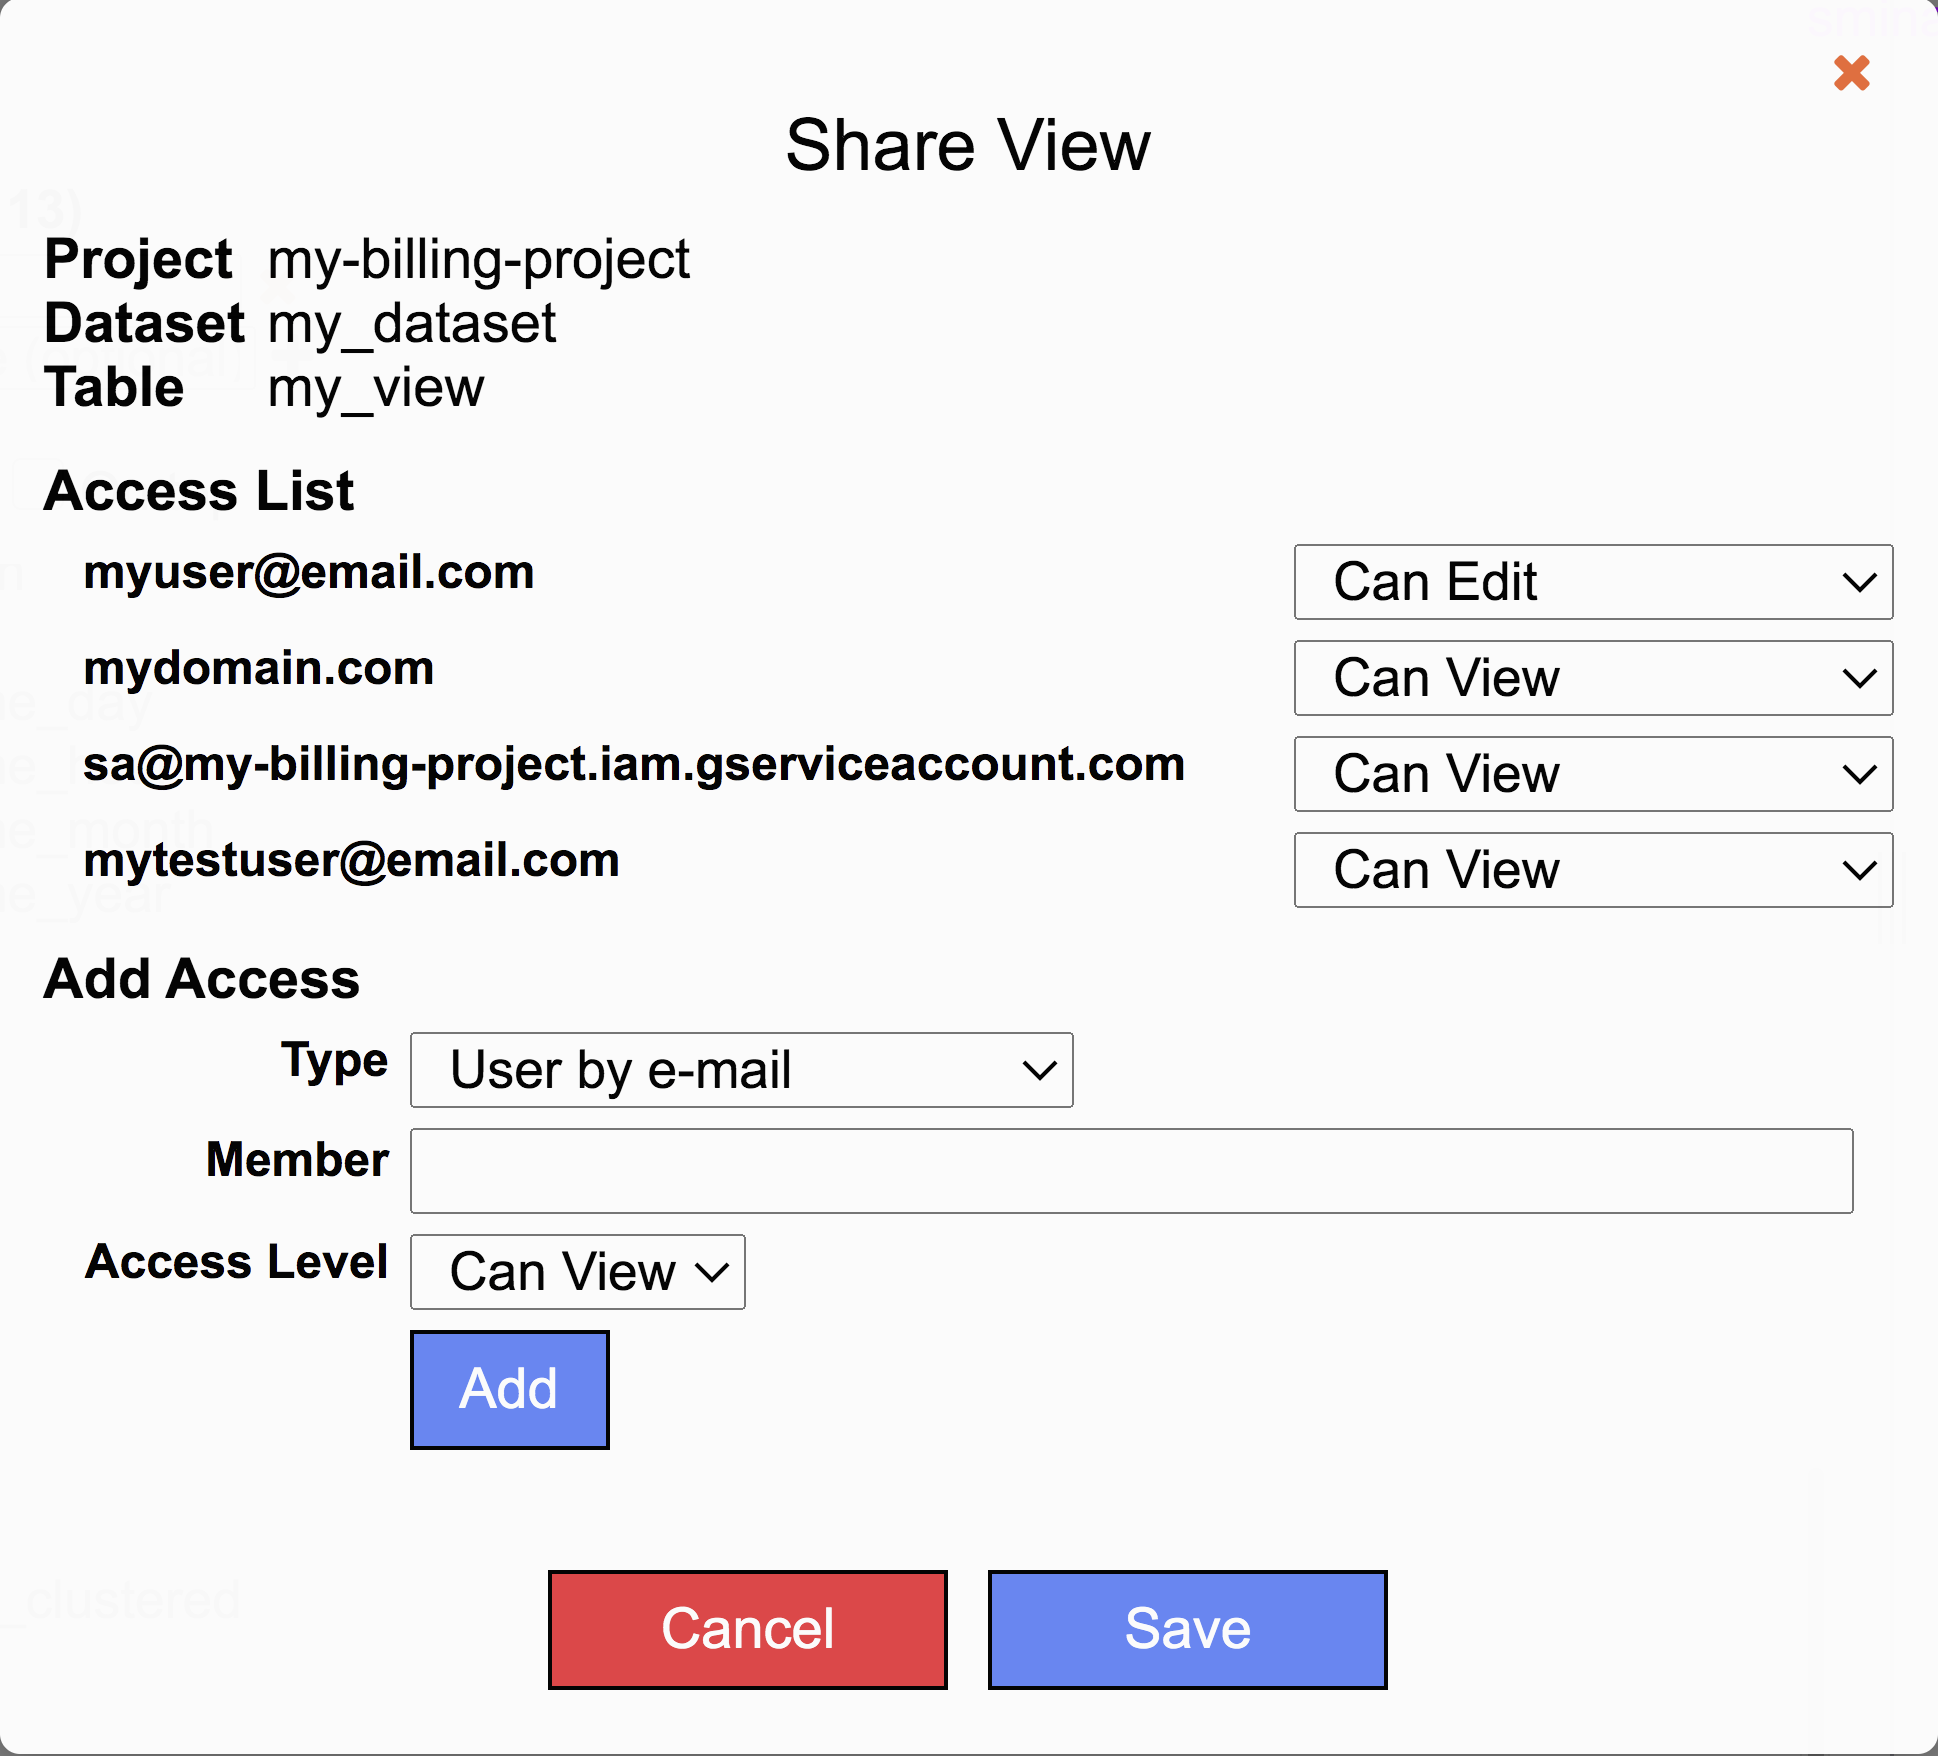
Share View
|
Share View with users.
Access List displays those who have access to the view. Add Access allows members to be added to the share. Type options include User by e-mail, Group by e-mail, Domain, All Authenticated Users, and Service Account. Access Level options include Can View, Can Edit, Is Owner, and Remove Access. |
| Query View > Insert view | Inserts view to query area at cursor |
| Query View > Insert all fields | Inserts all fields to query area at cursor |
| Query View > Insert picked fields | Inserts selected fields from list to query area at cursor |
| Query View > Insert “select from view” | Inserts select from selected view to query area. The type of insert depends on the option selected under User Settings > Default Insert. Options include overwrite, insert at cursor, insert at end of page, or insert in a new tab. |
| Query View > Insert “select all fields from view” | Inserts all columns from view to query text area. The type of insert depends on the option selected under User Settings > Default Insert. Options include overwrite, insert at cursor, insert at end of page, or insert in a new tab. |
| Query View > Insert “select picked fields from view” | Inserts selected columns from view to query text area. The type of insert depends on the option selected under User Settings > Default Insert. Options include overwrite, insert at cursor, insert at end of page, or insert in a new tab. |
Modify View Info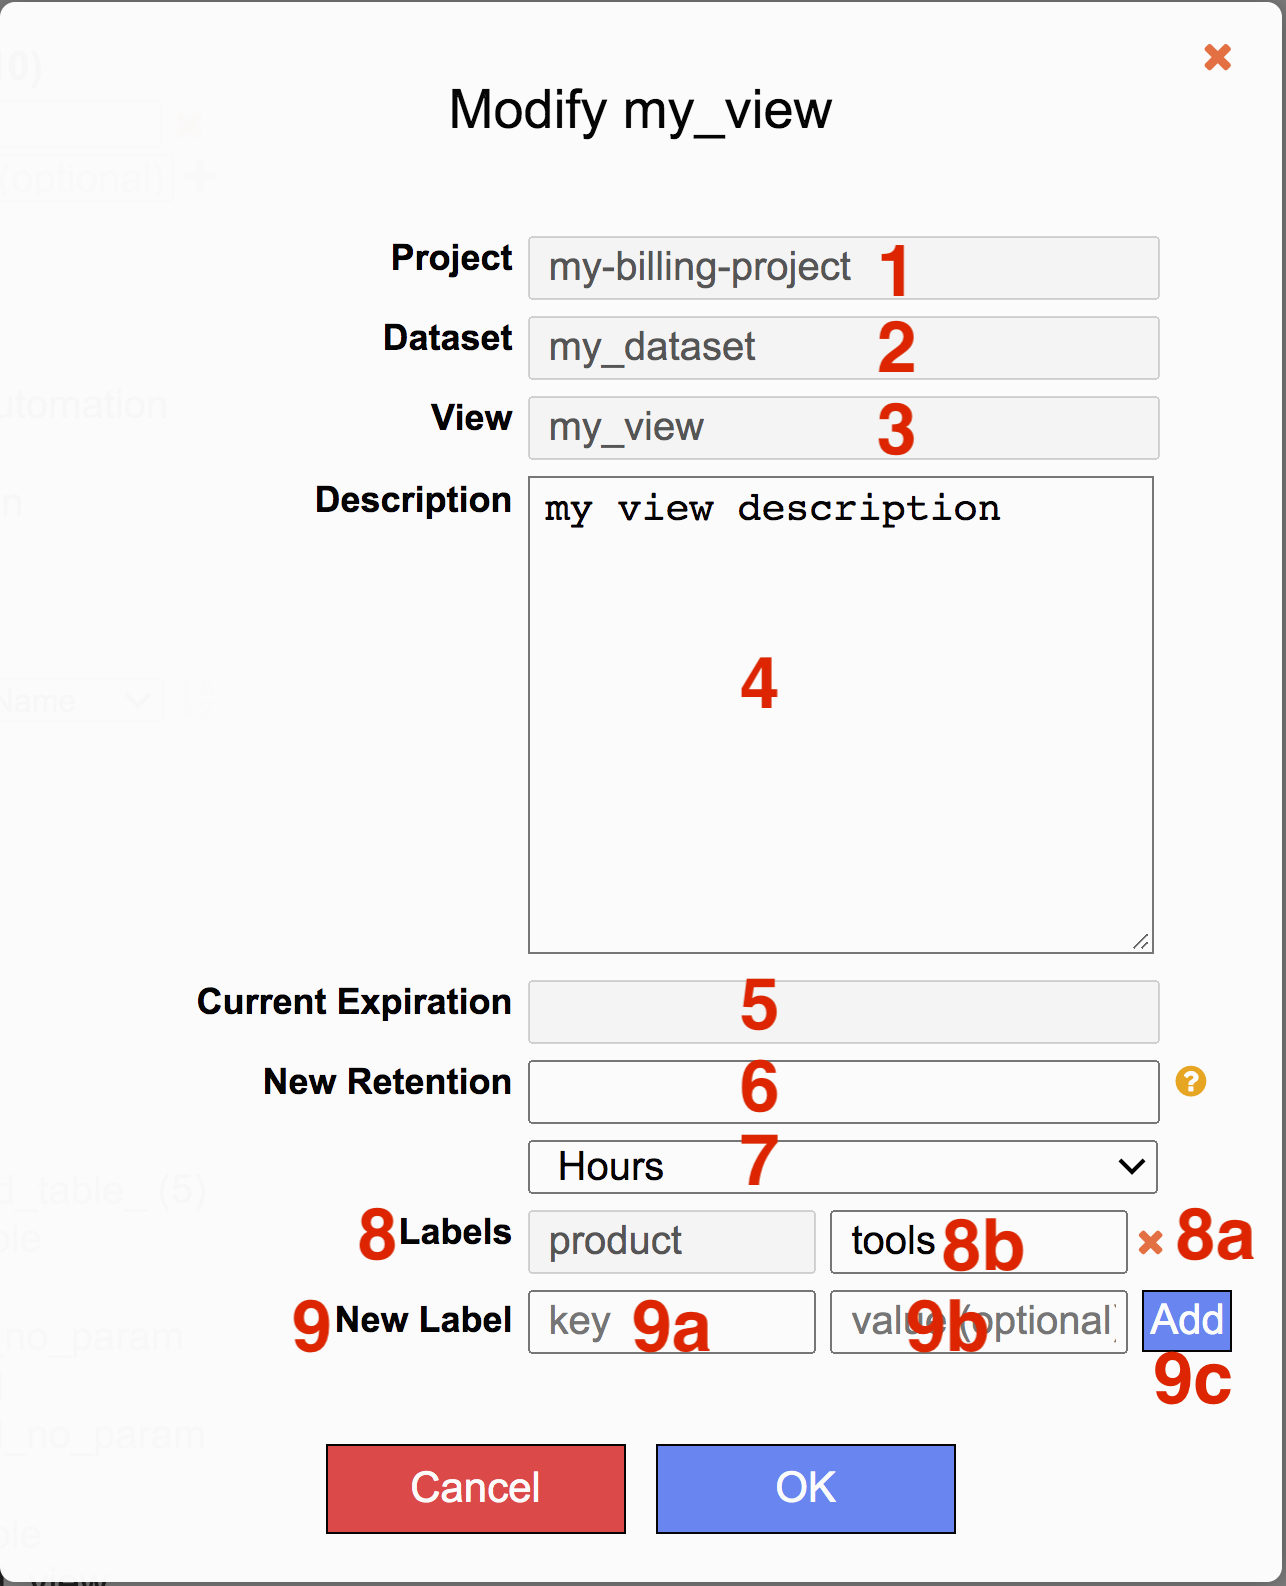 |
Modify view description and retention A view’s description and retention can be modified
|
|
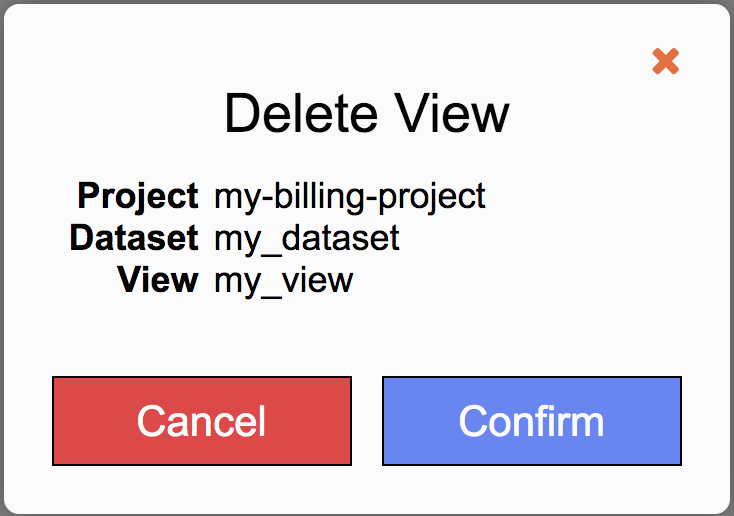
Delete View |
To delete a view, verify the correct view is selected and then click Confirm |
|
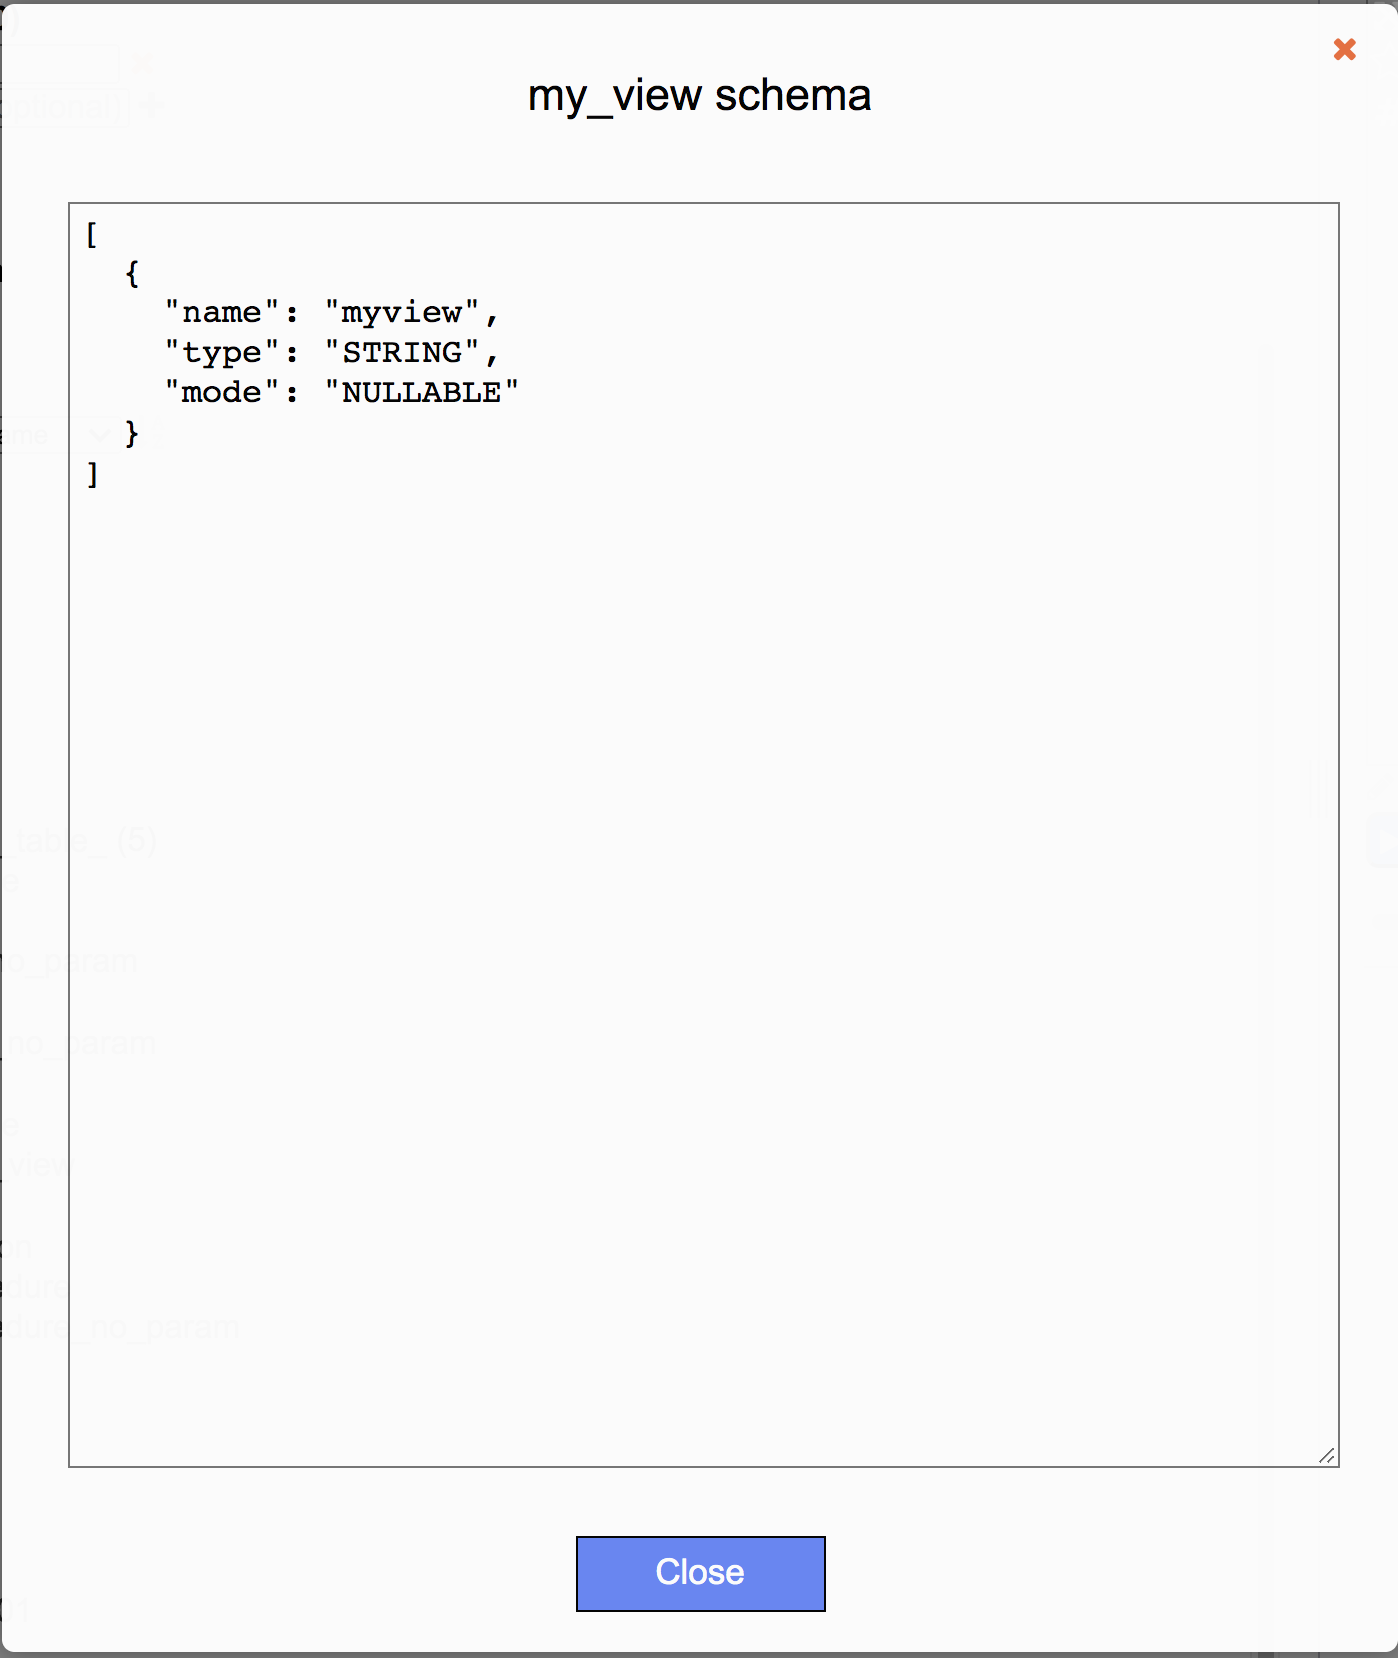
Show Schema
|
Displays the view’s schema. |
| Share Link | Click on Copy Link to copy URL to clipboard that links directly to view |
Model Context Menu
Model Context Menu is accessed by right-clicking on model name or let clicking on other options menu icon.
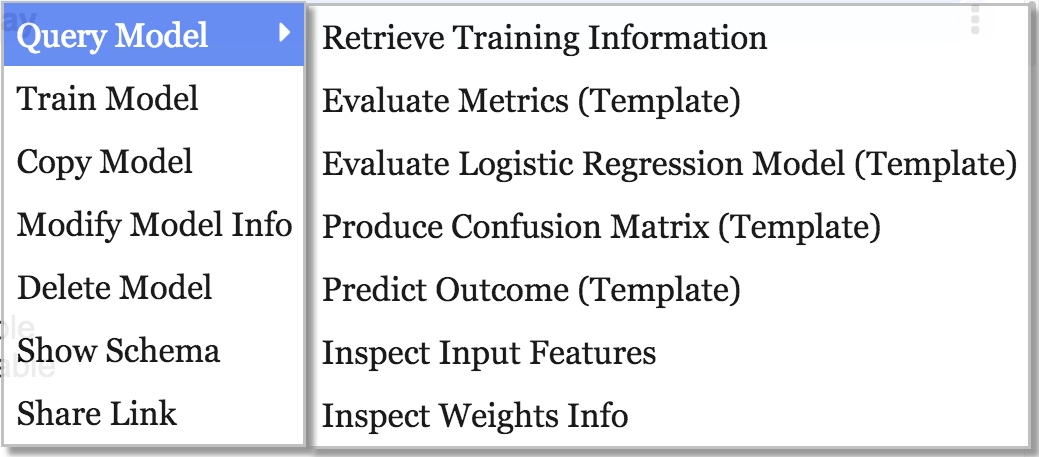
| Menu Item | Action |
| Query Model > Retrieve Training Information | Inserts starter template to query text area that provides training information on model. |
| Query Model > Evaluate Metrics (Template) | Inserts starter template to query text area that evaluates model metrics. |
| Query Model > Evaluate Logistic Regression Model (Template) | Inserts starter template to query text area that evaluates regression-specific metrics. |
| Query Model > Produce Confusion Matrix (Template) | Inserts starter template to query text area that provides a confusion matrix. |
| Query Model > Predict Outcome (Template) | Inserts starter template to query text area that predicts outcomes. |
| Query Model > Inspect Input Features | Inserts starter template to query text area that provides information on input features used to trail model. |
| Query Model> Inspect Weights Info | Inserts starter template to query text area that provides weights used by model during prediction. |
| Train Model | Inserts starter template to query text area that trains model. |
Copy Model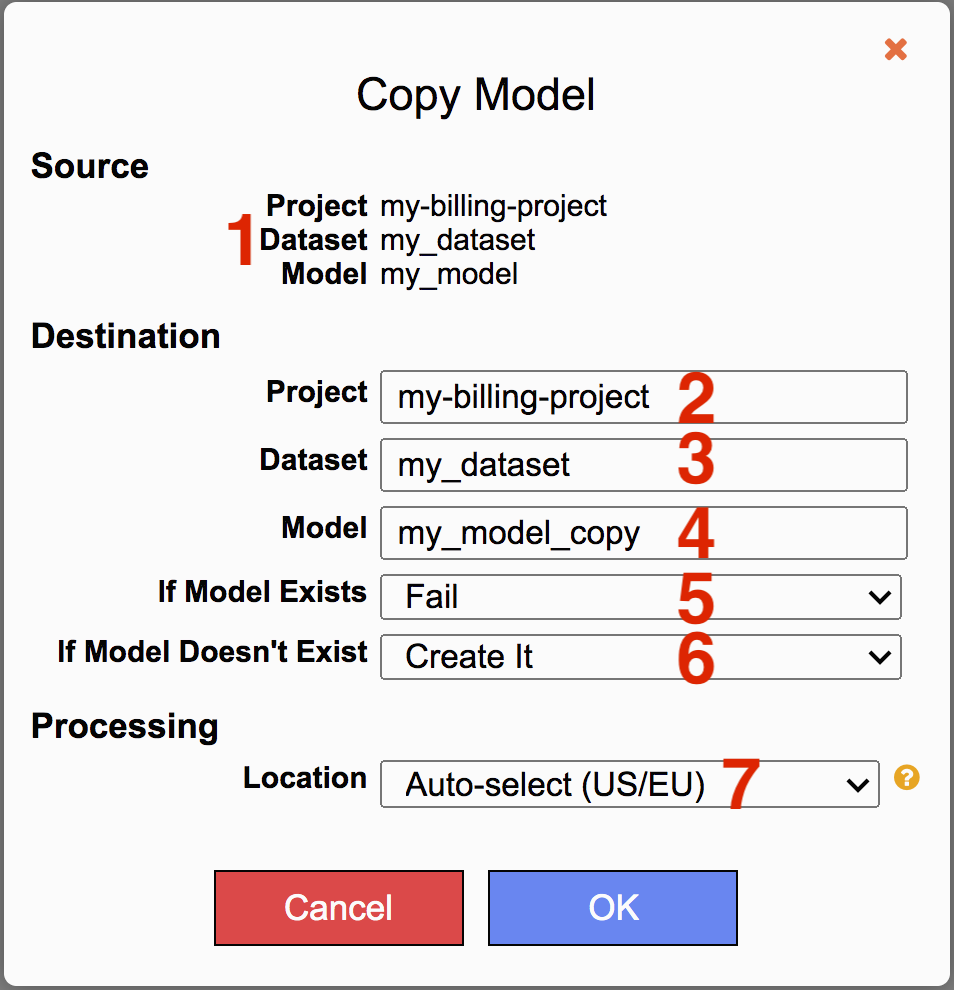 |
Copy selected model to new destination.
Click OK to submit request. |
|
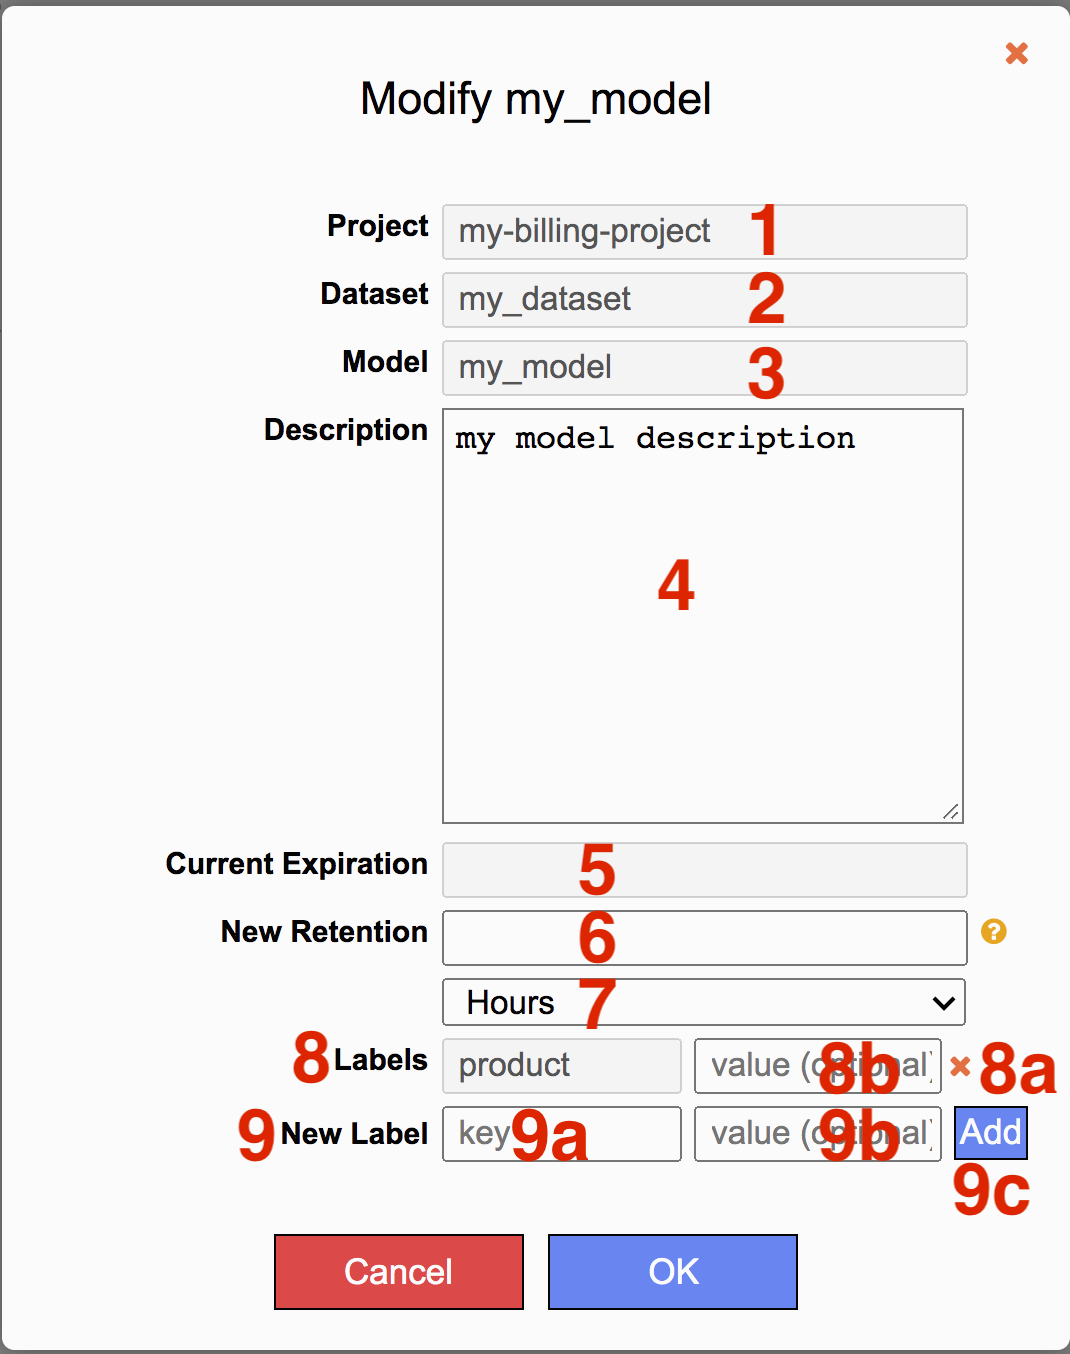
Modify Model Info
|
Modify model description, retention, and labels. A model’s description, retention, and labels can be modified
|
|
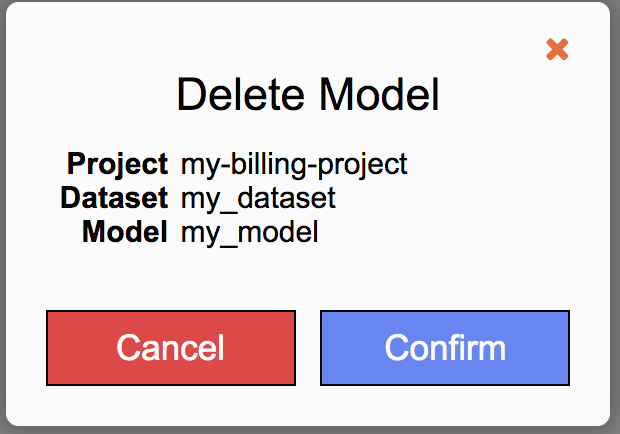
Delete Model
|
To delete a model, verify the correct view is selected and then click Confirm |
|
Show Schema
|
Displays the model's schema. |
|
Share Link
|
Click on Copy Link to copy URL to clipboard that links directly to model. |
Materialized View Context Menu
Materialized View Context Menu is access by right-clicking on model name or left click on other options menu icon.
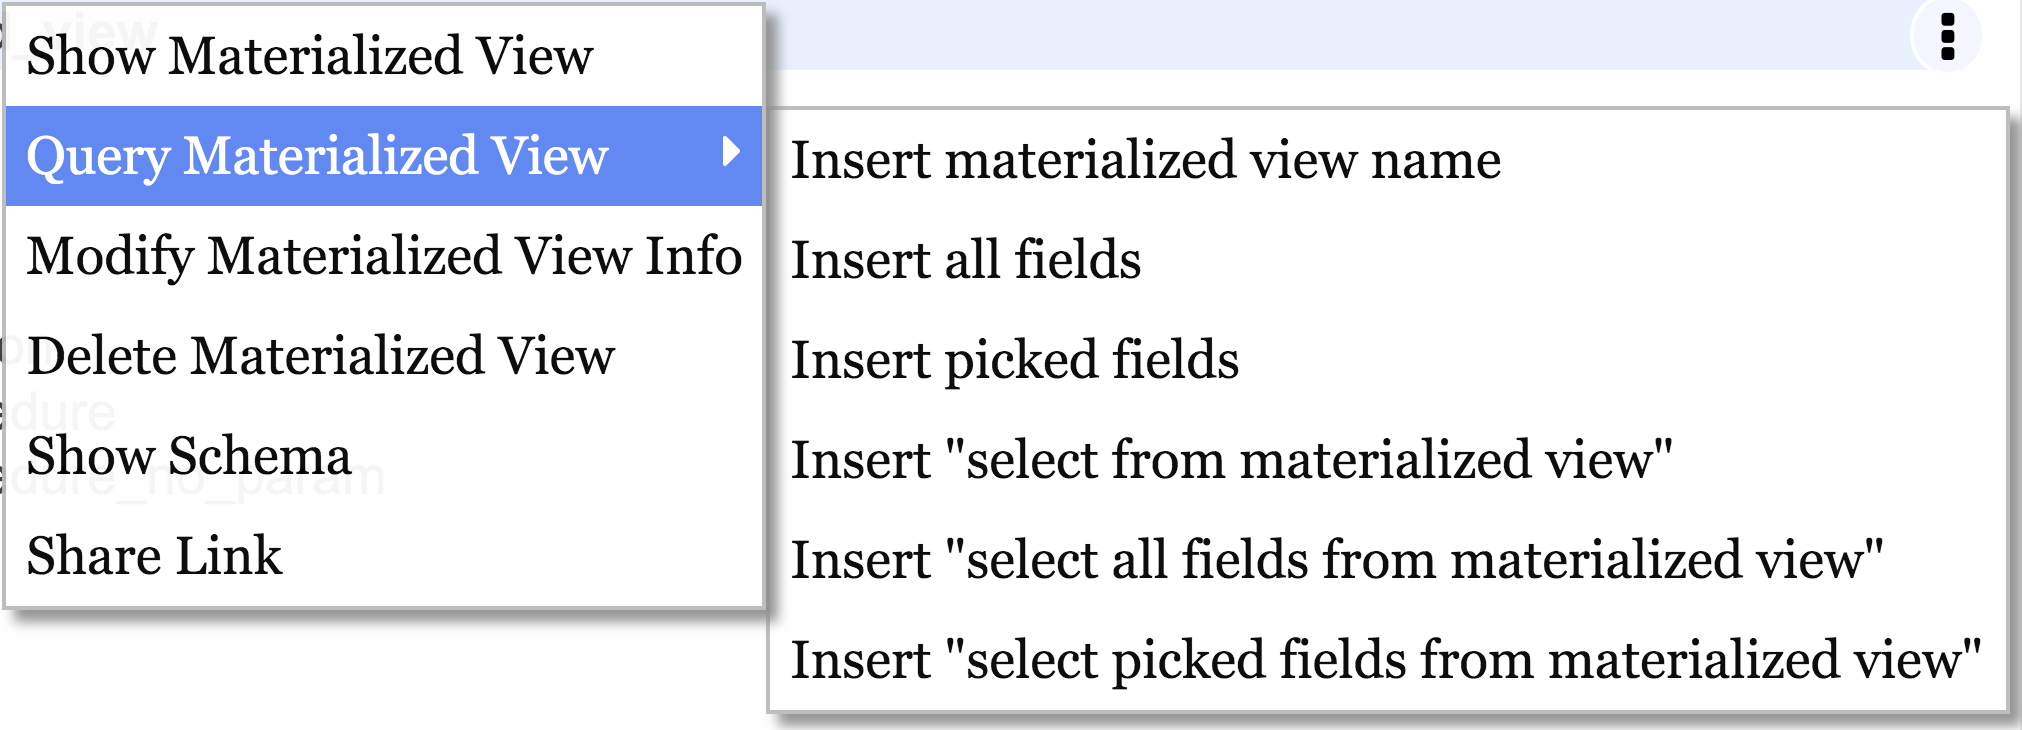
|
Menu Item |
Action |
|
Show Materialized View |
Inserts materialized view query to text area. |
|
Query Materialized View > Insert materialized view name |
|
|
Query Materialized View > Insert all fields |
|
|
Query Materialized View > Insert picked fields |
Inserts selected fields from list. |
|
Query Materialized View > Insert “select from materialized view” |
Inserts select from selected materialized view. The type of insert depends on the option selected under User Settings > Default Insert. Options include overwrite, insert at cursor, insert at end of page, or insert in a new tab. |
|
Query Materialized View > Insert “select all fields from materialized view” |
Inserts selection of all columns from materialized view. The type of insert depends on the option selected under User Settings > Default Insert. Options include overwrite, insert at cursor, insert at end of page, or insert in a new tab. |
|
Query Materialized View > Insert “select picked fields from materialized view” |
Inserts selected columns from materialized view. The type of insert depends on the option selected under User Settings > Default Insert. Options include overwrite, insert at cursor, insert at end of page, or insert in a new tab. |
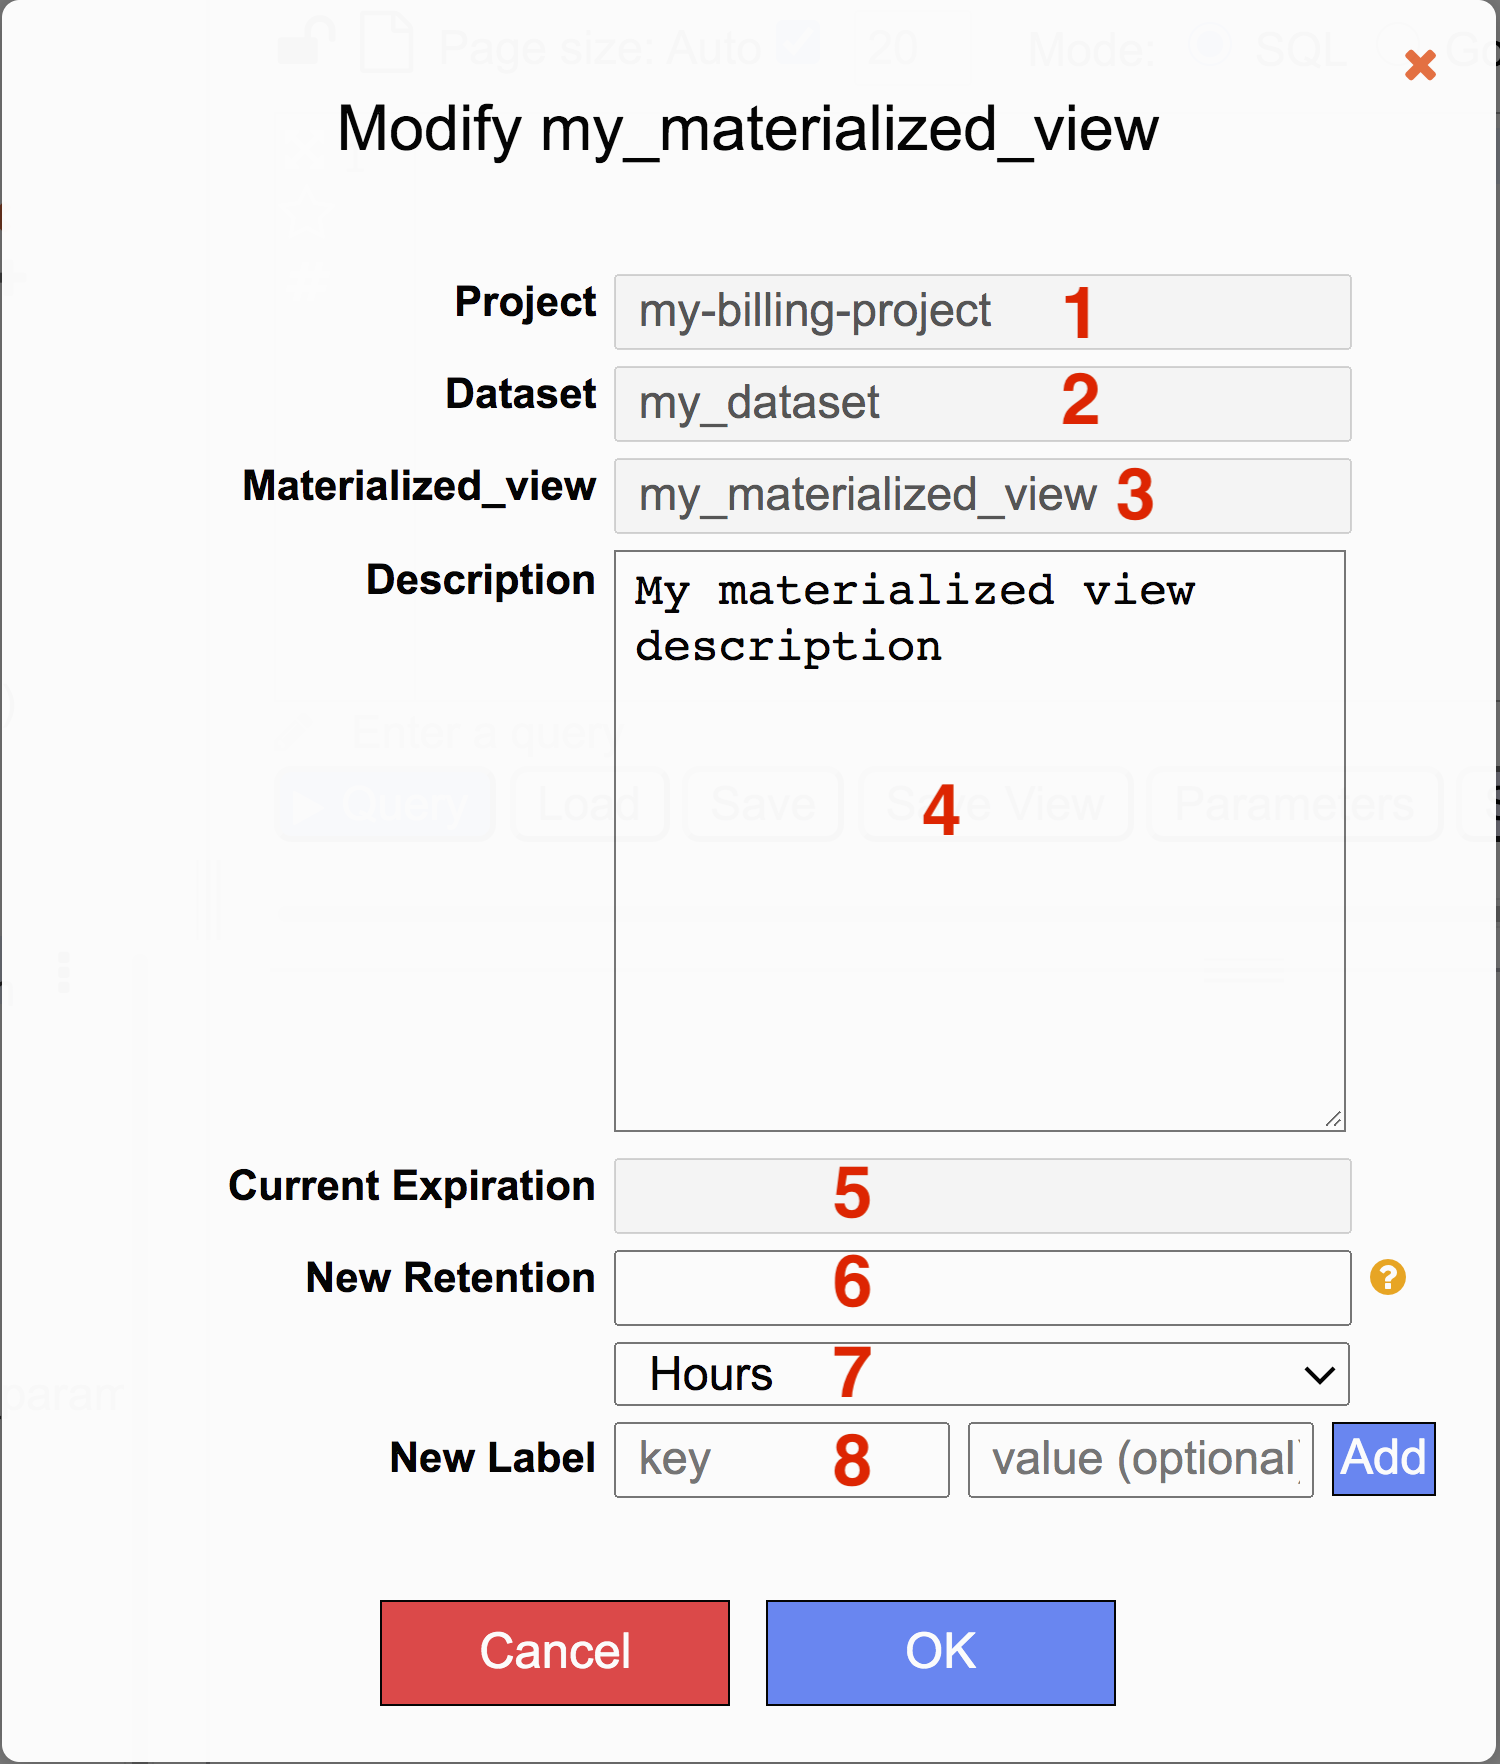
Modify Materialized View Info
|
Modify materialized view description, retention, and labels. A materialized view's description, retention, and labels can be modified
|
Delete Model
|
To delete a materialized view, verify the correct materialized view is selected and then click Confirm |
|
Show Schema |
Displays the materialized view’s schema. |
|
Share Link |
Click on Copy Link to copy URL to clipboard that links directly to materialized view. |

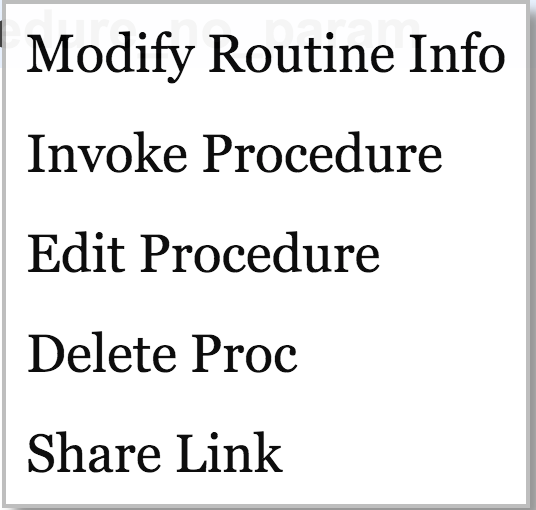
Procedure Context Menu
Procedure Context Menu is access by right-clicking on model name or left click on other options menu icon.
|
Menu Item |
Action |
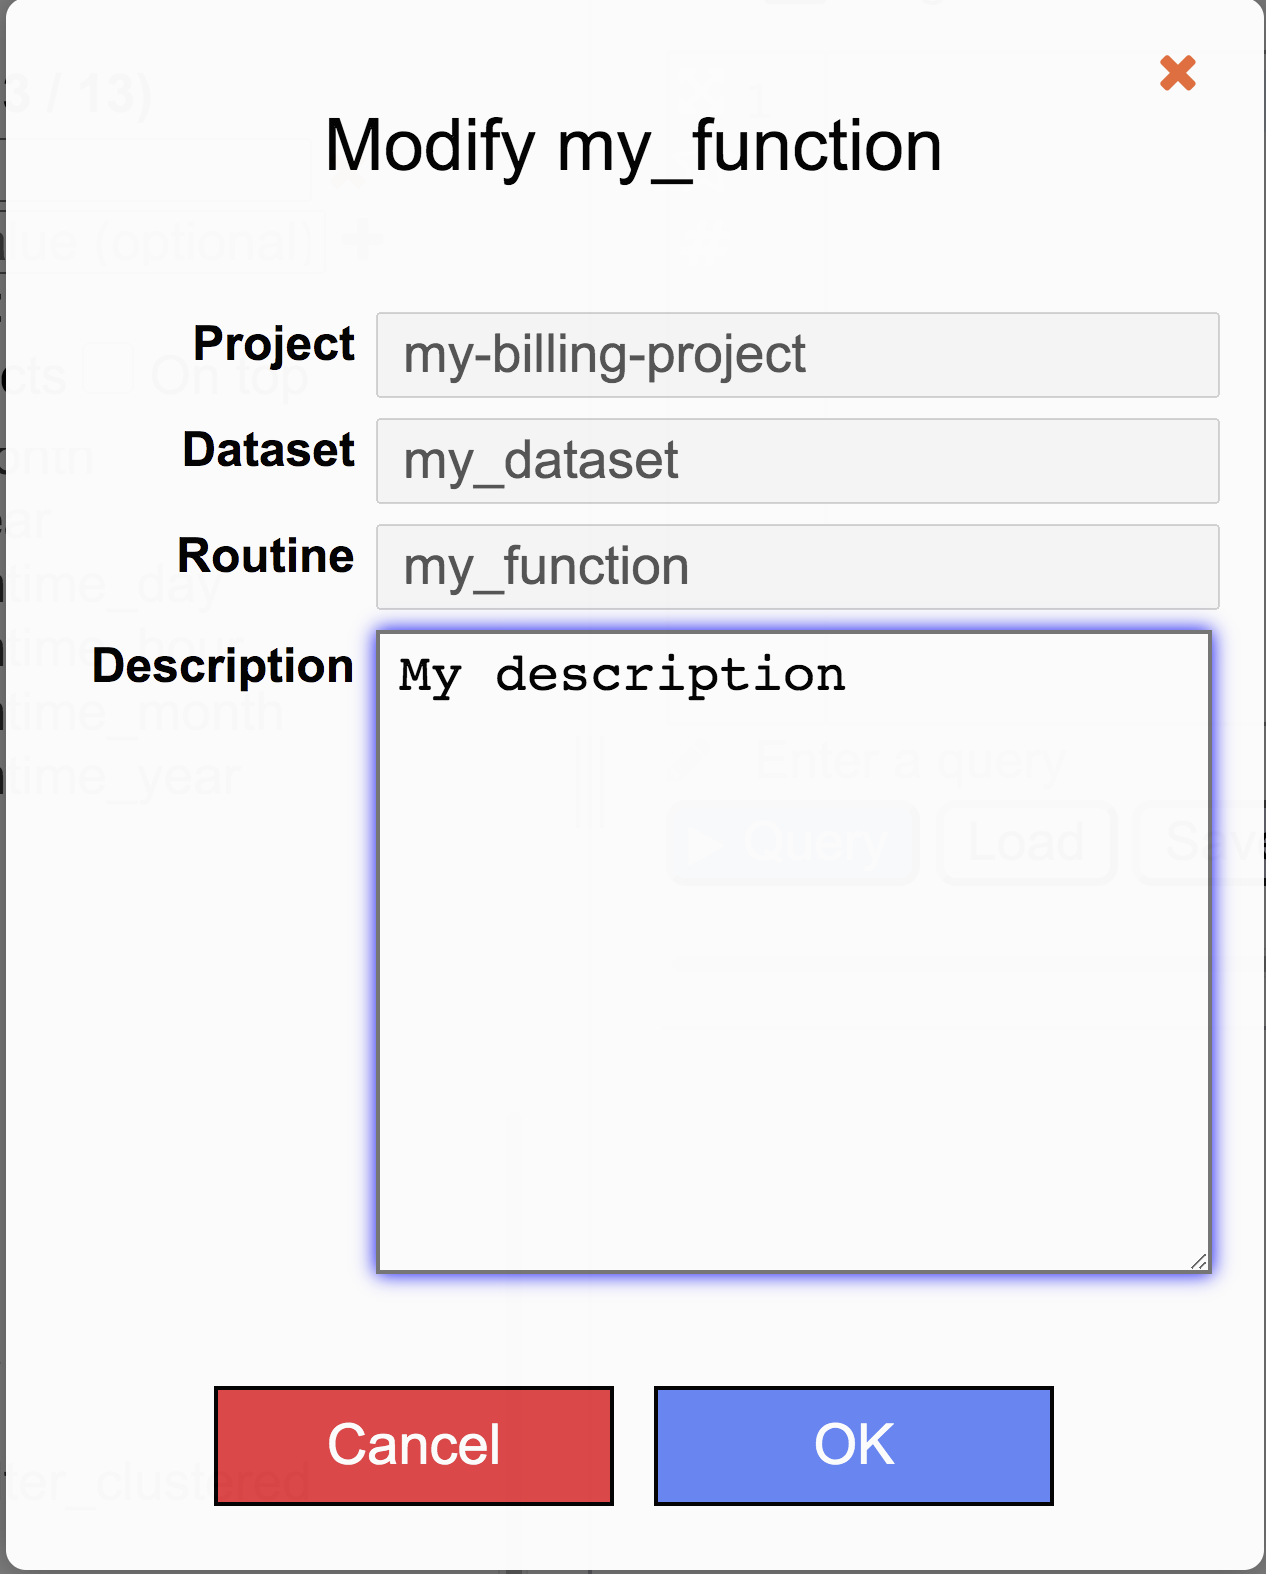
Modify Routine Info
|
Modify routine's description |
|
Invoke Procedure |
Inserts text into query area to template call procedure. |
|
Edit Procedure |
Inserts text into query area to template create or replace procedure. |
|
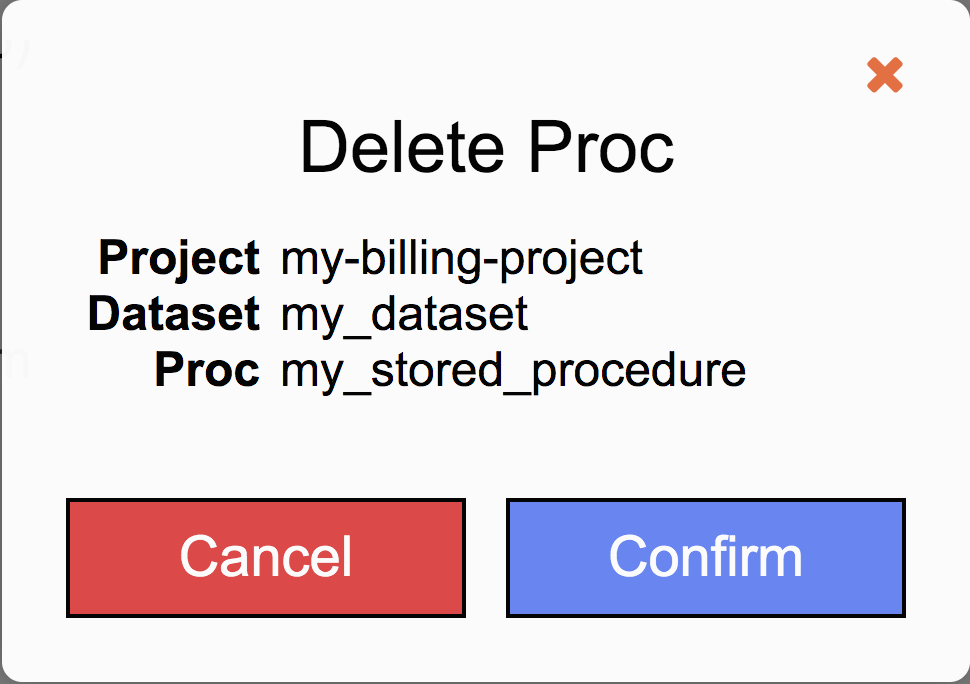
Delete Procedure
|
To delete a procedure, verify the correct procedure is selected and then click Confirm |
|
Share Link |
Click on Copy Link to copy URL to clipboard that links directly to procedure. |
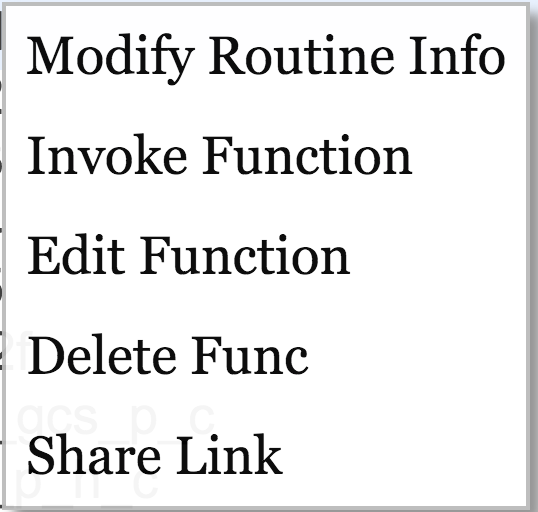
Function Context Menu
Function Context Menu is access by right-clicking on model name or left click on other options menu icon.
|
Menu Item |
Action |
| Modify Routine Info
|
Modify routine's description |
|
Invoke Function |
Inserts text into query area to template call function. |
|
Edit Function |
Inserts text into query area to template create or replace function. |
|
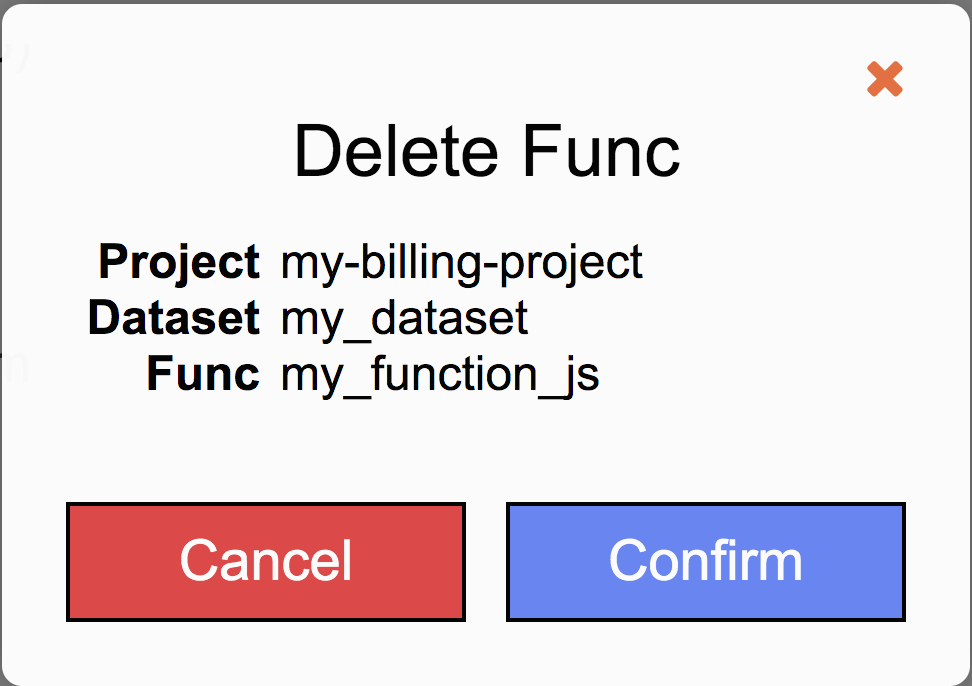
Delete Function
|
To delete a function, verify the correct function is selected and then click Confirm |
|
Share Link |
Click on Copy Link to copy URL to clipboard that links directly to procedure. |
Storage
Goliath displays Google Cloud Storage buckets and folders in the navigator. To display Storage items select GCS Storage menu item from the Project Context Menu
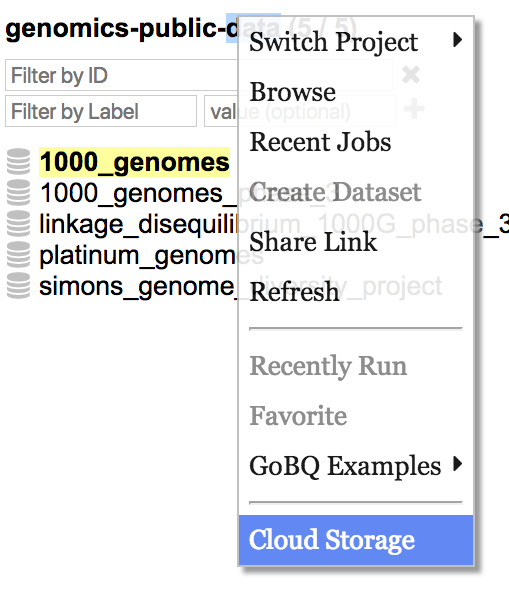
Storage Context Menu
When Storage is displayed in the navigator the Project Context Menu will change to handle Storage related tasks. Menu items that are not relevant to Storage are grayed out.

Switch Project
The project listings remain the same. However when selecting a project to switch to the navigator will load Storage buckets associated to that project instead of it’s datasets.
Buckets
Bucket menu item is unique to Storage Context Menu. Similar to functionality for Switch Projects Buckets the menu item lists individual Storage Buckets added to display by the user.
- To switch to a Bucket click on the bucket from the Buckets list.
- To add a bucket select Display bucket… from the menu and enter the bucket name. Click on Remember checkbox to save the bucket and have it listed in the Buckets list.
- To remove a saved bucket click on Remove bucket display… and select the bucket from the drop down menu.
Browse, Recent Jobs, Create Dataset, and Share Link are disabled and not available when displaying Storage in the navigator
Refresh will refresh all buckets listed in the navigator
Recently Run, Favorite, and GoBQ Examples remain the same both Dataset and Storage navigation
GBQ Datasets option becomes available when in Storage navigation. Clicking on GBQ Datasets will switch to dataset listing in the navigator.
Buckets
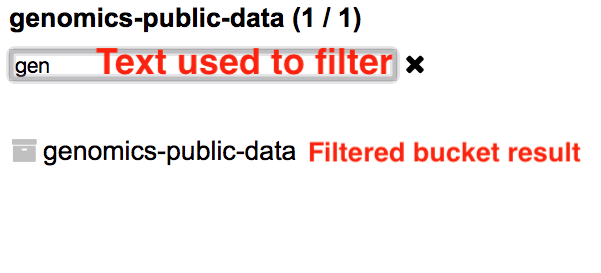
Storage navigator lists buckets associated to the displayed project.

User Filter by ID to filter buckets
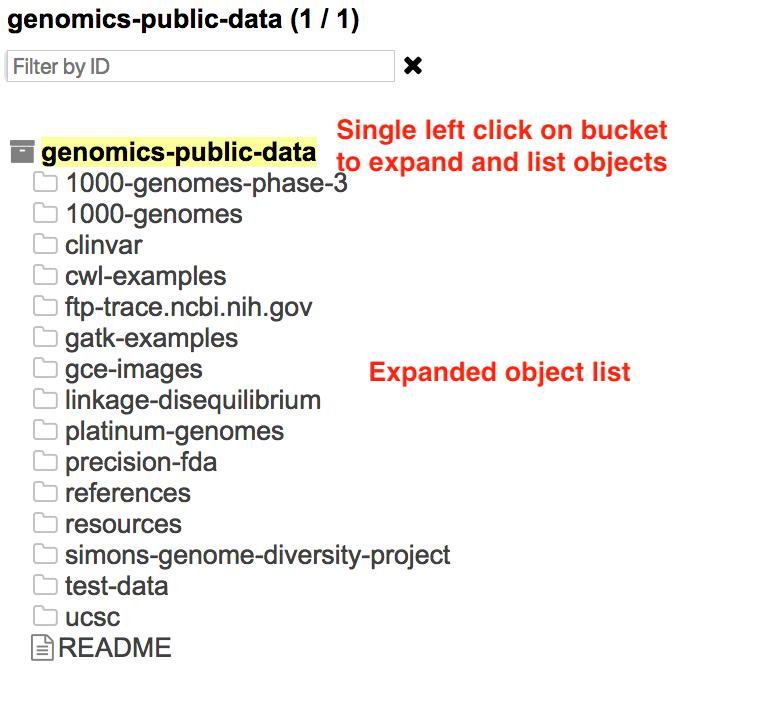
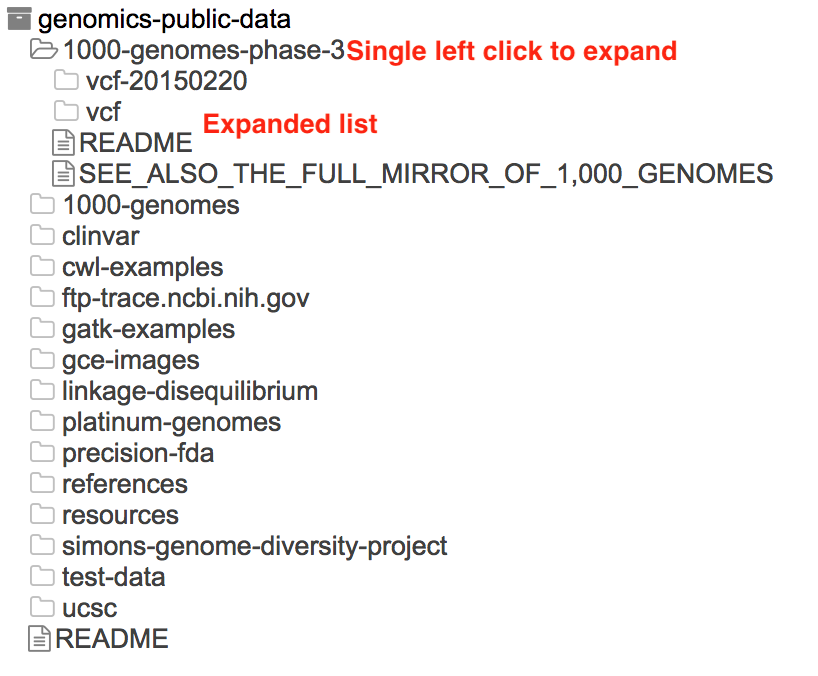
Single left click on bucket to expand object
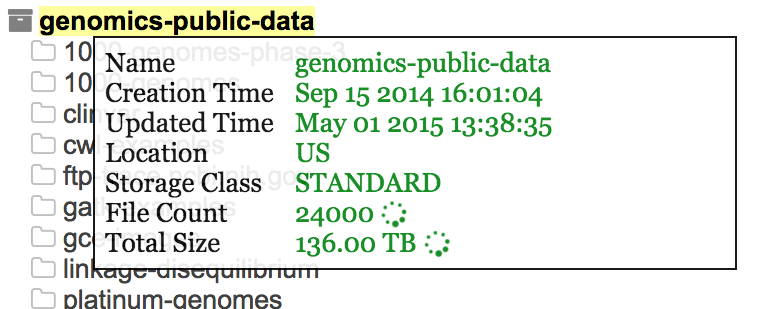
Hover over bucket to obtain popup with metadata
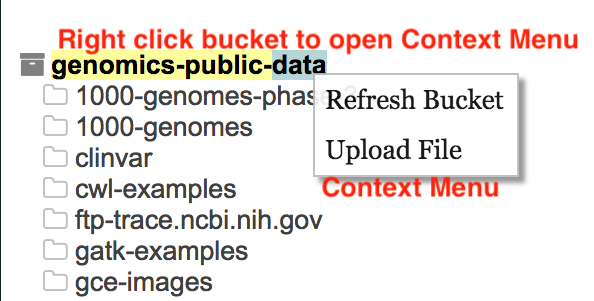
Right click on a bucket to open Bucket Context Menu
Bucket Objects
Buckets contain files. The file path is broken into folders and files. For example a file path with folder1/folder2/filename.txt will be displayed in the navigator under a folder named folder1 and a subfolder named folder2 that contains a file titled filename.txt
In the navigator folders have a folder icon and files have a file icon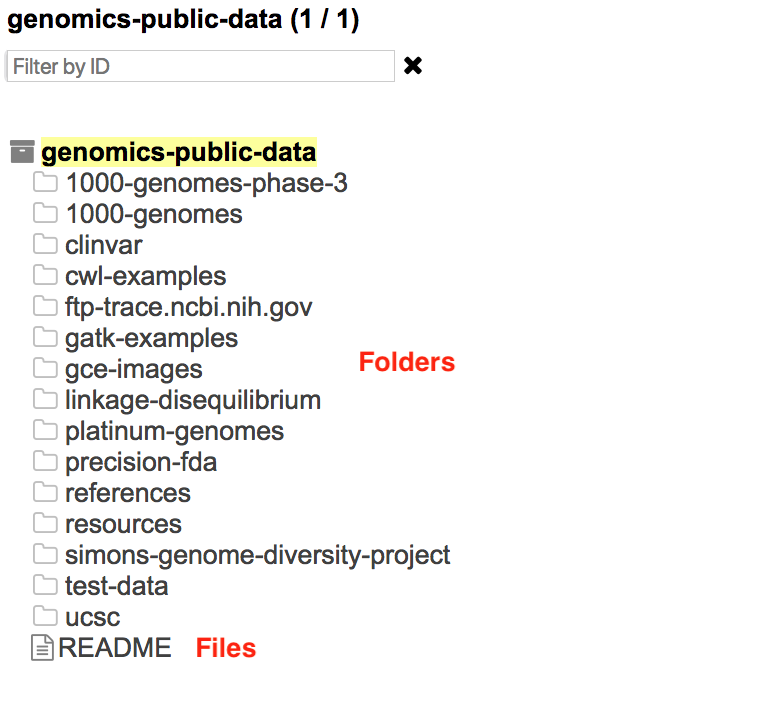
Single left click to expand a folder
Right click on a file to open File Context Menu
Hover over file to obtain popup with file metadata

Pin/Unpin Projects, Datasets and Objects (Beta Feature)
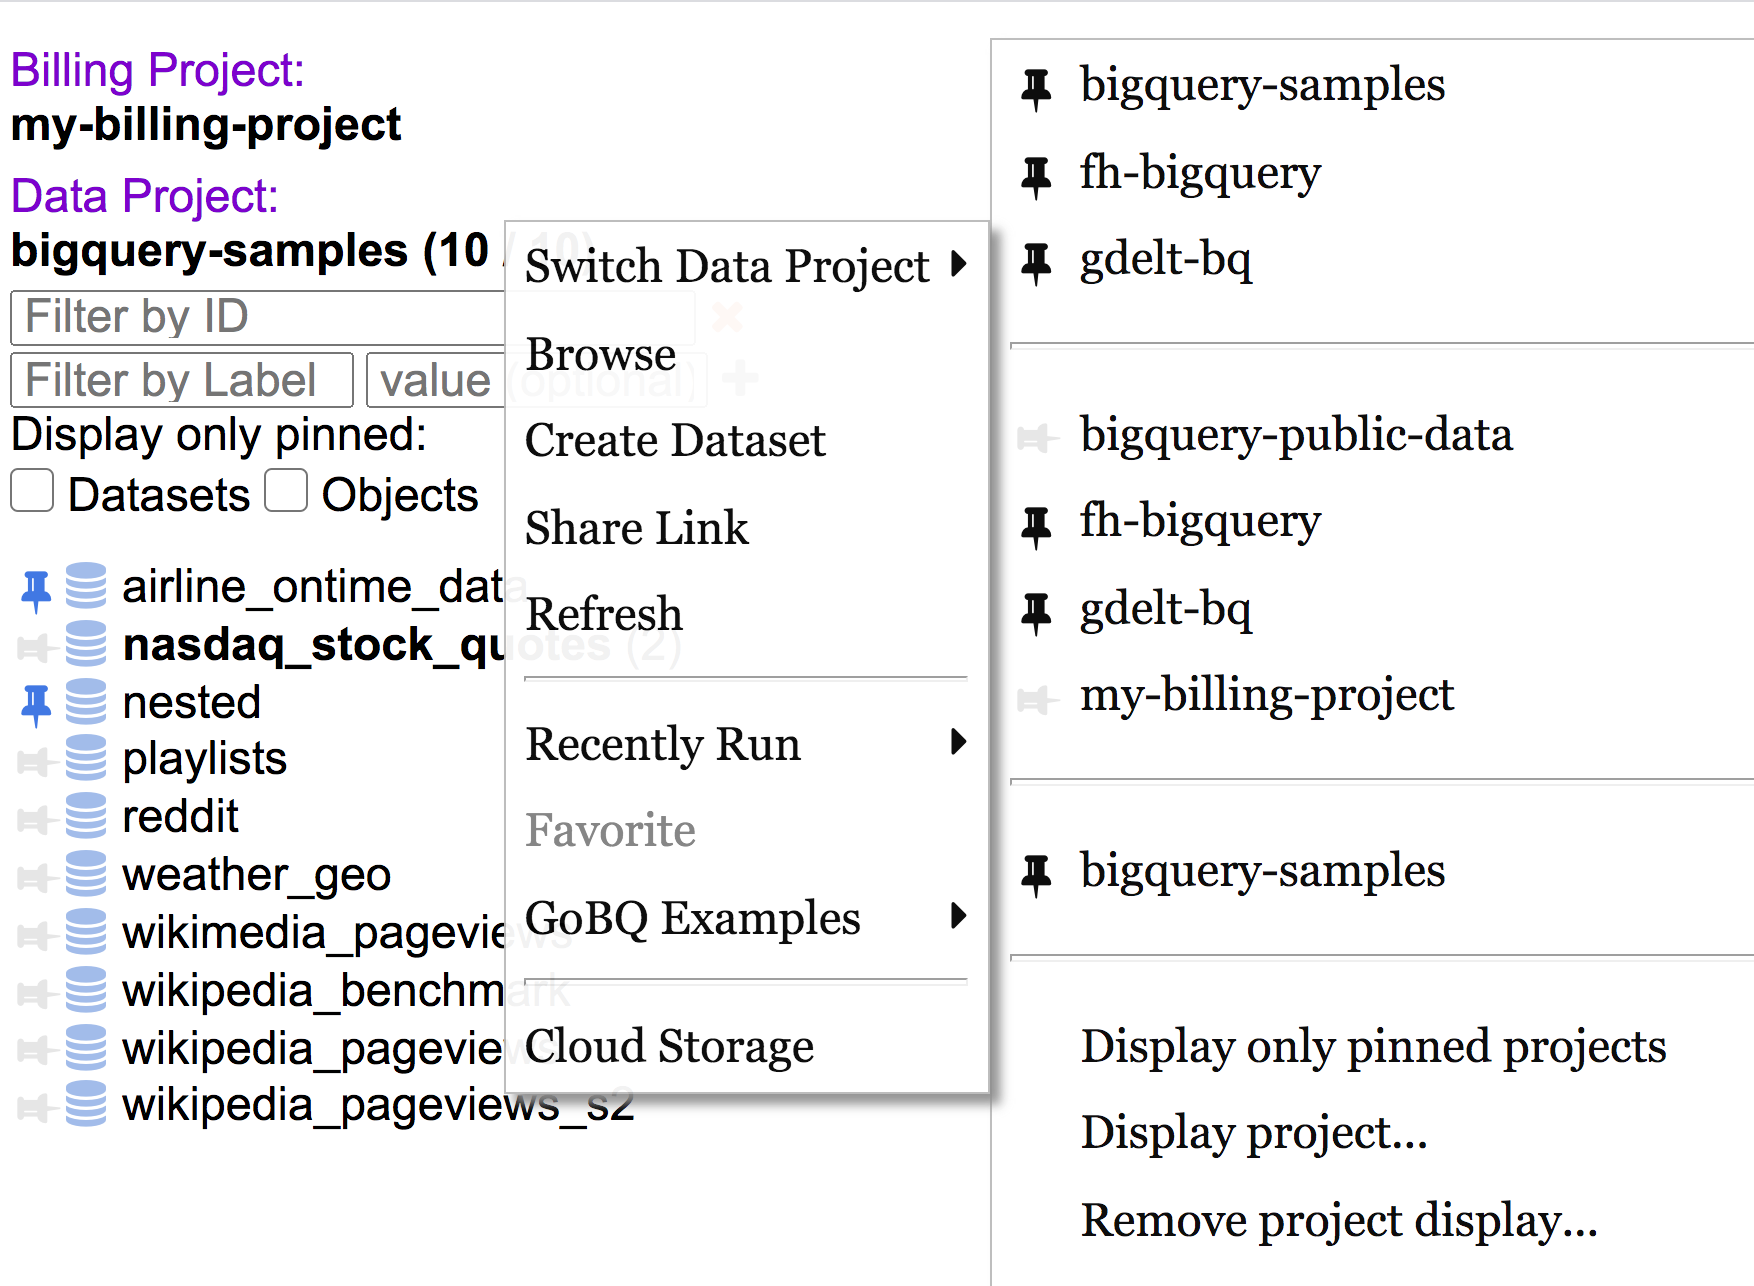
Projects, Datasets and the Objects within Datasets can be pinned for easy access to frequently used items. The Navigator and the Switch Data Projects context menu both contain controls to show only pinned or both pinned and unpinned items.
Pin/Unpin Projects
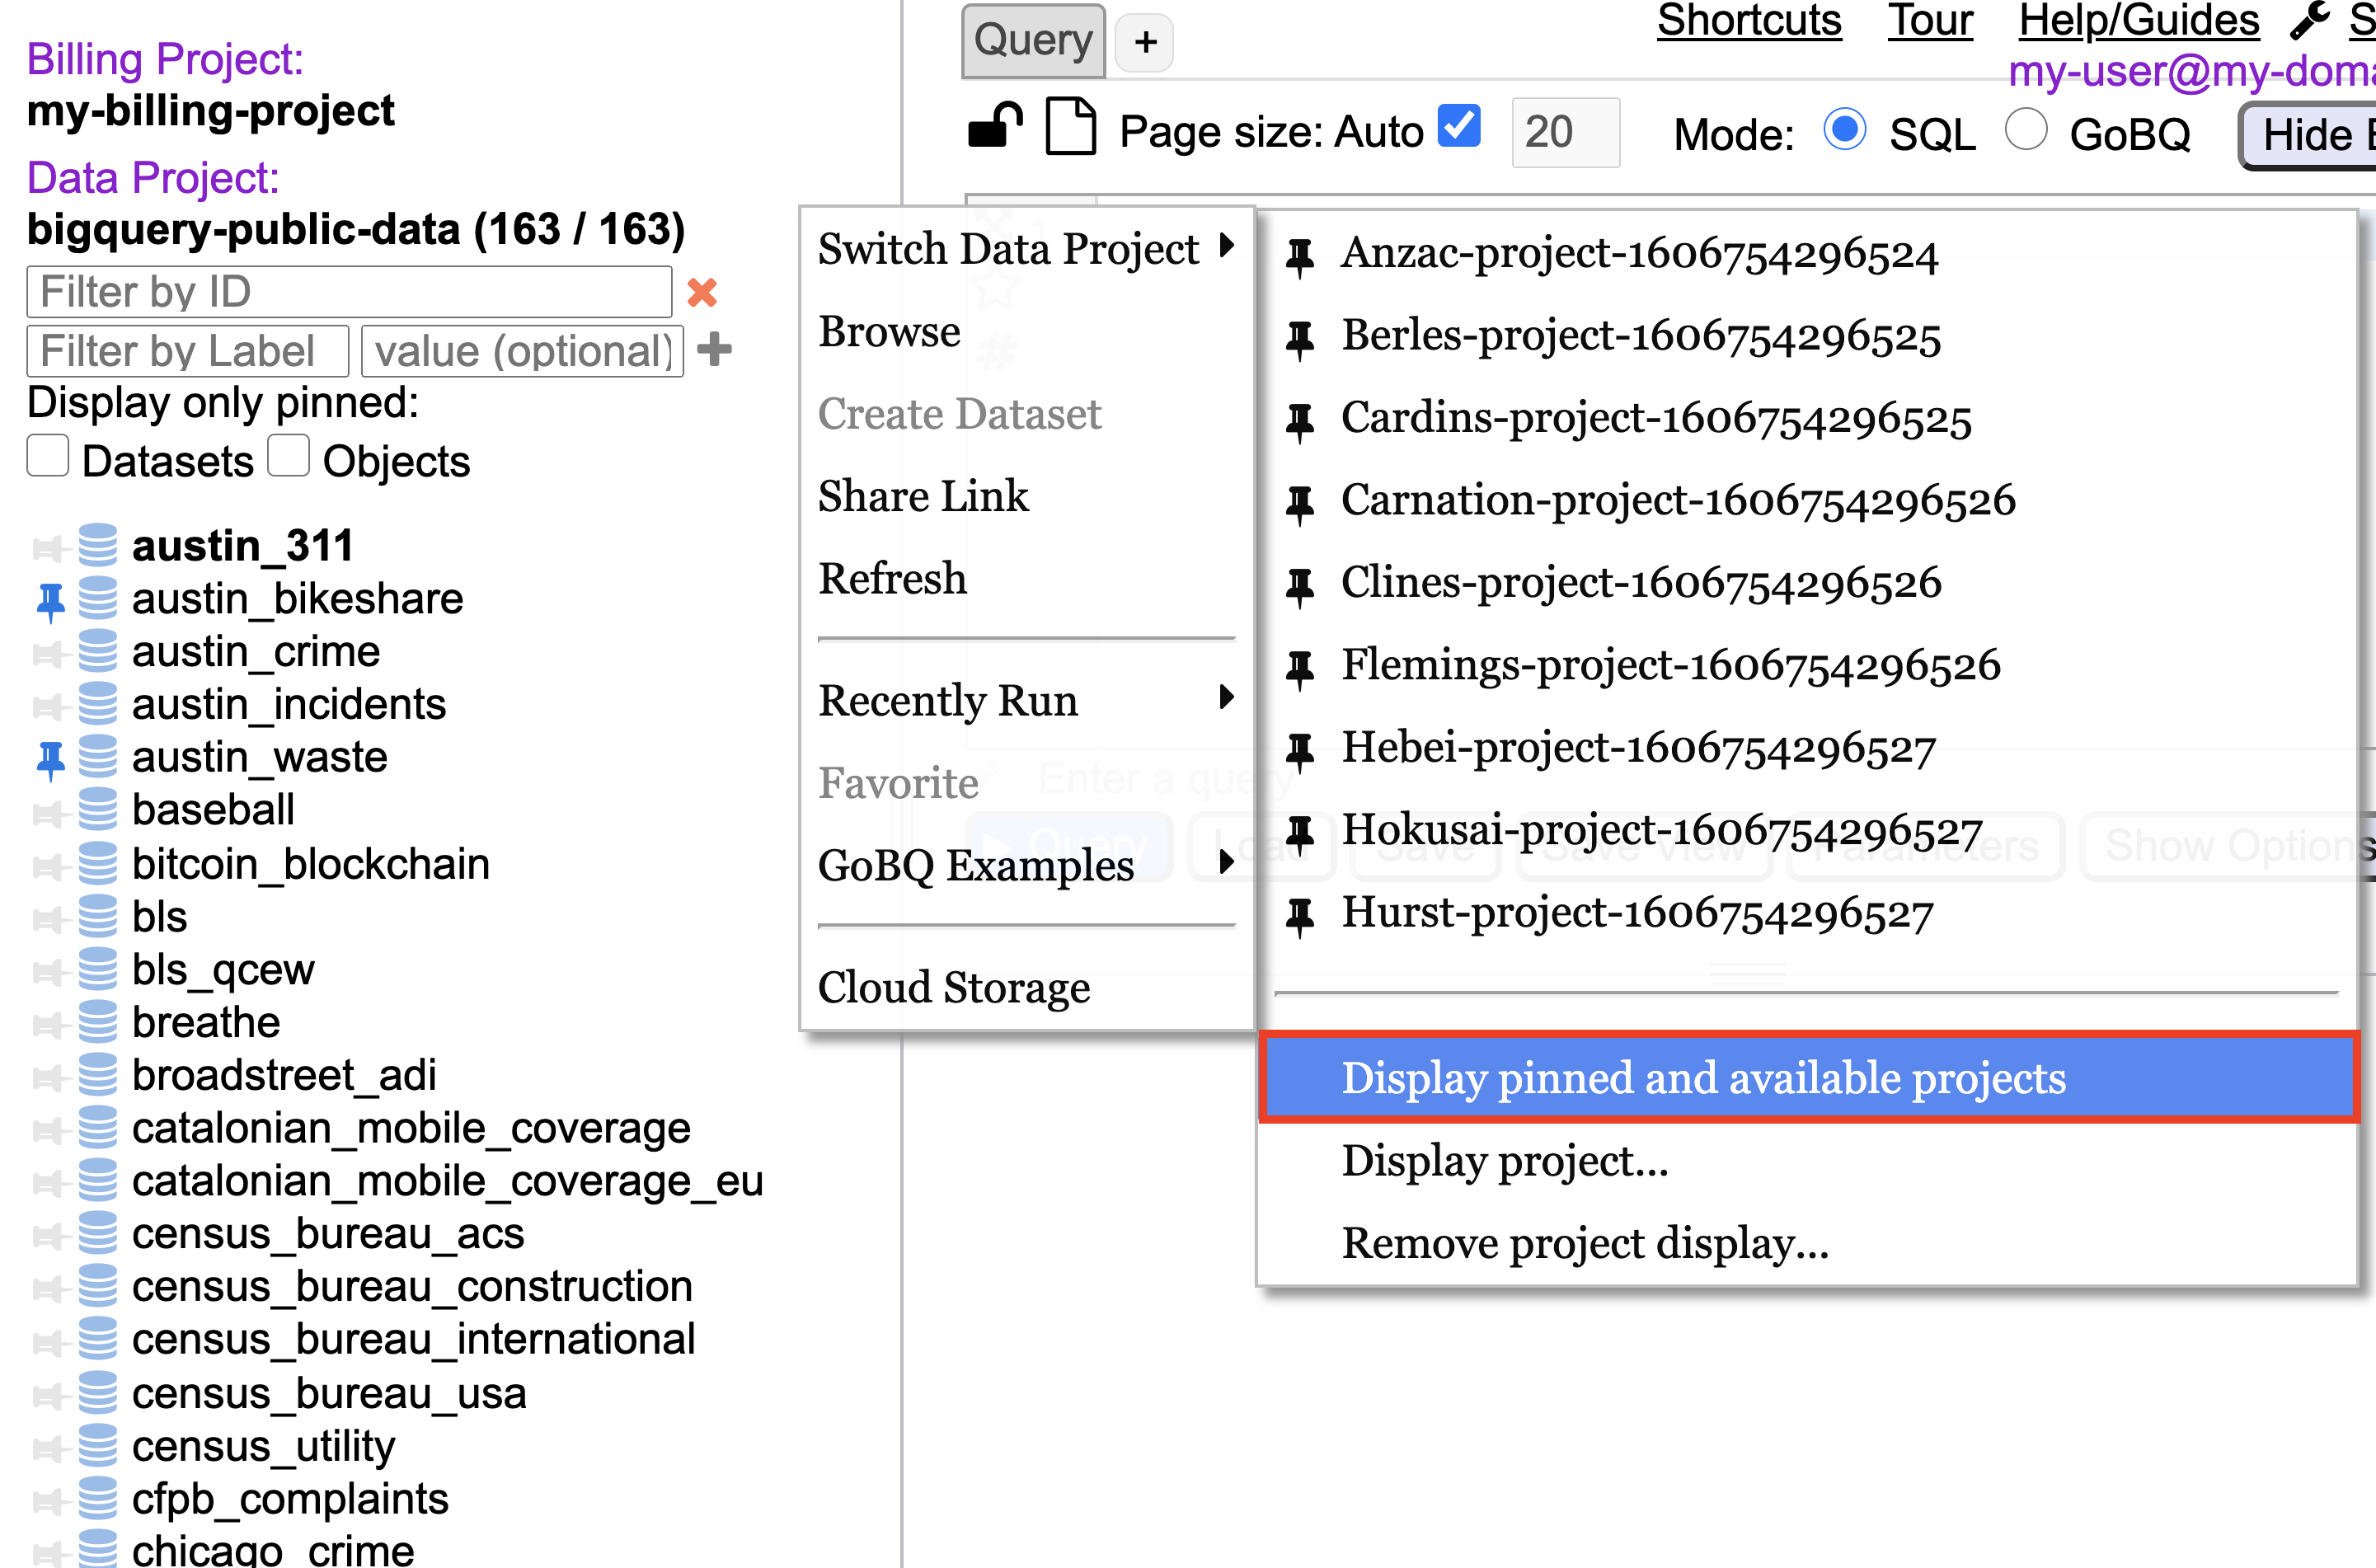
Projects can be pinned or unpinned by clicking the Pin icon to the left of items in the Switch Data Projects context menu. A rotated pin icon is shown to the left of pinned Projects.
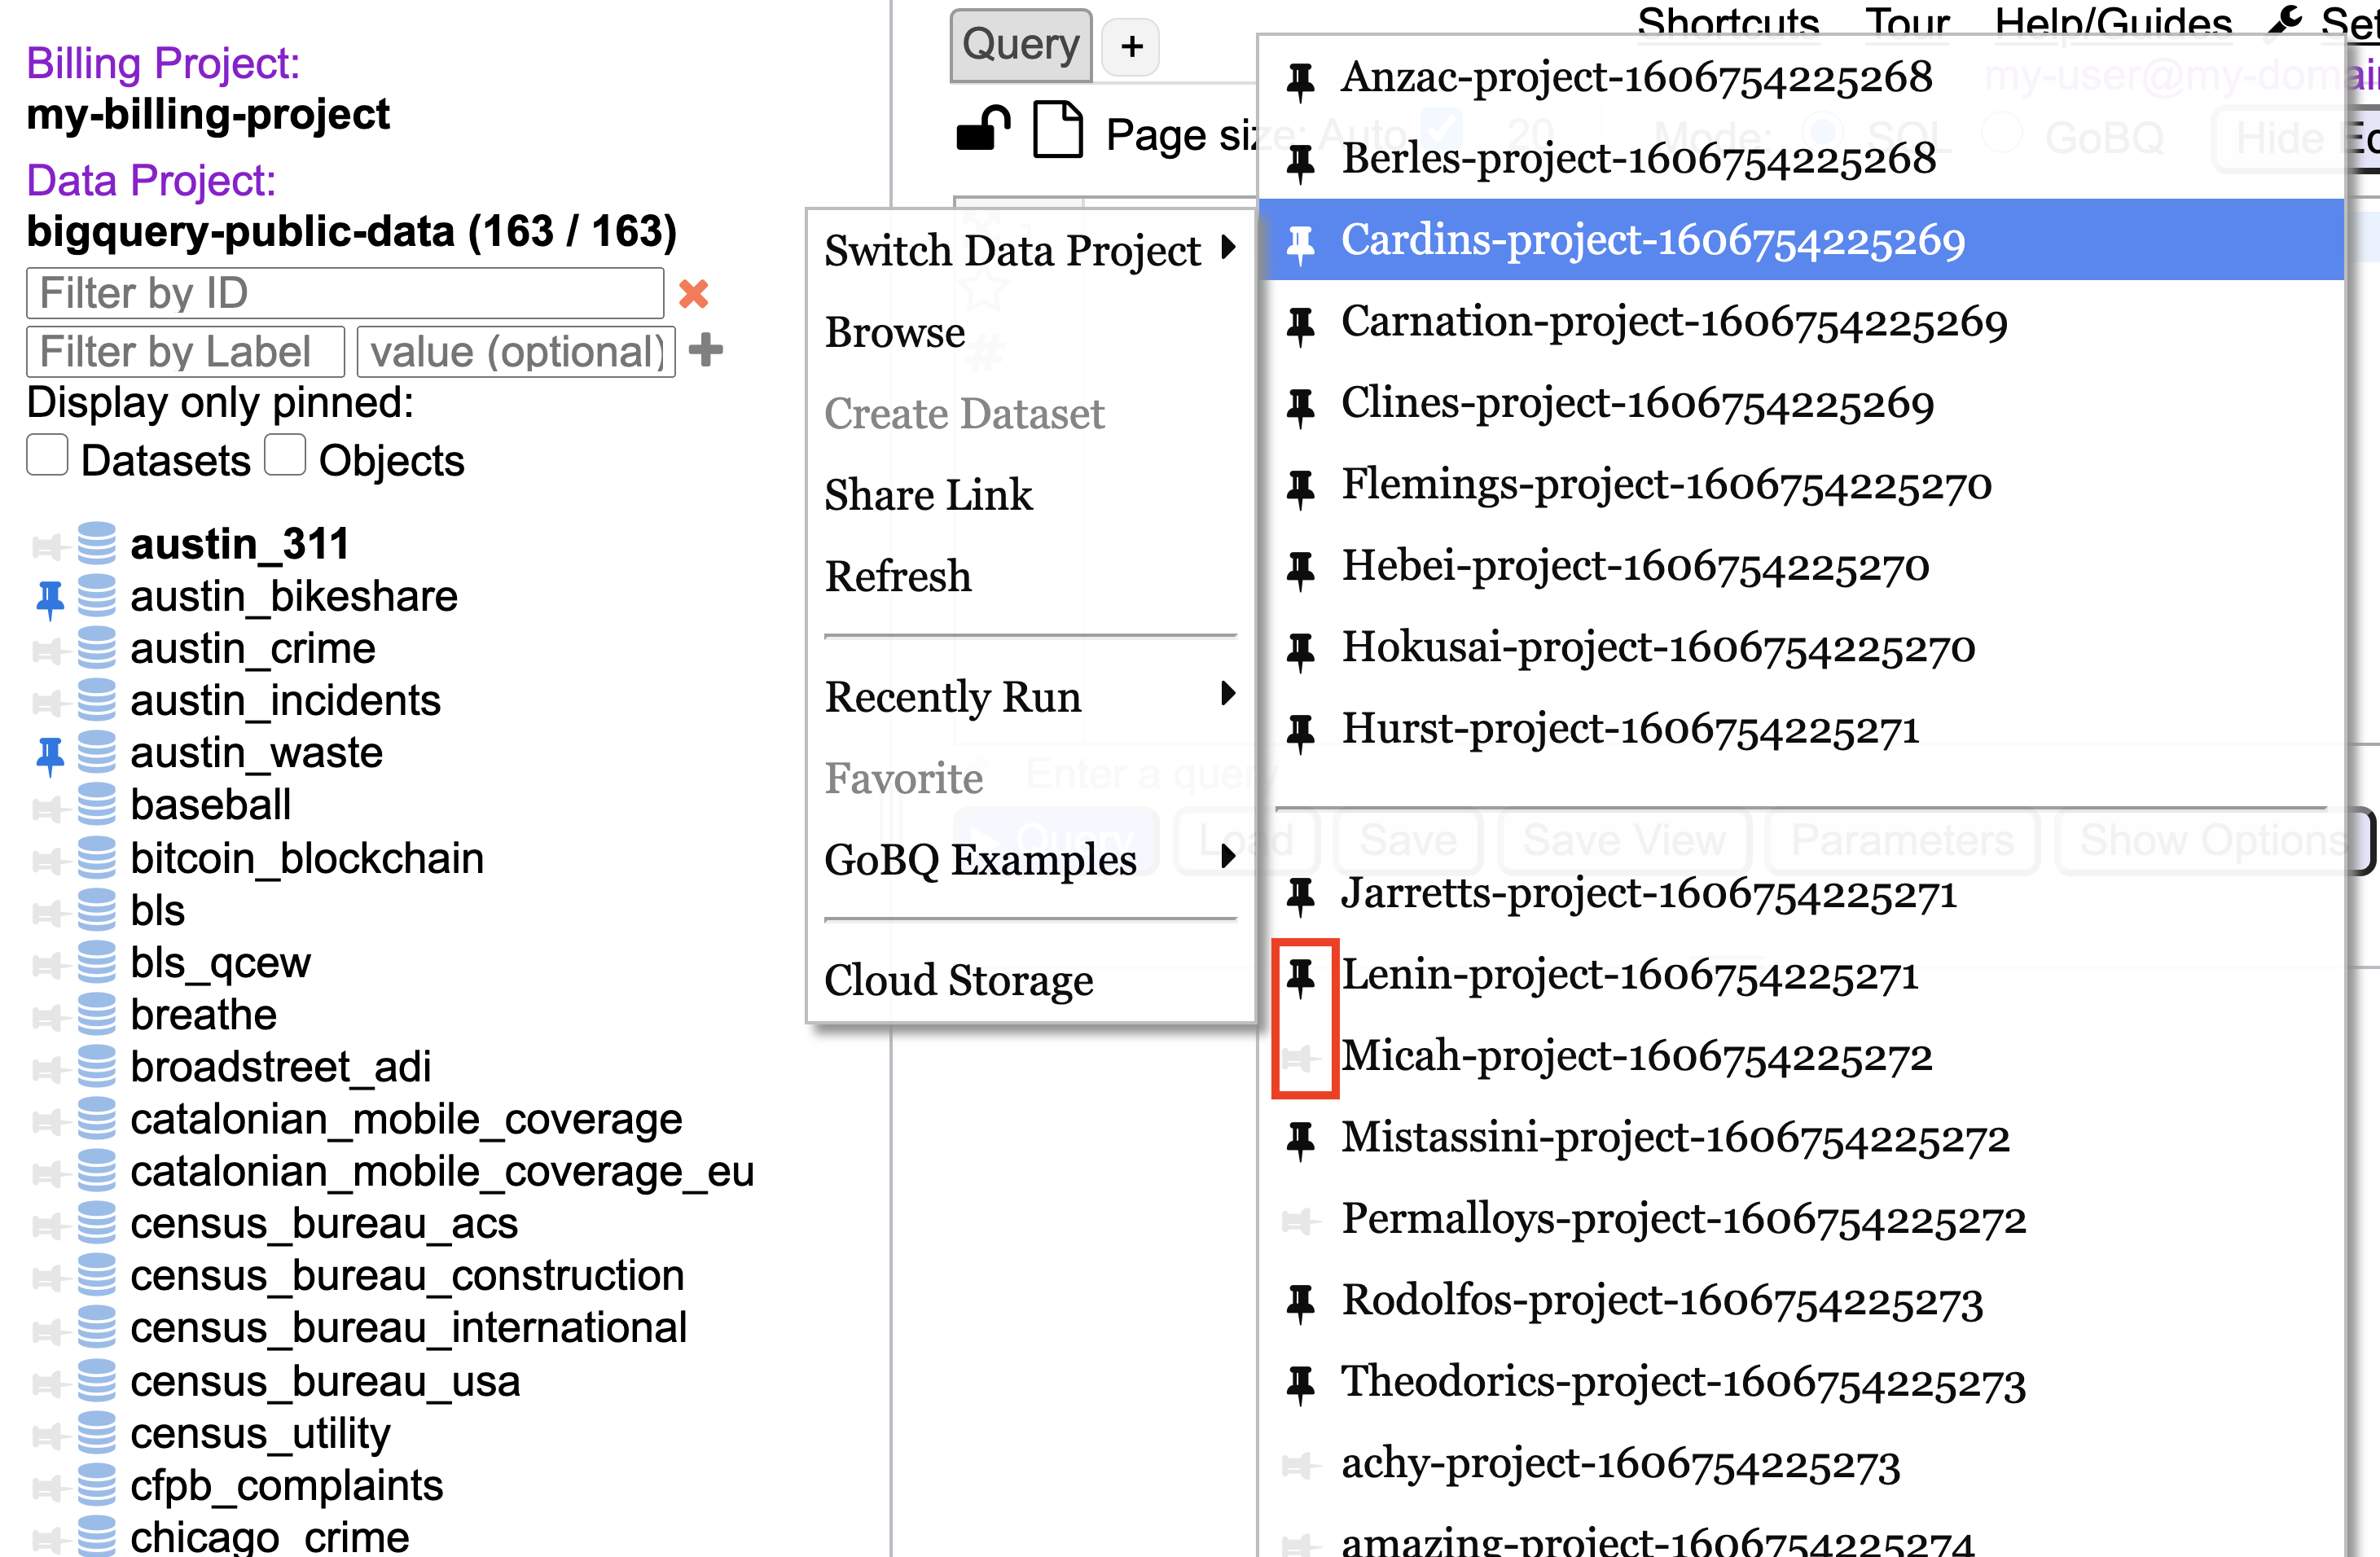
Pinned Projects are displayed additionally at the top of the Switch Data Projects context menu.
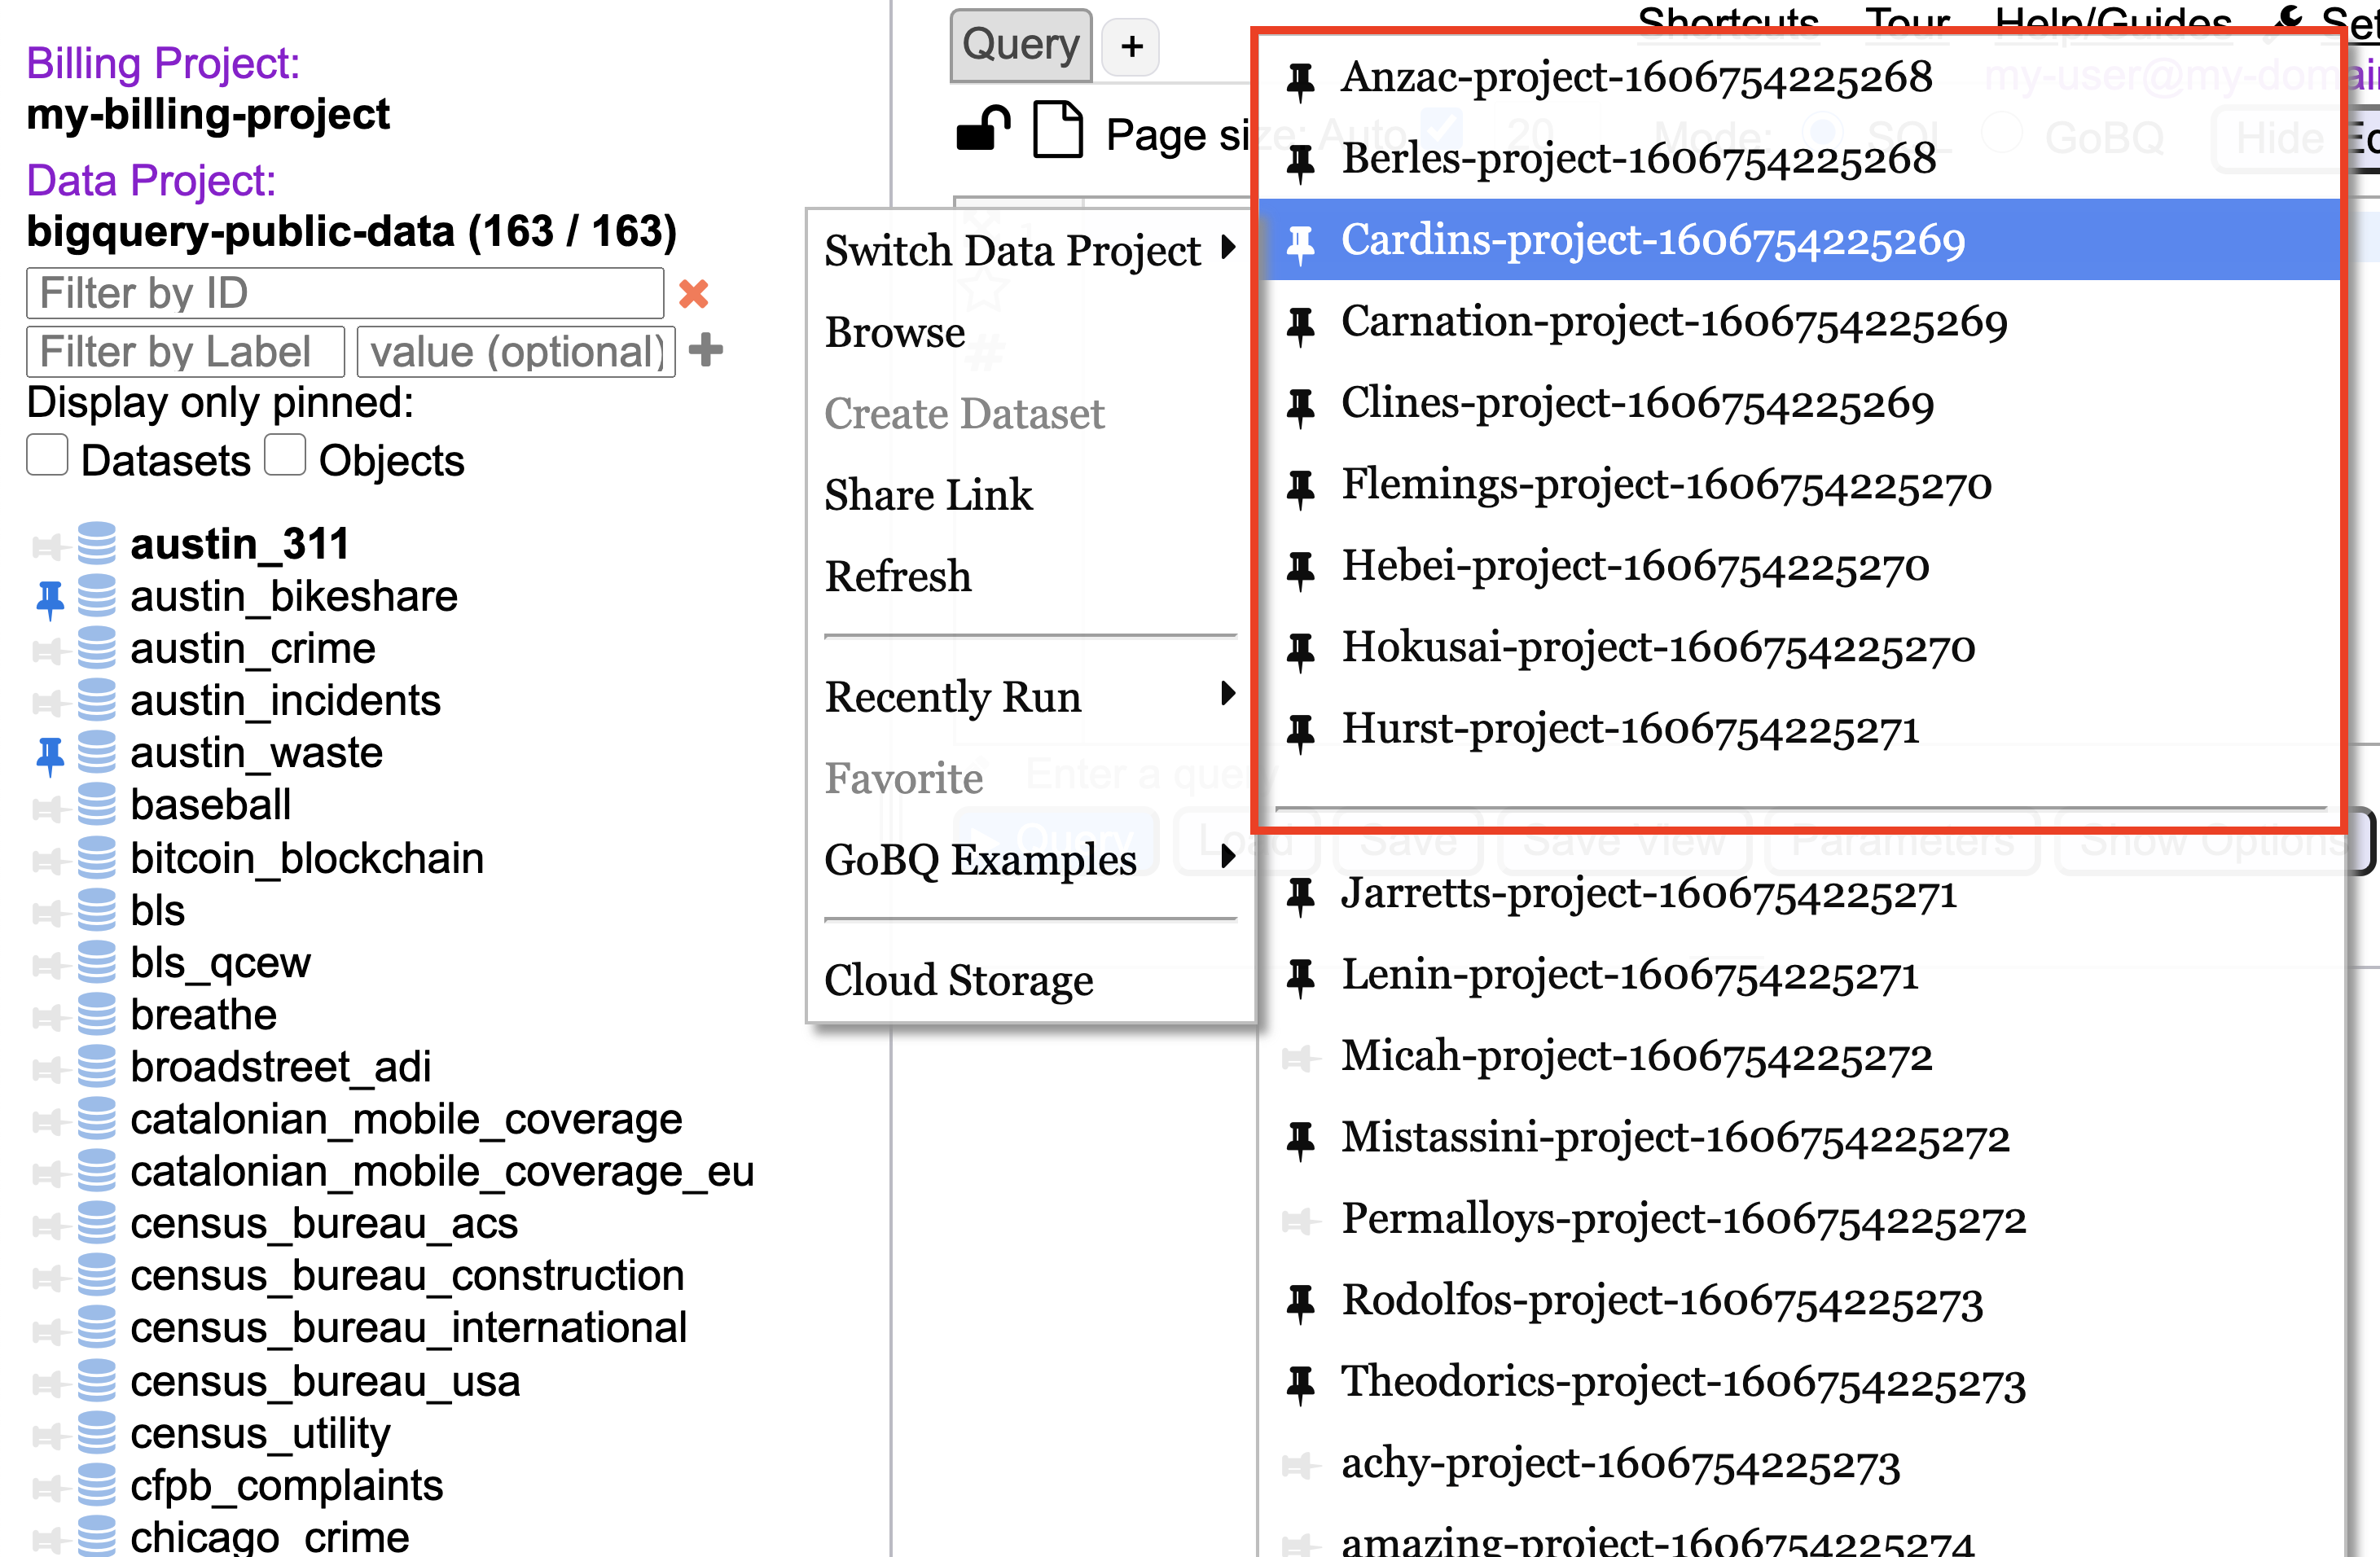
At the bottom of the Switch Data Projects context menu clicking, “Display only pinned projects” changes the mode of the menu to hide unpinned projects from view.
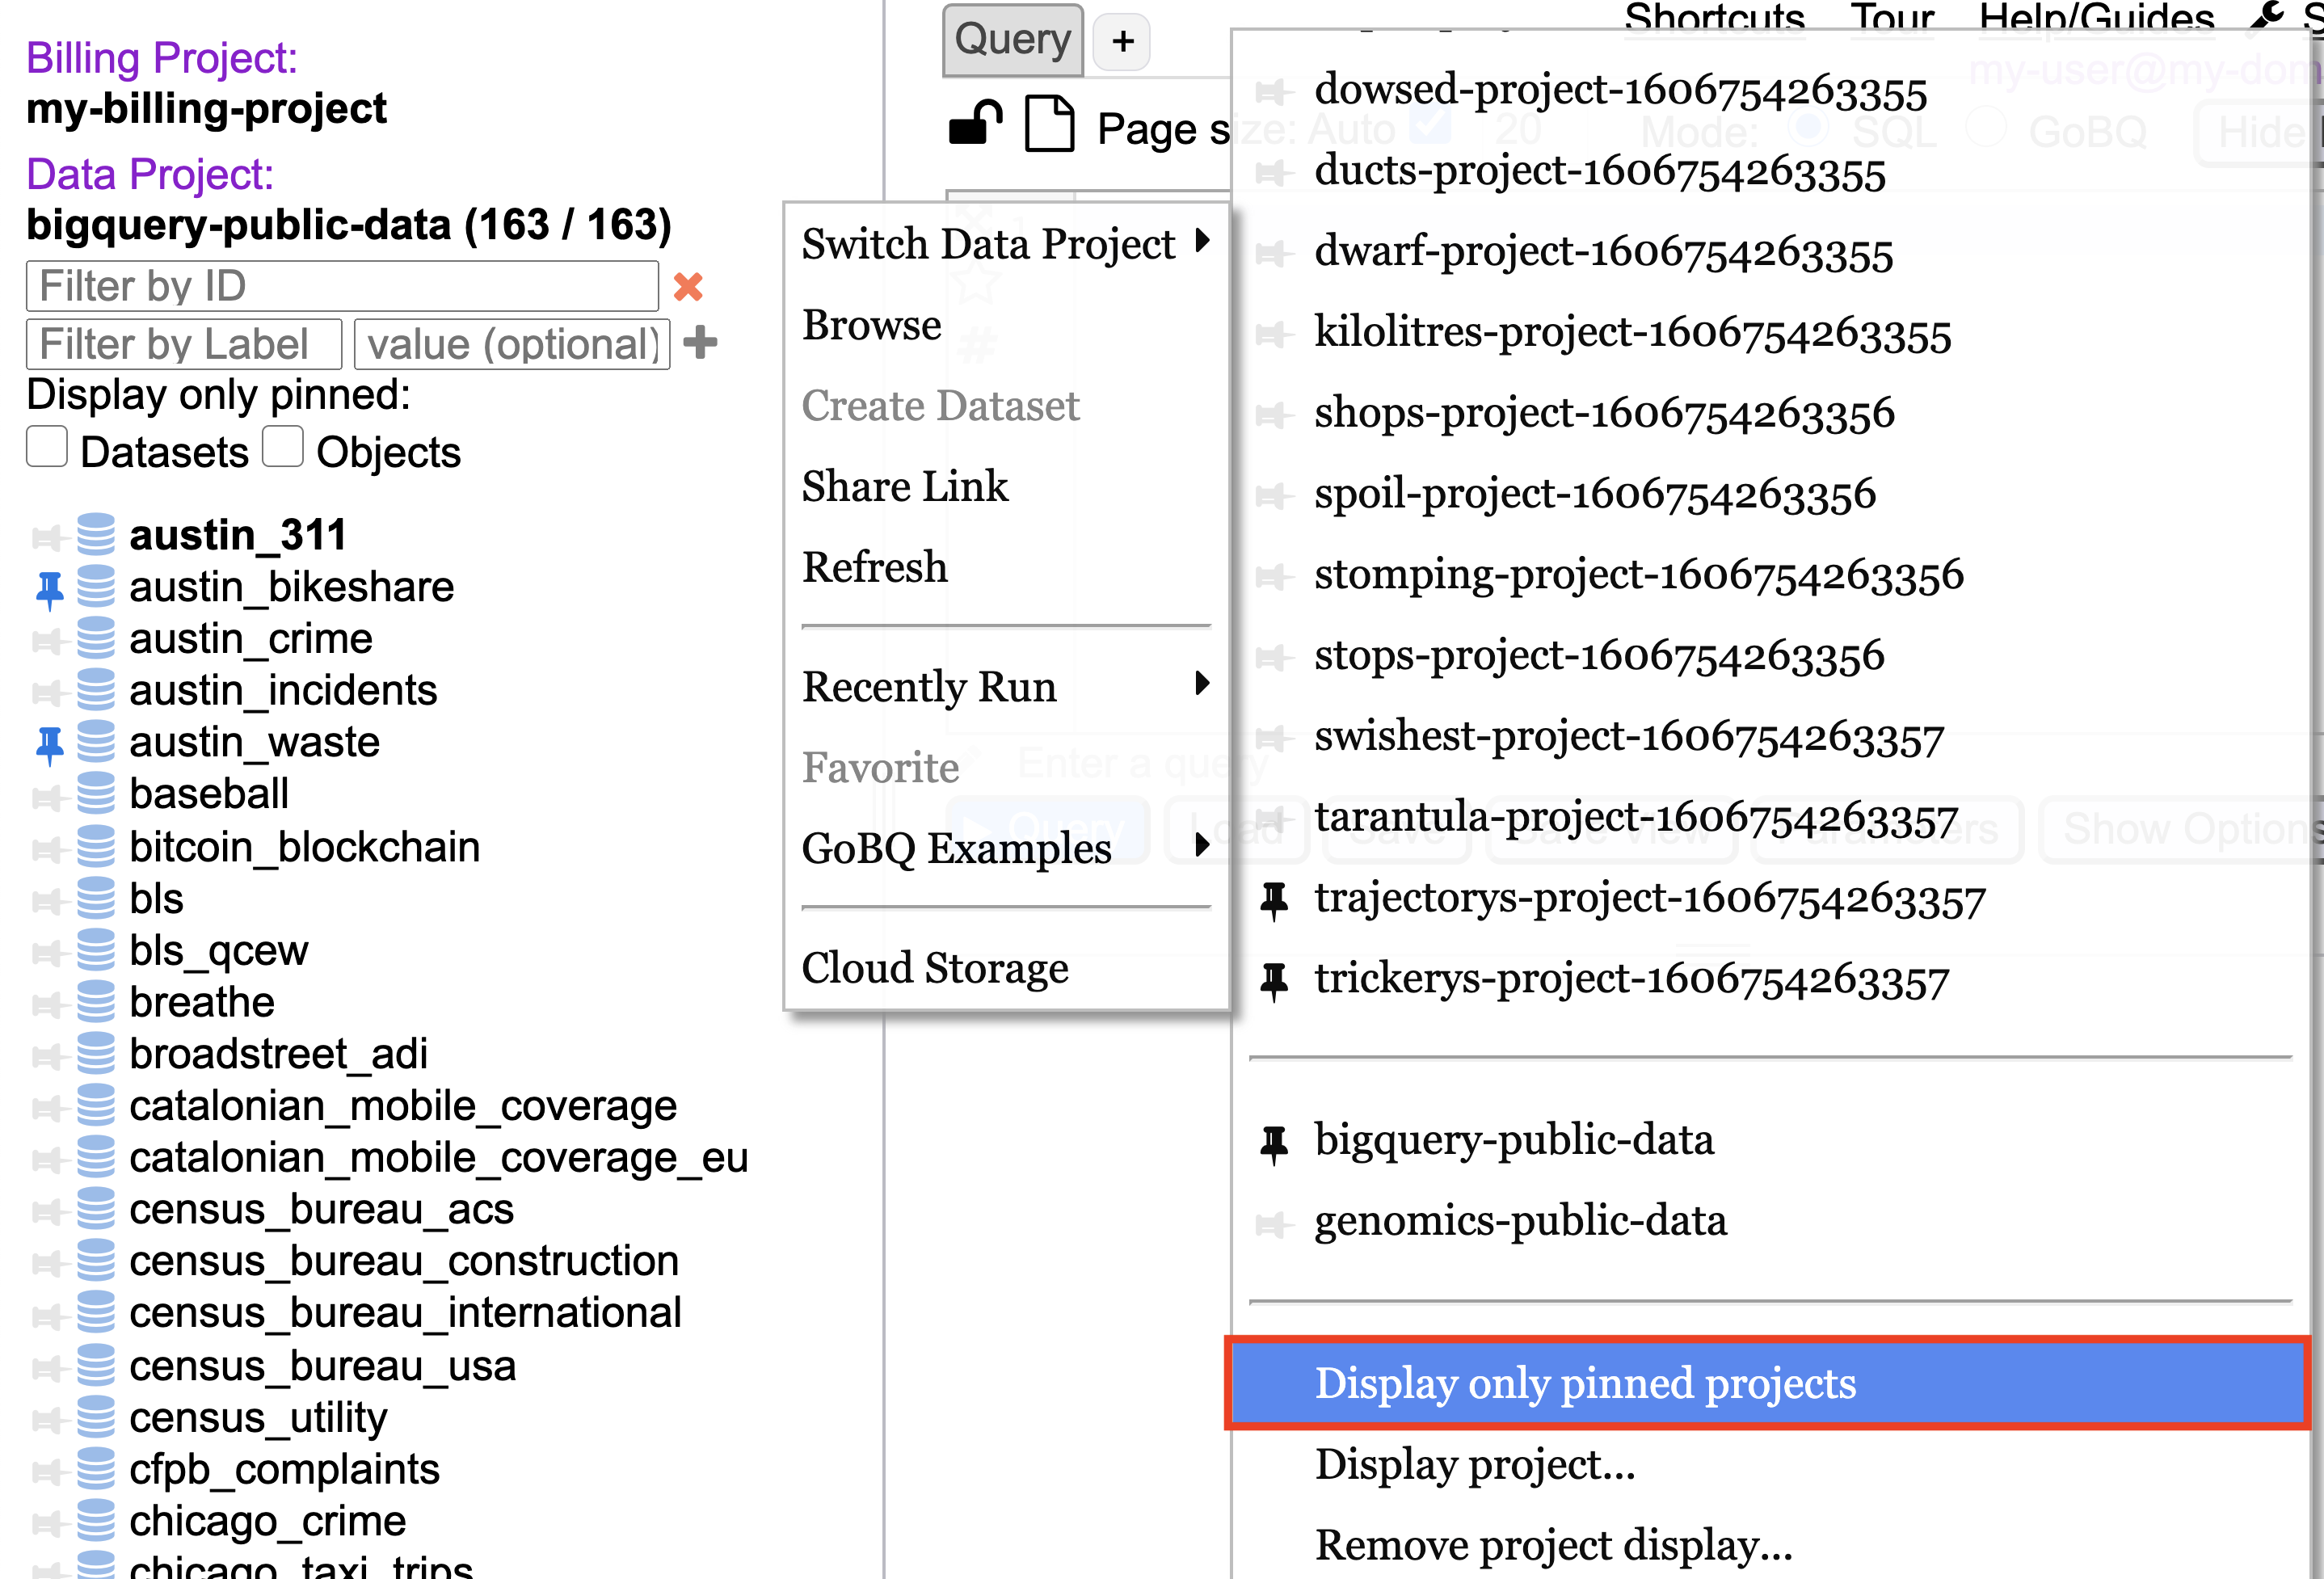
Clicking, “Display pinned and available projects” in the Switch Data Projects context menu changes the mode back to displaying both pinned and unpinned items.
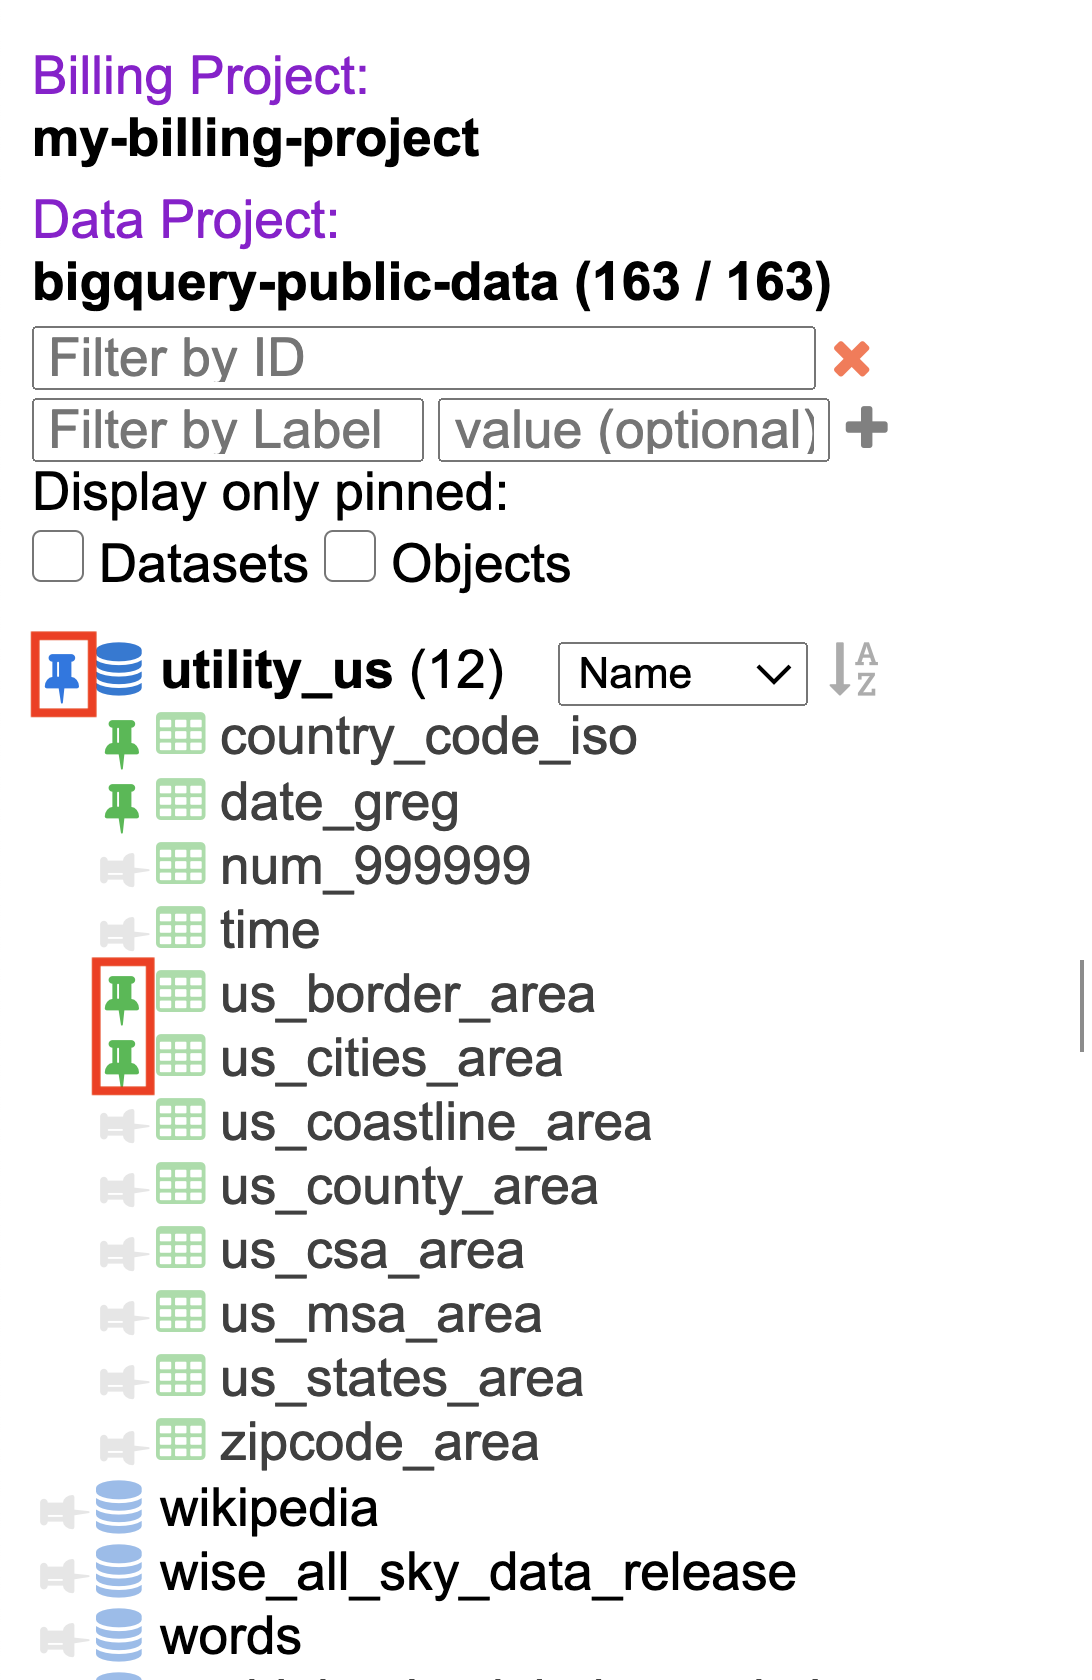
Pin/Unpin Datasets and Objects
Datasets and Objects can be pinned or unpinned by clicking the Pin icon to the left of items in the Navigator. A colored rotated pin icon is shown to the left of pinned items.
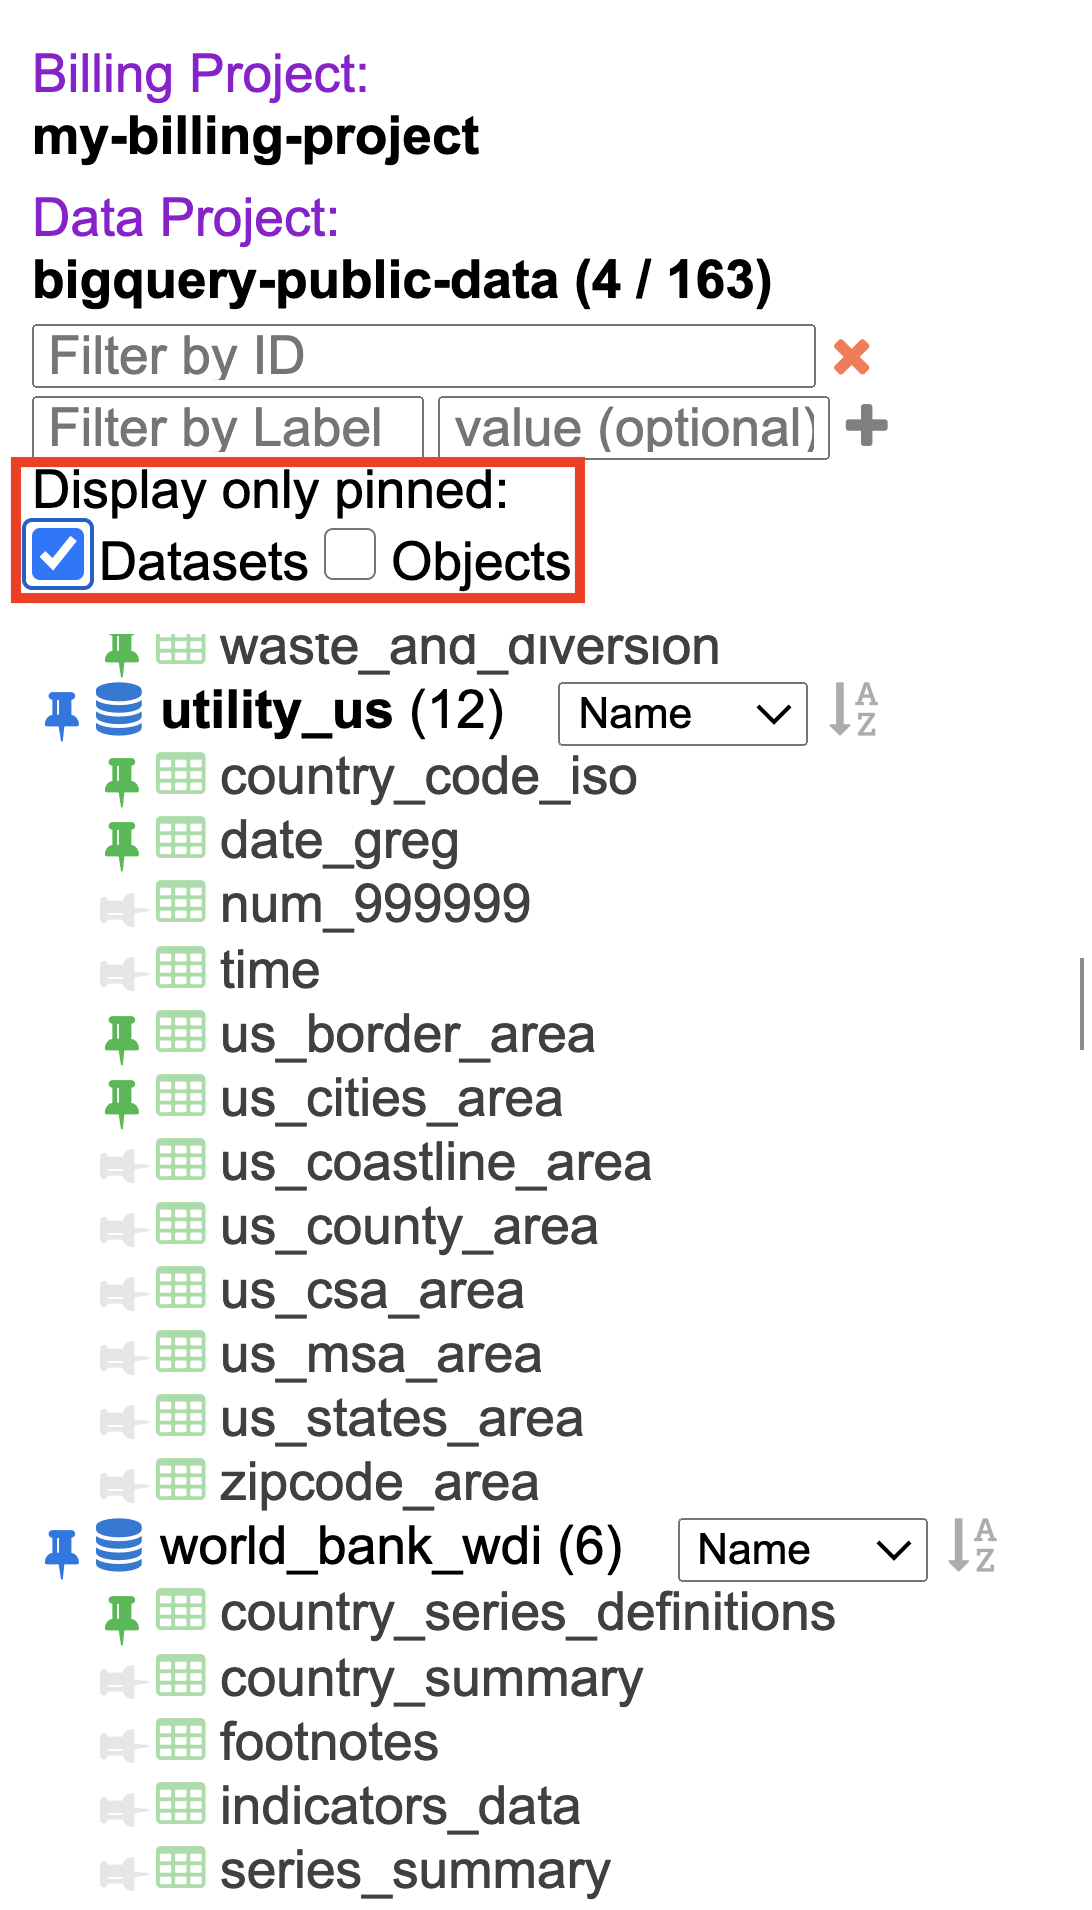
Checking the box labeled, “Display only pinned: Datasets” above the Datasets in the Navigator hides all Datasets which are not pinned.
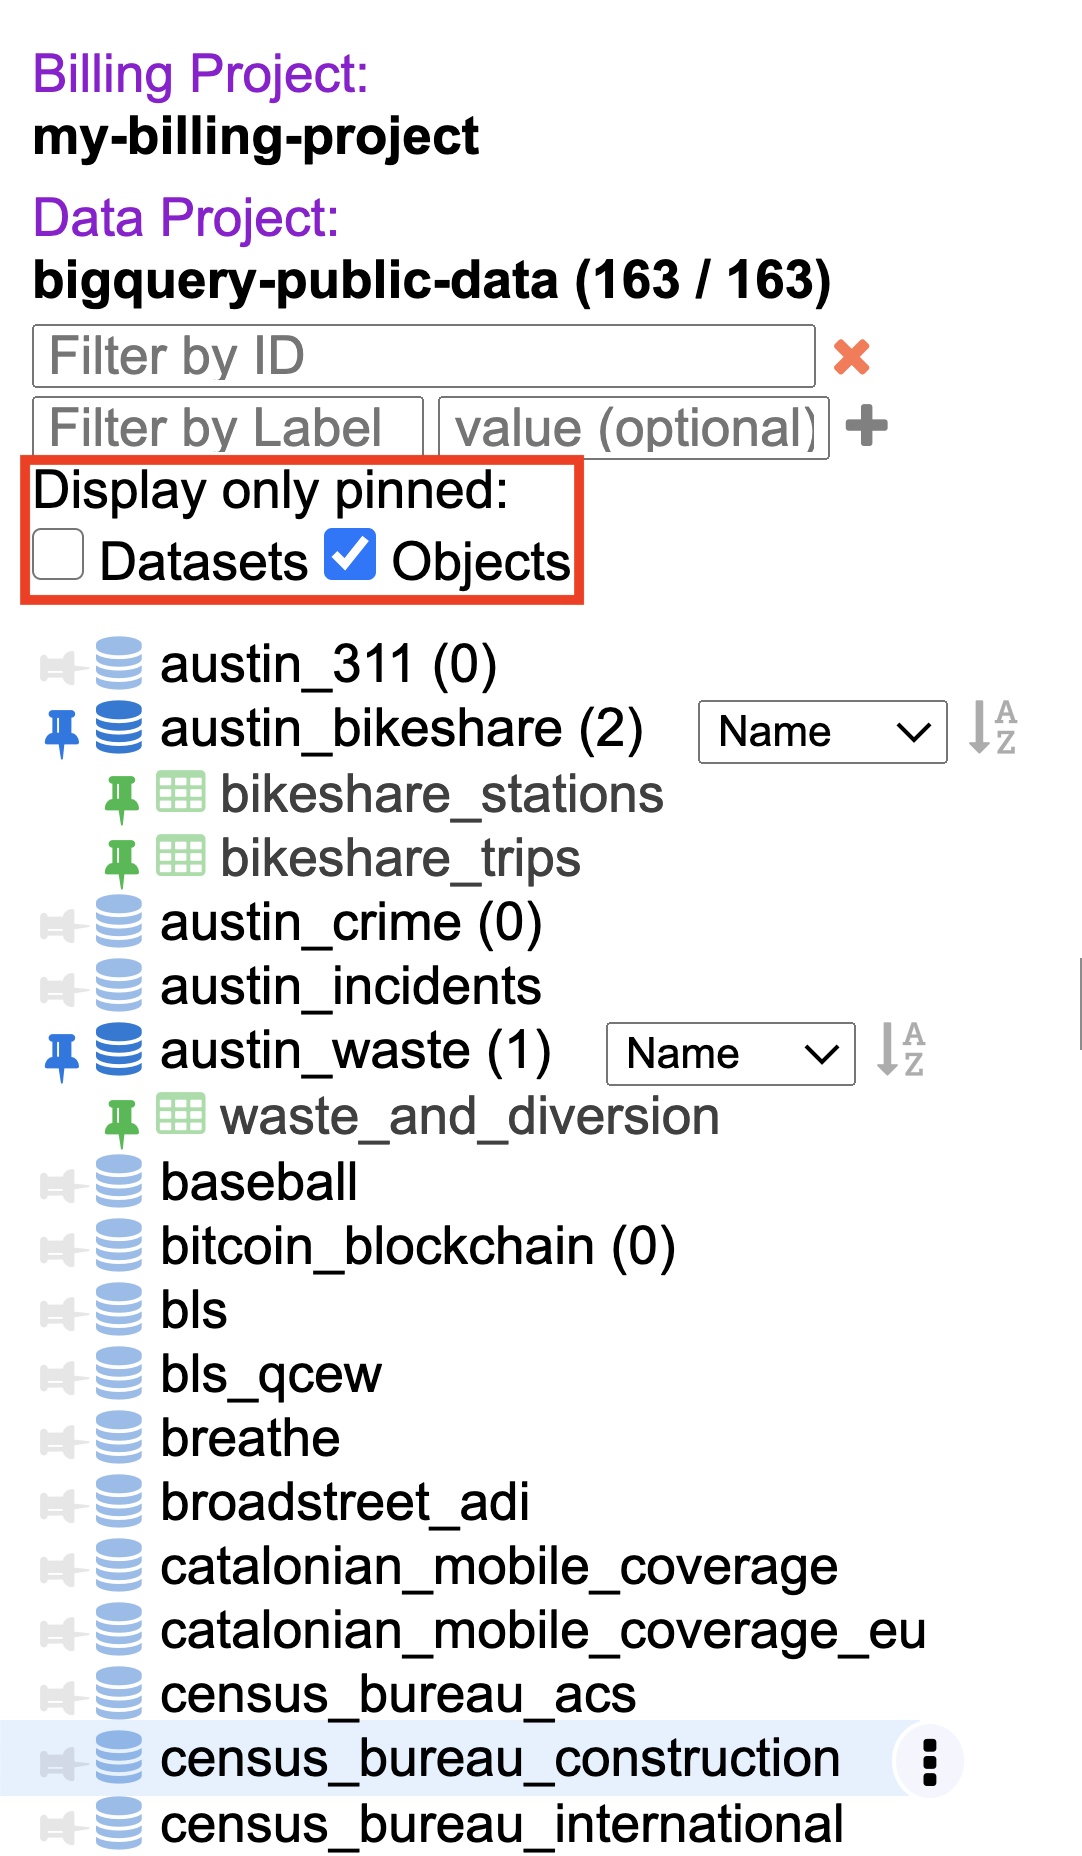
Checking the box labeled, “Display only pinned: Objects” above the Datasets in the Navigator hides all Objects which are not pinned.
Checking the boxes labeled, “Display only pinned: Datasets/Objects” above the Datasets in the Navigator hides all Datasets and Objects which are not pinned.
Saving Pins
Pinned items are automatically saved across page loads.
Pinned items can also be saved to or backed up from a file by clicking “Save / Load Settings” in the settings menu.