This article provides users with a general guide to the features listed.
These features may have been updated or superseded by additions found in the release notes.
Read the content below to become familiar with the feature and review the release notes to get the latest iteration.
Overview
Goliath features a playground that offers a wealth of query and result options
- Toolbar presents graphical icon options including selecting Editor modes, running or editing queries, and downloading results
- Query/Script Editor allows construction of queries through rich text, an abundance of query options, ability to save query as view, and presentation of status info
- UDF (User Defined Function) features are presented via the UDF editor with both inline and URI options
- Parameters enhance development of queries by allowing builtin and custom parameters to be added to the query
Below are detailed descriptions for each feature
Multiple Tabs
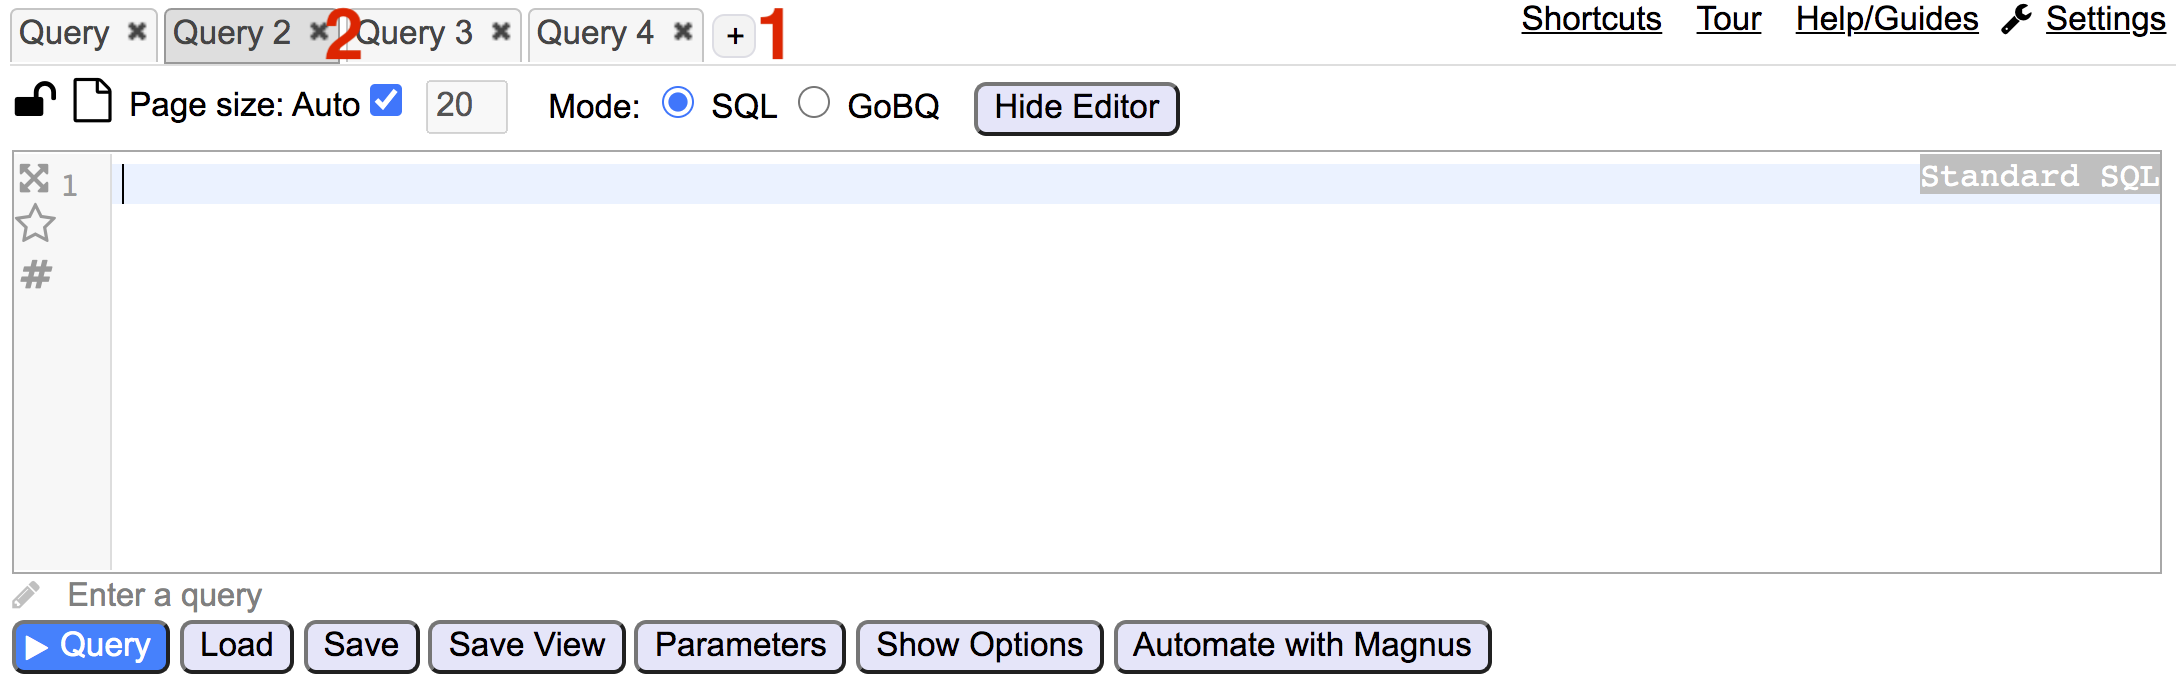
Within the Goliath workspace you can have multiple tabs.
Each tab’s workspace contains its own values for
- toolbar settings
- query text
- options
- query results
A tab’s workspace does not include parameters, job history, project browser, and dataset browser. These sections are the same and shared across multiple tabs.
Tabs can be
- Added by clicking on the + icon. There is currently a limit of 20 active tabs.
- Removed by clicking on the tab’s x icon
- Re-positioned by clicking the tab and dragging to new position
- Renamed by clicking on tab and adding text

Toolbars
Query Toolbar

The following icons are available:
| Icon | Action | Description |
|
|
Legacy SQL / Standard SQL |
Query will run in either Legacy SQL mode or Standard SQL. Click to change. See also Auto-detection |
 |
New Query |
Clears text area and resets options |


Paging Control

Page size is available in Standard, Enhanced, and Preview modes. Page size limits the number of result rows displayed.
Auto-Size
A check indicates Auto and that the number of rows is automatically determined by the available browser space
Page size
Unchecking allows the number of rows to be specified
Mode

The query can be run in different modes
| Mode | Description |
SQL |
runs BigQuery query |
GoBQ |
runs Golang script |
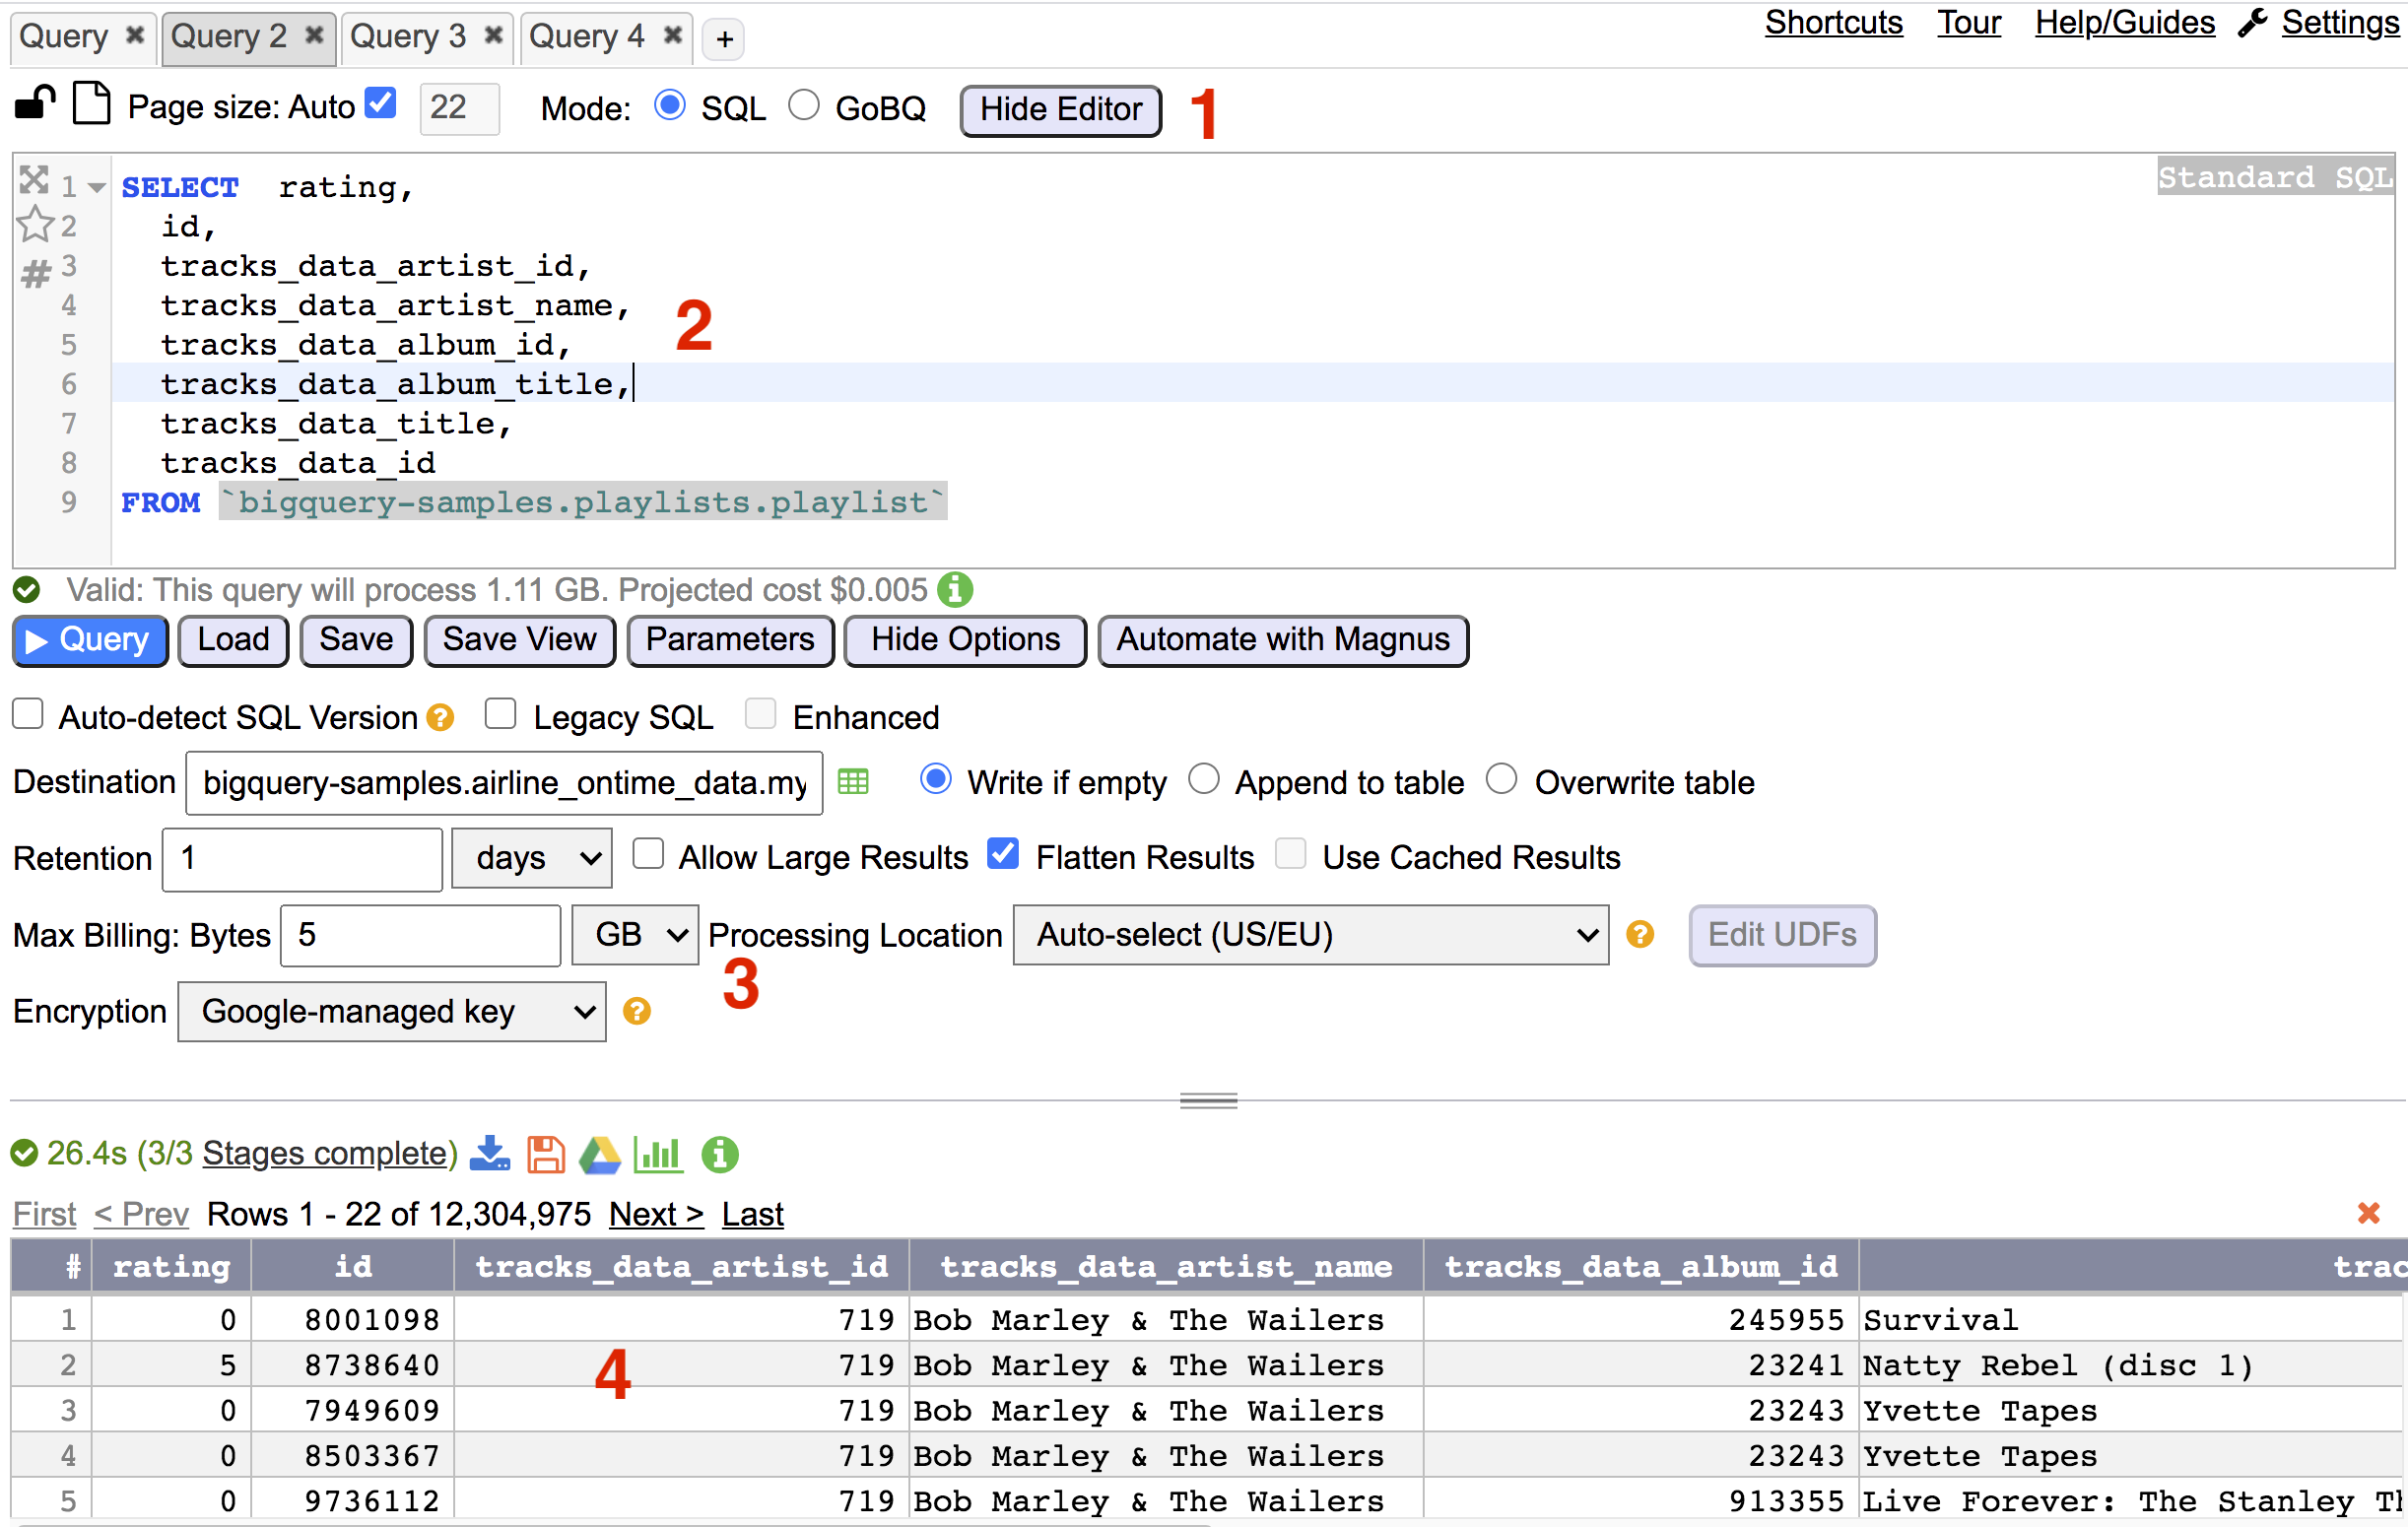
Show/Hide Editor
Clicking to Hide Editor will hide the query text area and options.
Clicking to Show Editor will show the query text area and options.


Query Results Toolbar

After a query is run the following icons are available:
![]() 2.8s is the time it took to run the query. This query timer is not displayed for cached query results. 2/2 indicates the current stage the query is on and the total number of stages for the query. Click on Stages complete link to view Query Execution Details.
2.8s is the time it took to run the query. This query timer is not displayed for cached query results. 2/2 indicates the current stage the query is on and the total number of stages for the query. Click on Stages complete link to view Query Execution Details.
| Icon | Action | Description |
 |
Open Geo Visualization |
Opens the Geo Visualization for the query results. This option is only available if the query results contain geography data types. |
|
|
Download Result |
Download results to local file |
|
|
Save as Table |
Saves results to table |
|
|
Save to Google Drive |
Saves results to Google Drive. |
|
|
Pivot/Chart Result |
Opens Visualization Panel |
|
|
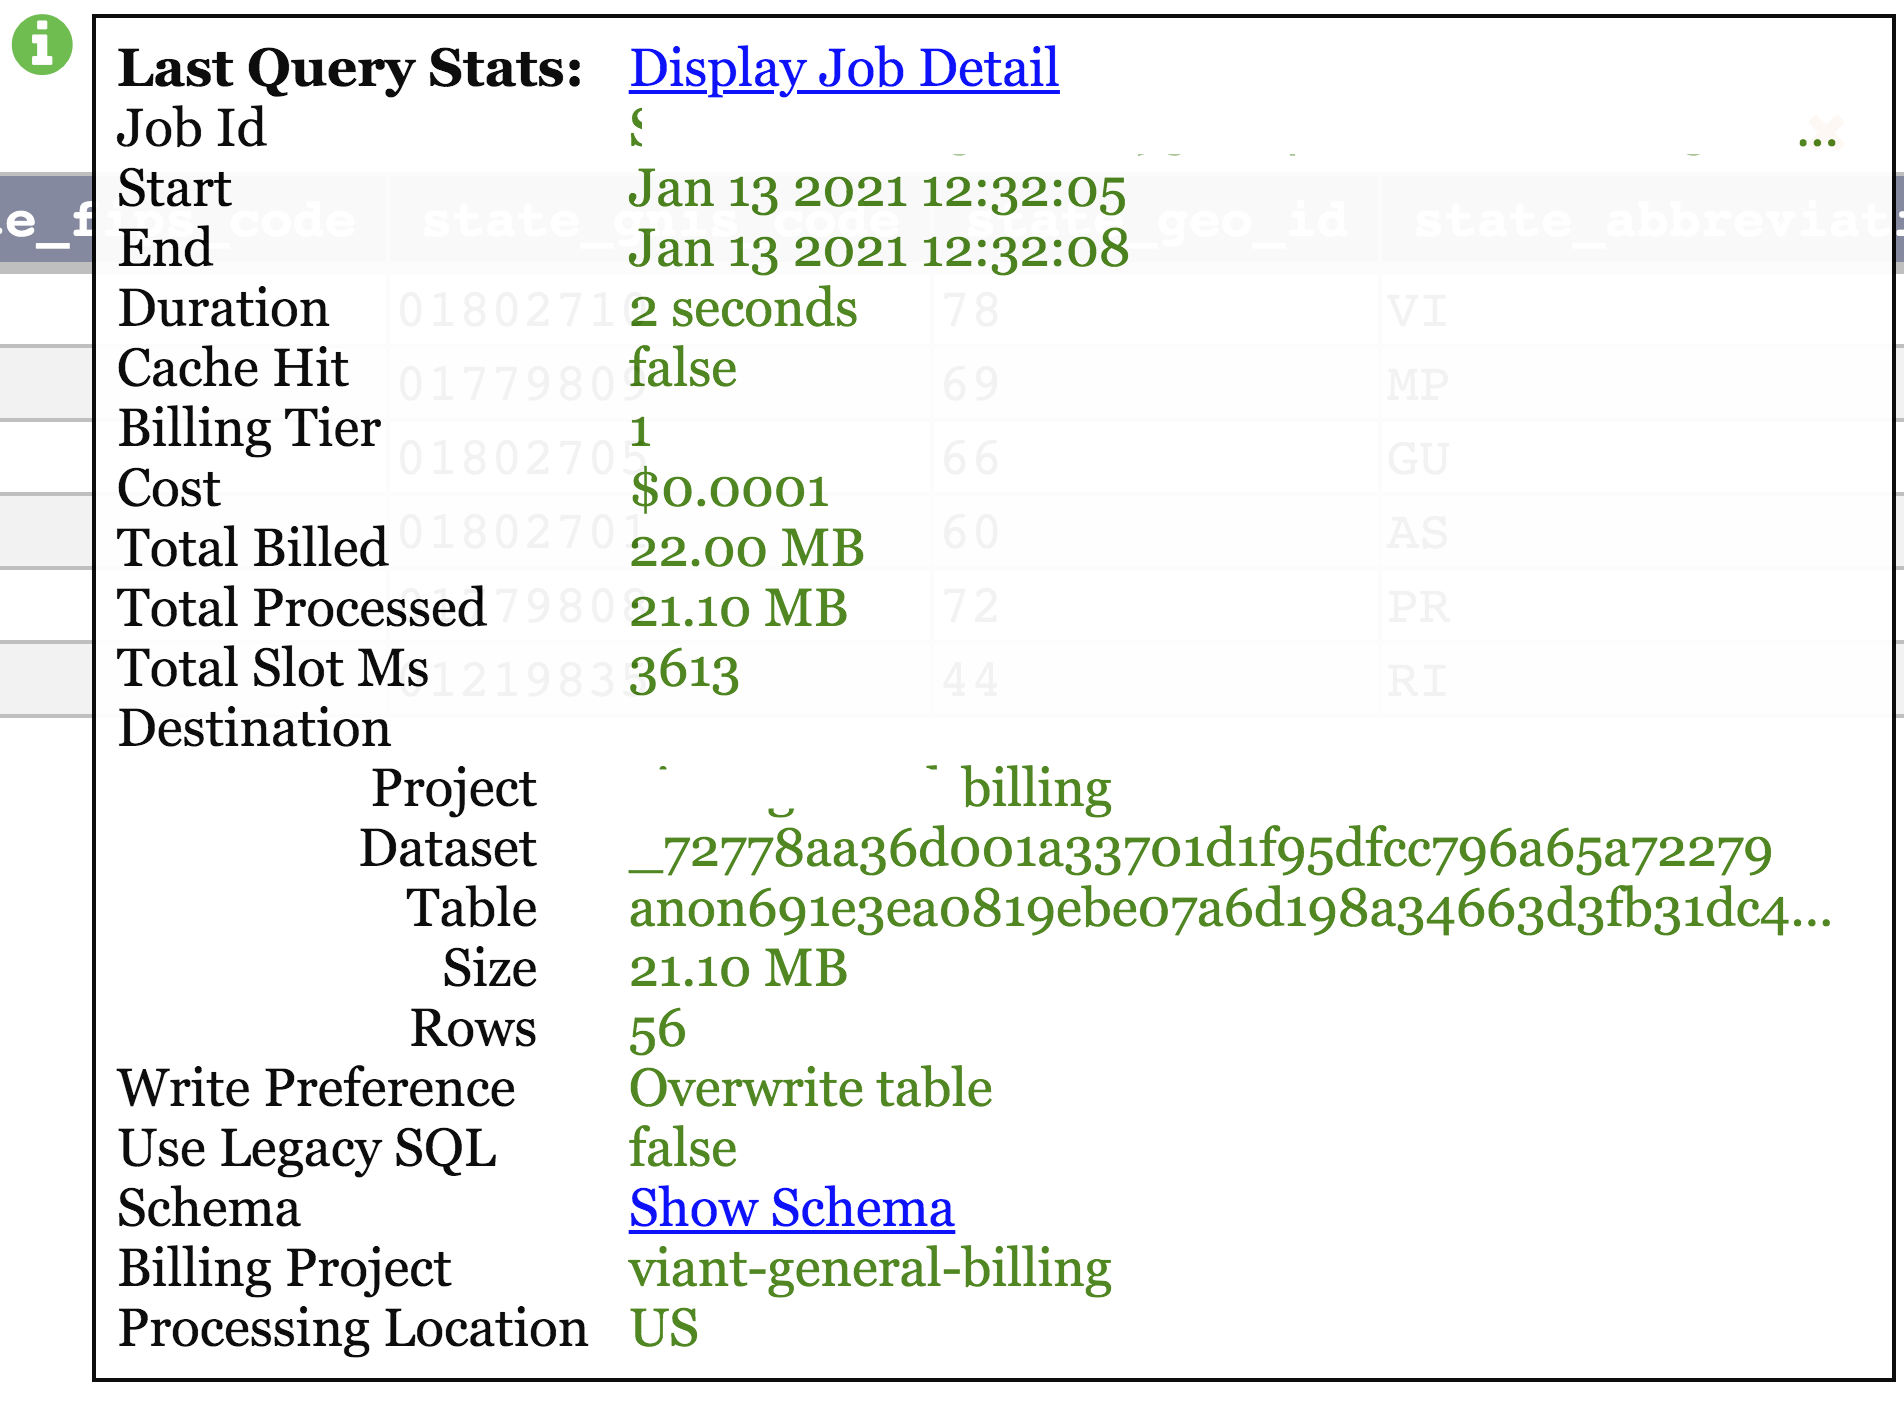
Last Query Stats |
Displays job details from previously run query
|


Information and User Settings
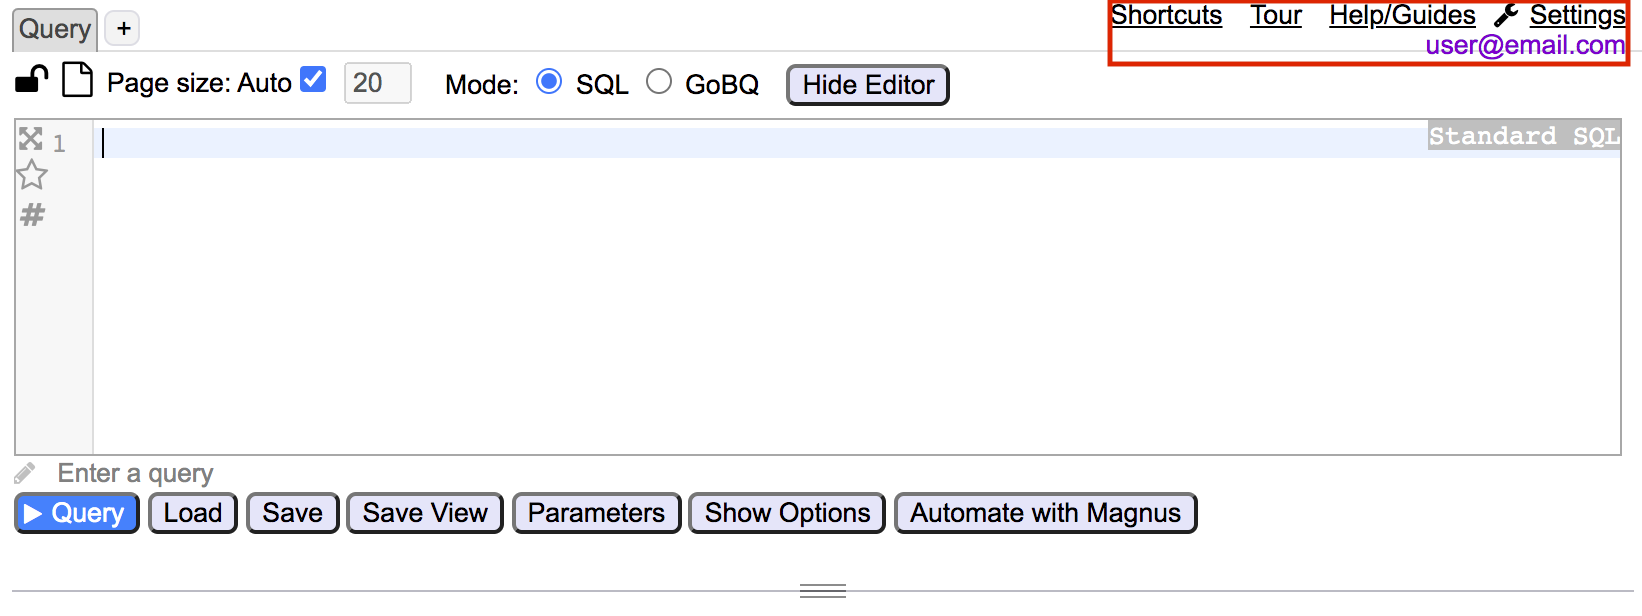
Help links and the name of the logged in user is displayed in the upper right section of the window
Tour opens a browser tab that walks the user through a tour of Goliath features
Help/Guides offers links to documentation on core features
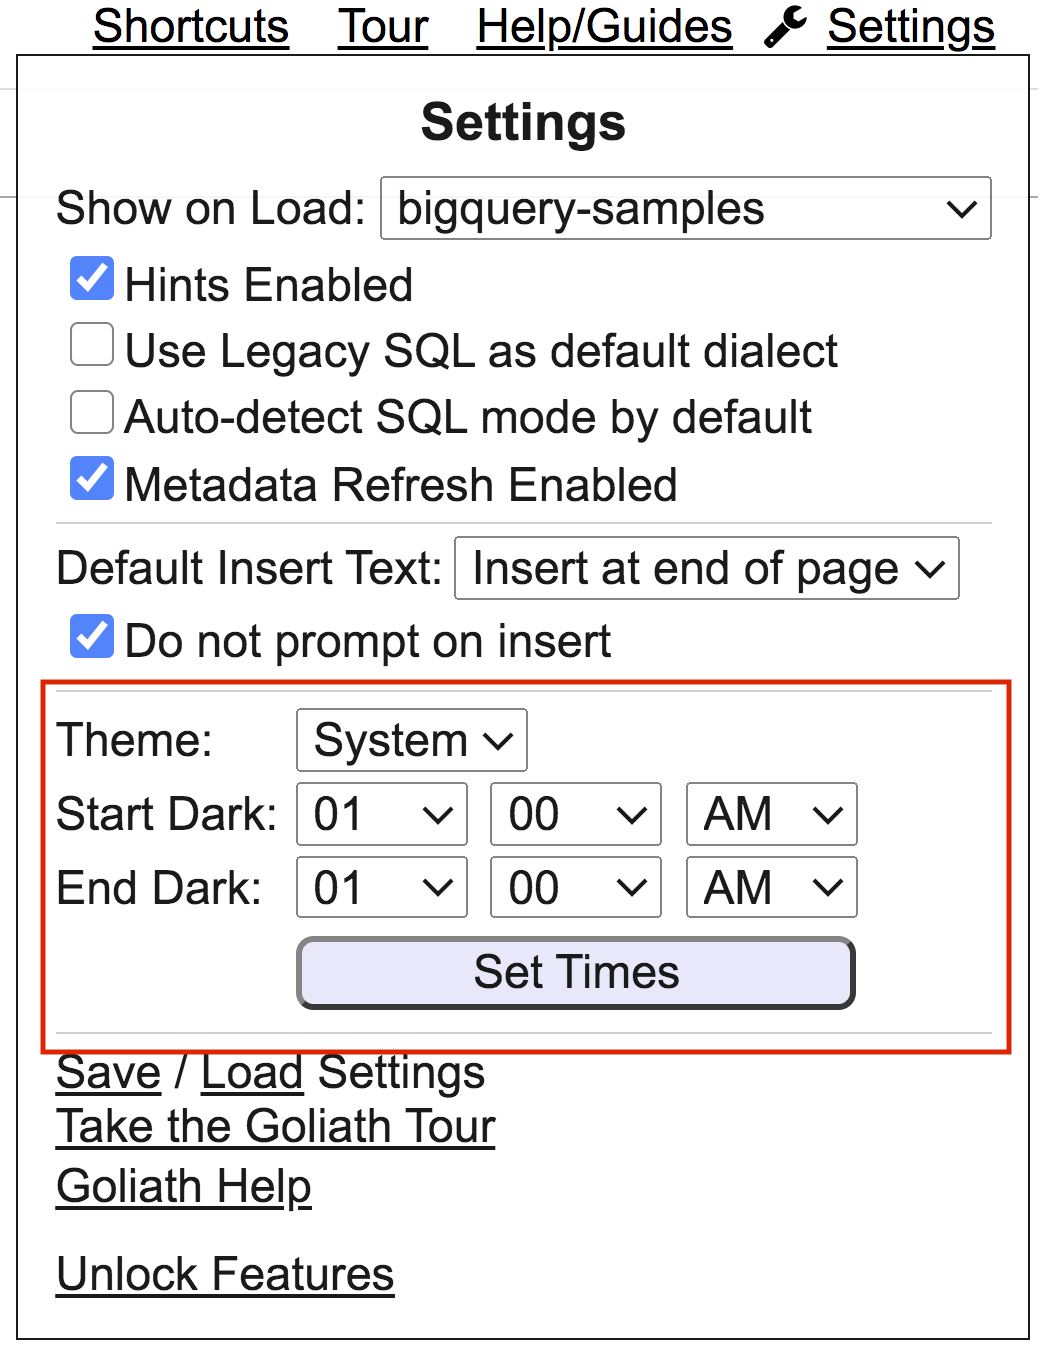
Settings provides a popup with setting options

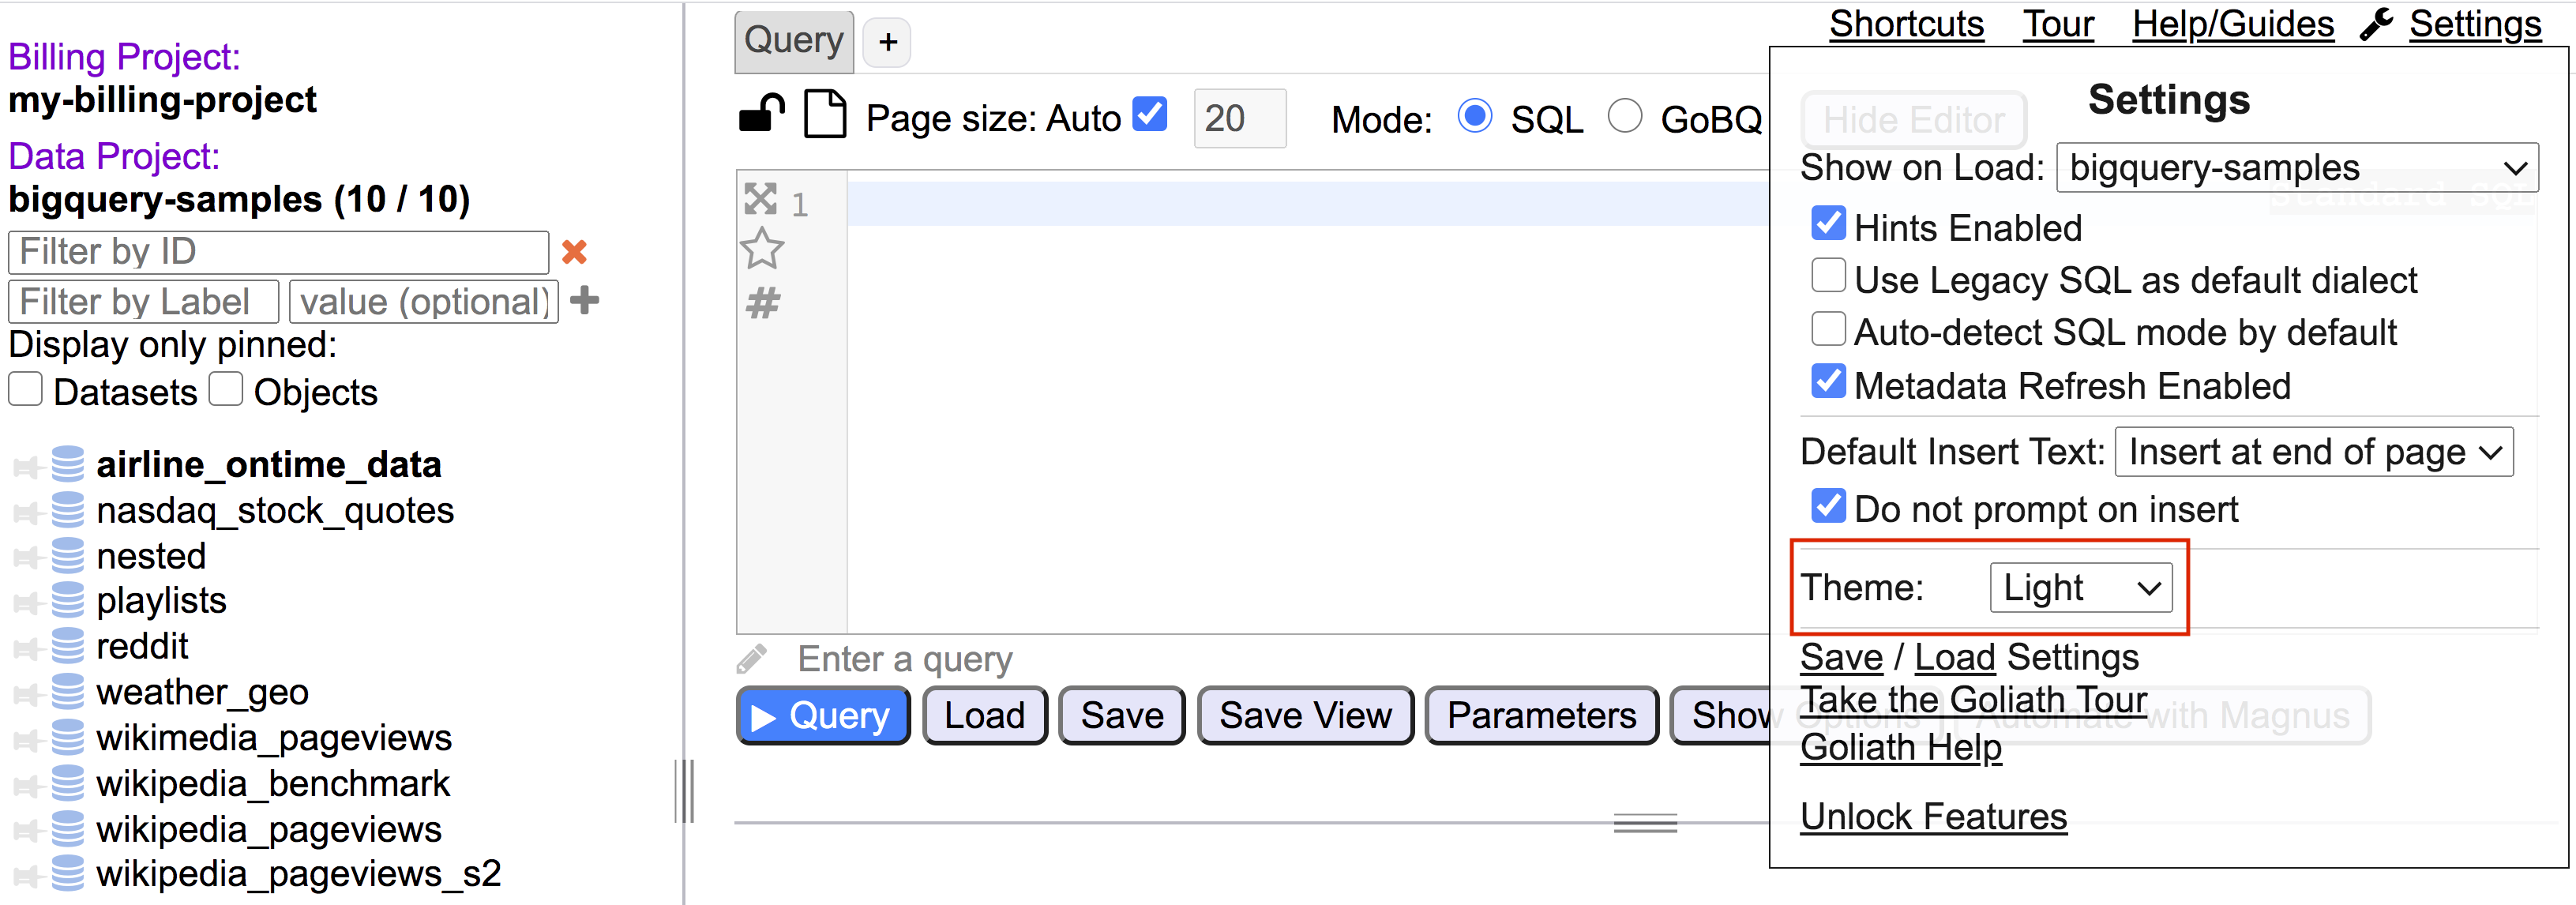
- Show on Load: Is the project that is loaded in the navigator when Goliath is loaded. To change the project that shows on load select from the drop down menu.
- Enable Hints display various hints while using the Goliath
- Use legacy SQL as default defaults the SQL version to legacy when Goliath is loaded
- Auto-detect SQL mode by default sets the default to auto-detect when Goliath is loaded
- Metadata Refresh Enable frequently refreshes BigQuery project, dataset, and table metadata used for listing items in navigator. Un-checking this item does not automatically refresh the metadata.
- Default Insert Text is the option used for inserting text into the query area from the context menu. For example, Insert Query into text area will be inserted by this selection. Options include overwrite, insert at cursor, insert at end of page, and insert in new tab. Checking Do not prompt on insert will not open a modal when invoking an insertion. Unchecking will open a modal with the default option selected.
- Theme determines the color schema. Options include Light, Dark, and System. If System is selected a choice of time is available on when to switch between Light and Dark themes. For additional details see Dark Theme below.
- Save / Load Settings saves and loads user settings to/from a local file. Custom projects, custom buckets, Show on Load, Hints Enabled, User Legacy SQL as default dialect, and Auto-detect SQL mode by default are selections that are saved and loaded. To save settings click on Save, enter file name, and click save to save file locally. To load settings click on Load, navigate to the file, select the file, and click load.
- Take the Goliath Tour opens a browser tab that walks the user through a tour of Goliath features
- Goliath Help brings the user to this awesome Wiki resource documenting all Goliath features
- Unlock Features opens Manage Locked / Unlocked Features which displays a list of features, what scopes are needed for each, what permissions have been granted, and the ability to grant permissions
Dark Theme
In addition to the default Light Theme for Goliath there is Dark Theme and System Time Theme.
Theme settings are accessible through the settings menu.
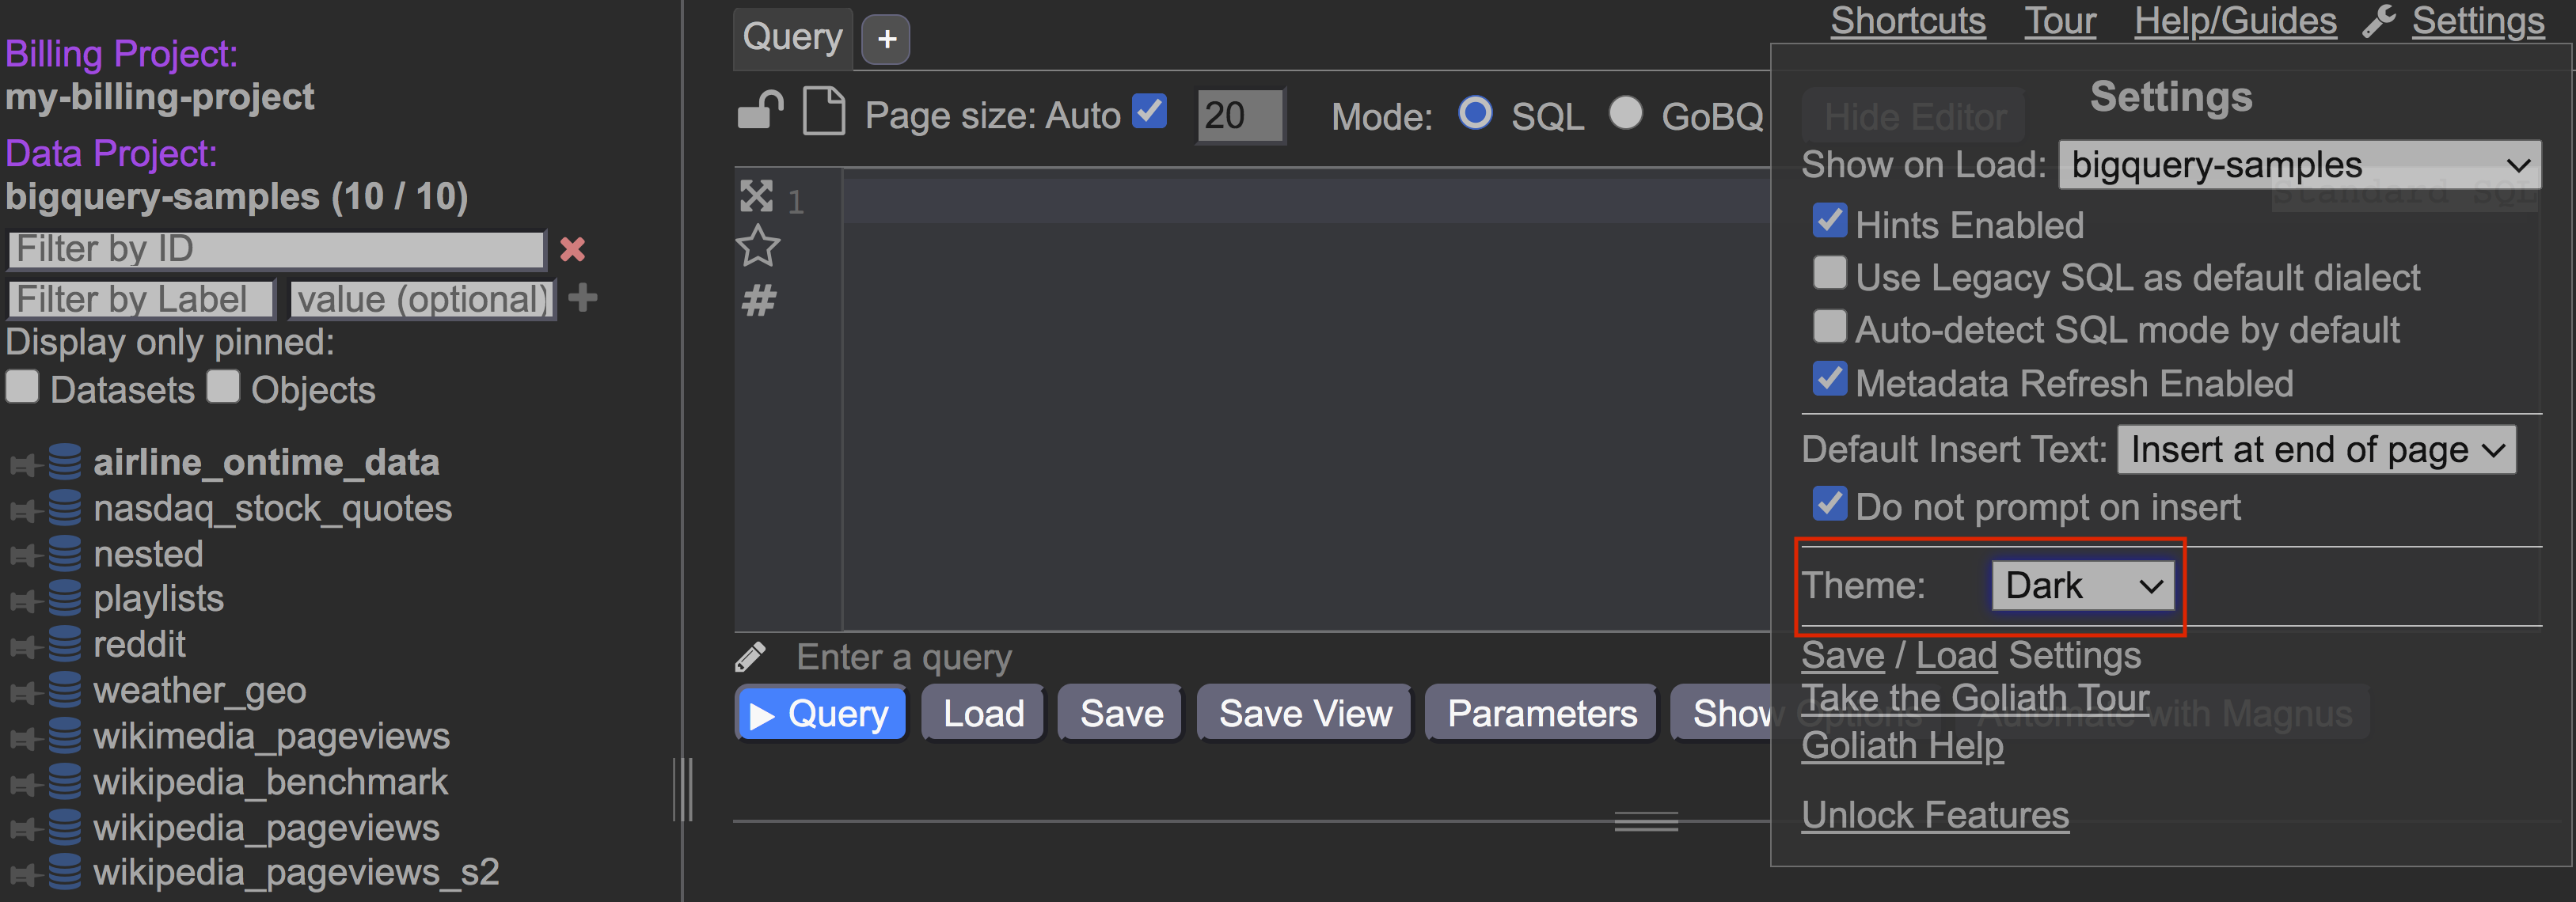
Selecting “System Time” from the theme selector brings up additional fields labeled “Start Dark” and “End Dark”. These fields are for setting the start time for Dark Theme and end time when Goliath returns to Light Theme on a daily basis.
Query / Script Editor
Features
Languages Support
- BigQuery Legacy and Standard SQL dialects
- JavaScript (UDF)
- Go (GoBQ)
IntelliSense
The Editor provides IntelliSense that includes formatting, highlighting, auto-completion for keywords and data objects, code folding. Options can be configured in Settings. See the IntelliSense article for details.
Action Bar (Buttons)
Available in SQL Mode
| Button | Action |
Run Query |
Also F5 works as a Run Query Executes query in text area along with options OR Executes query in focus along with options
For example ##bq ##bq See Multi Query section for details |
Cancel Query |
Appears in place of the Run Query button while a query is being executed. This button opens a confirmation dialogue to confirm the intention to cancel the query. If confirmed, currently running query will be cancelled. |
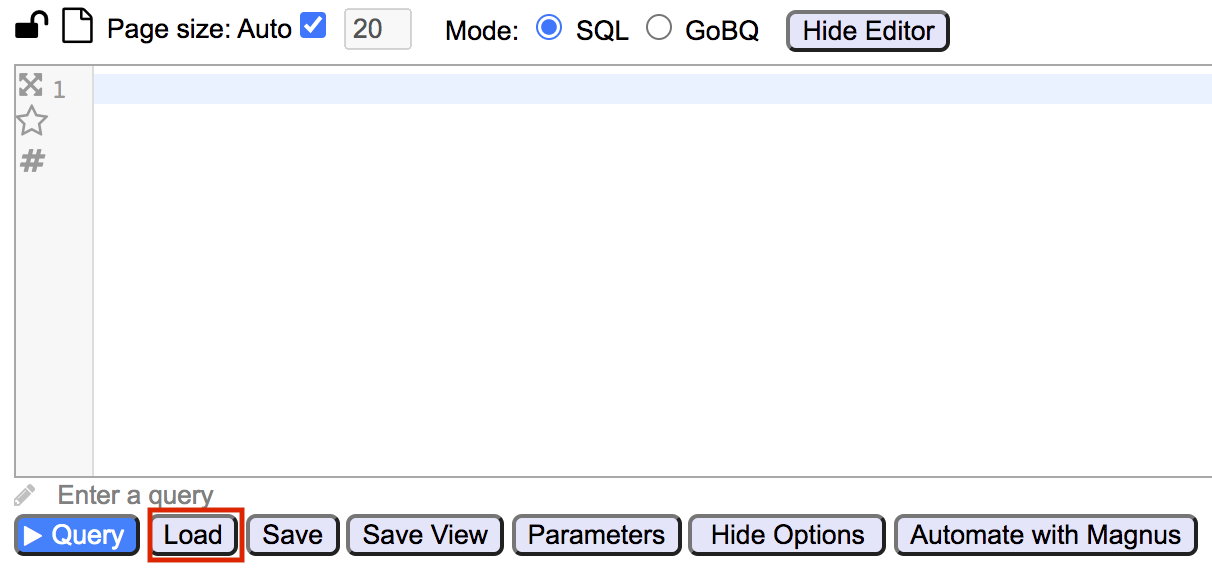
Load |
Loads query or workspace For query: inserts query text from chosen local file into query area For workspace: loads query, options, and parameters |
Save |
Saves query or workspace For query: text from query area is saved to local file For workspace: text from query, options, and parameters are saved to local file |
Save View |
Prompts for GBQ destination to save query as view |
Parameters |
Opens parameters window. Parses query/input fields for parameters and adds them to parameter list |
Show/Hide Options |
Expands/Closes query options |
Automate With Magnus |
Opens Magnus and exports query in Goliath to a Magnus Workflow BigQuery Task. |
Status Info |
Displays validation message and estimated query cost |
Available in GoBQ mode
| Button | Action |
| Run Script | Executes script in text area. or F5 |
| Load |
Loads script or workspace For script: inserts text from chosen local file into script area For workspace: loads script, options, and parameters |
| Save | Saves script or workspace
For script: text from script area is saved to local file For workspace: text from script, options, and parameters are saved to local file |
| Parameters | Opens parameters window. Parses script for parameters and adds them to parameter list |
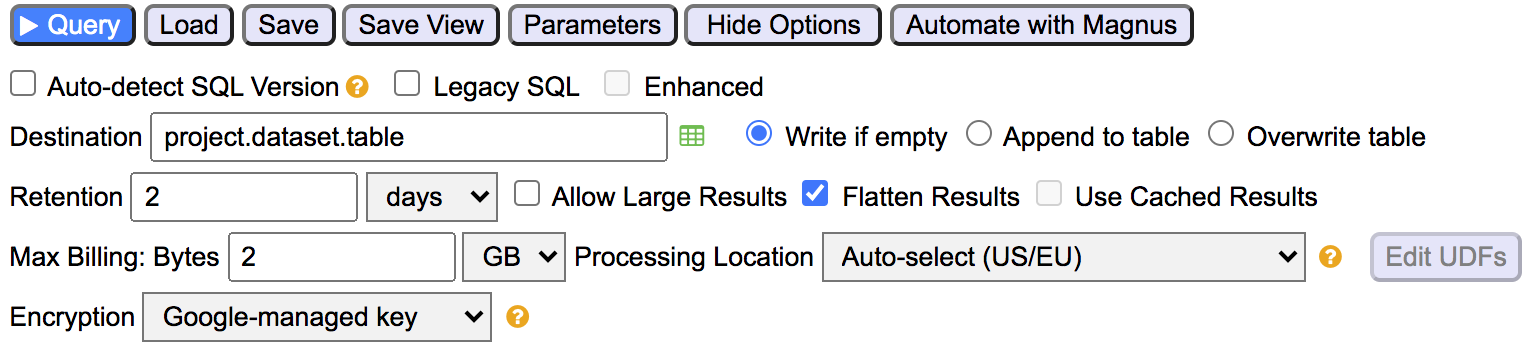
Options

When a destination table has been added in Options and the options section is hidden - text identifying that a destination table has been supplied is displayed under action bar

Regular Options (as in Native Web UI)
| Input | Description |
SQL Dialect |
When checked query is run as Legacy SQL. Unchecked query is run as Standard SQL |
Destination |
Enter name of project:database.table where results of query are saved to. Project is optional. Default(billing) project will be used then |
Write Disposition |
Write preferences (Write if empty/Append to table/Overwrite table) |
Max Billing Bytes |
Maximum number used to limit query resources used. A run exceeding provided value will cancel |
Processing Location |
Regional location where the query is processed. |
Edit UDF |
Opens Dialog to add UDF source |
Encryption |
Data is automatically encrypted using Google-managed key by default. To set encryption using a Google Cloud key, select Customer-managed key and provide the Cloud KMS key to use. |
Additional Options
| Input | Description |
Retention |
Number of days/hour before table expires |
SQL Dialect Auto-detect |
When checked text in query is automatically checked to determine SQL version. When unchecked switching between SQL versions is manual |
Enhanced |
When checked query results are not flattened. Only for Legacy SQL |
UDF
Concept: Inline vs URI
- Inline is added directly to query
- URI is an external reference
Editor
 |
Inline Code
|
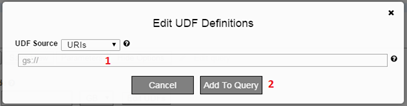 |
URI
|
Parameters
Concept of Parameters here in Goliath
Parameter Actions
|
|
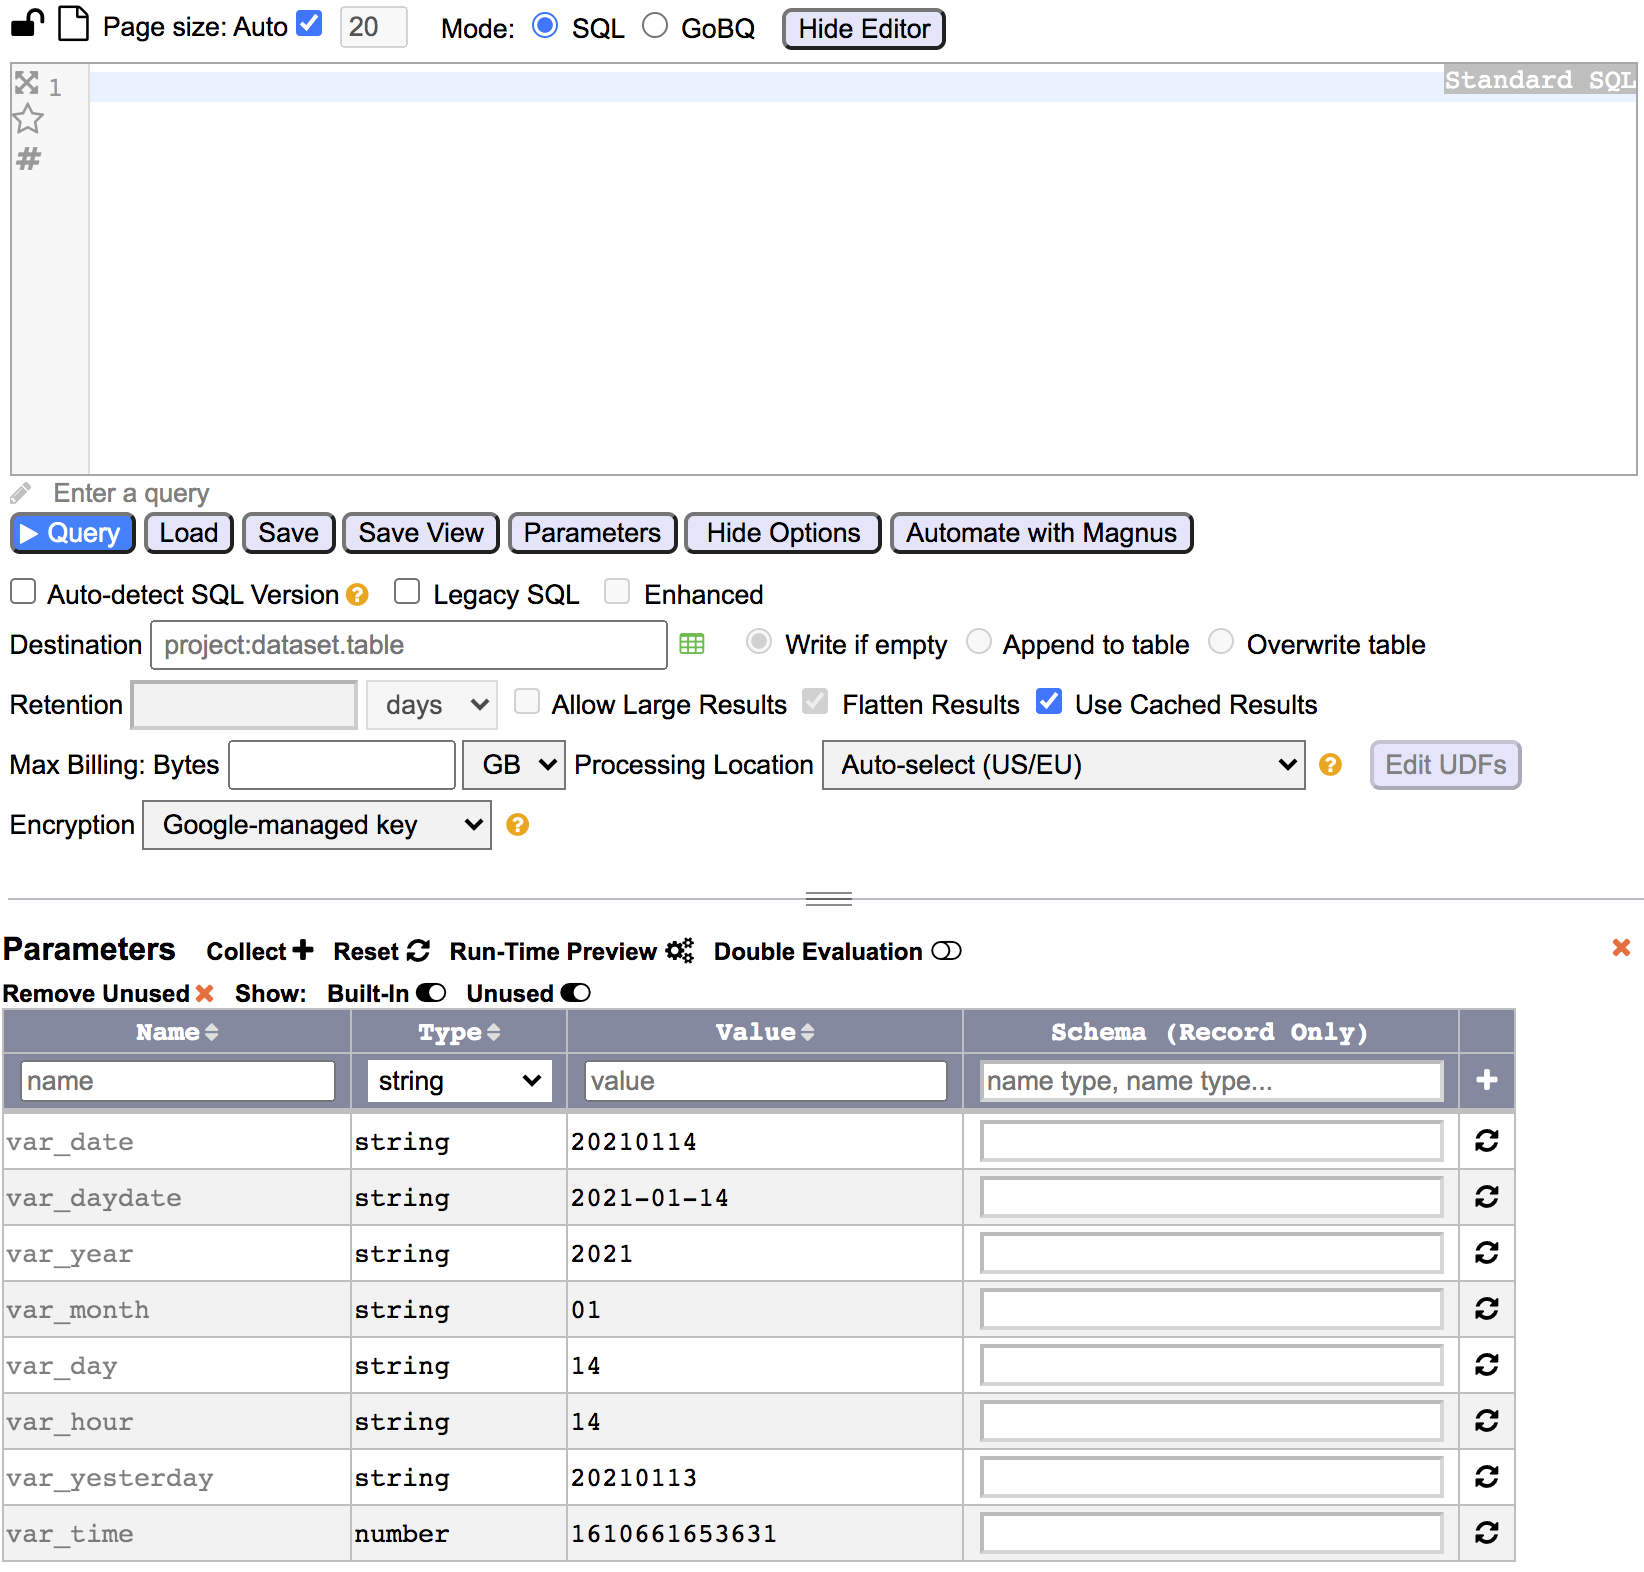
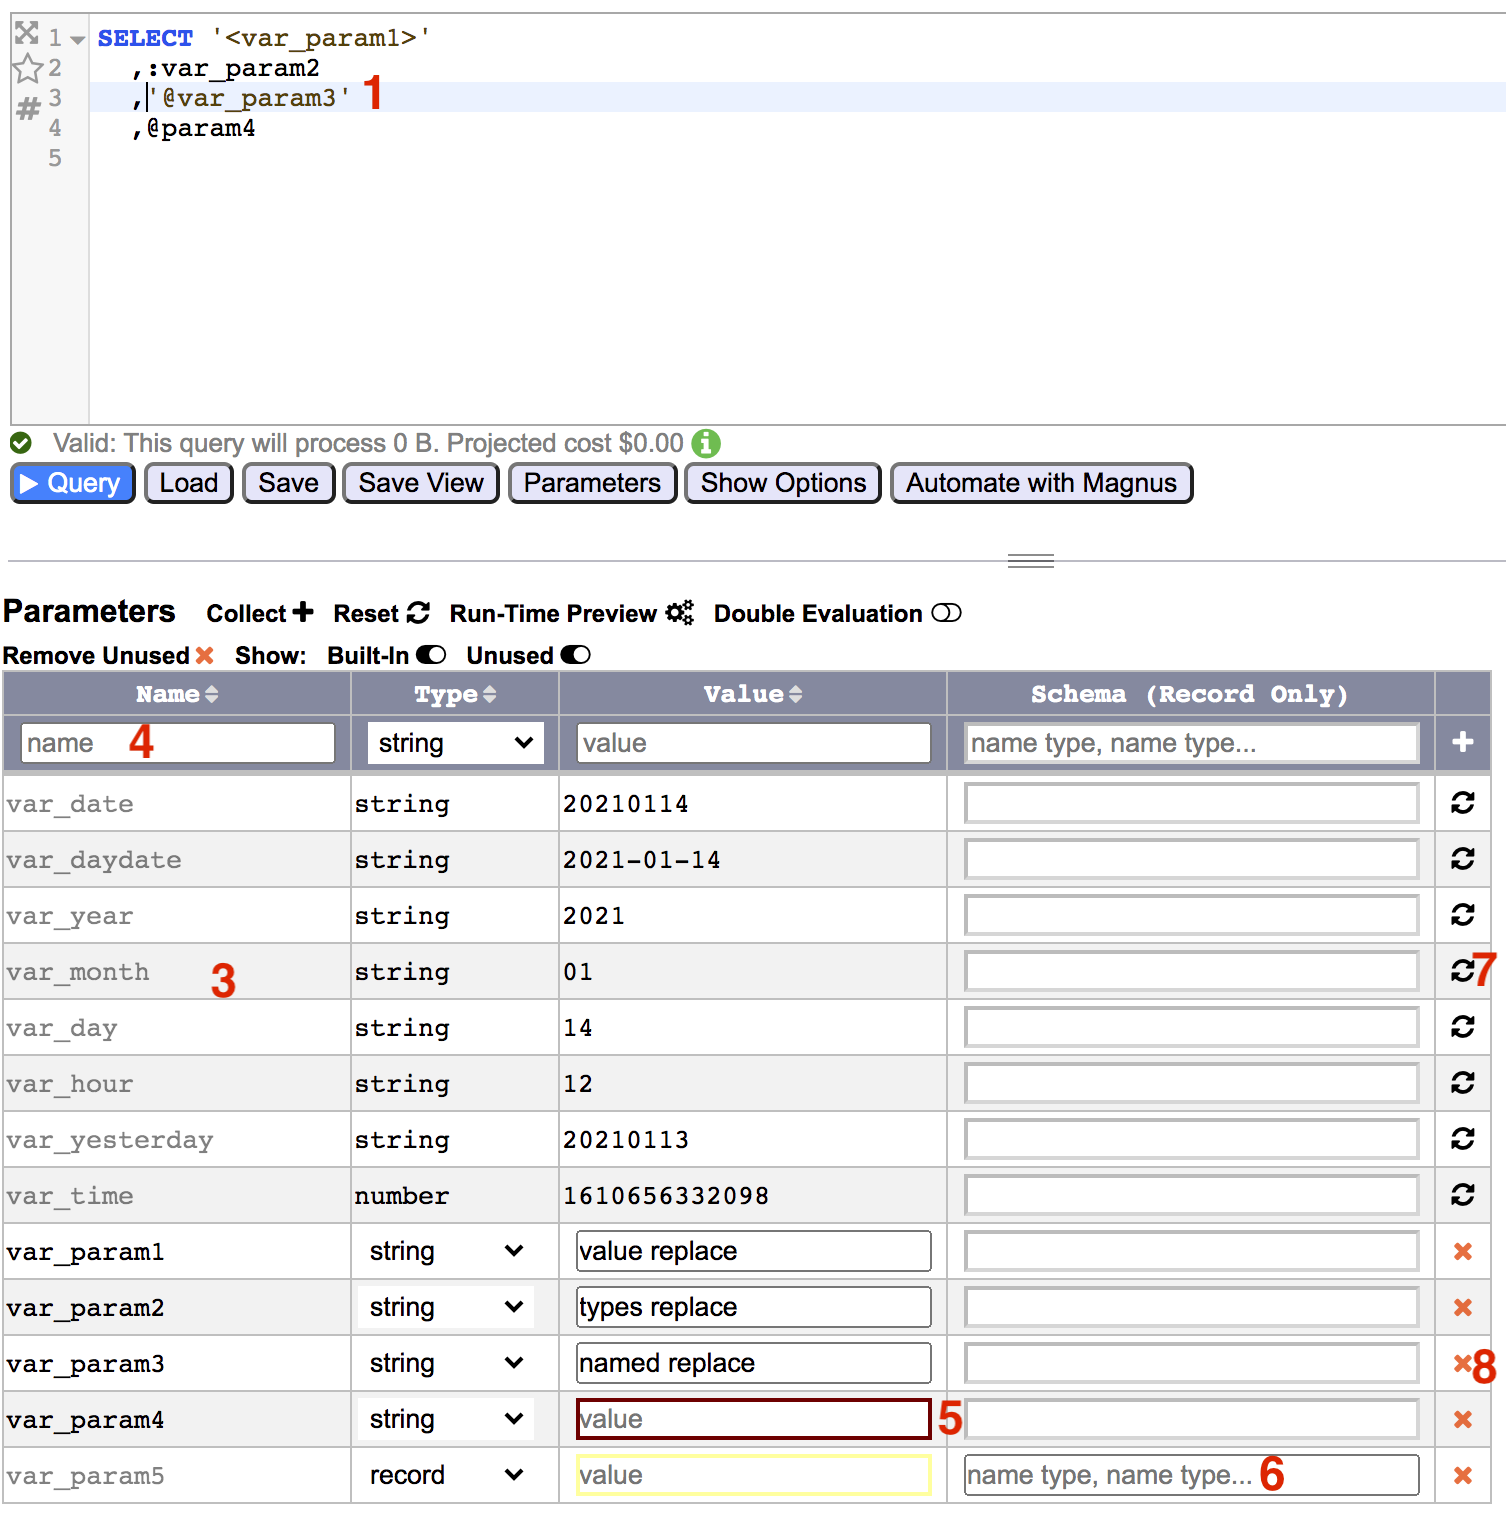
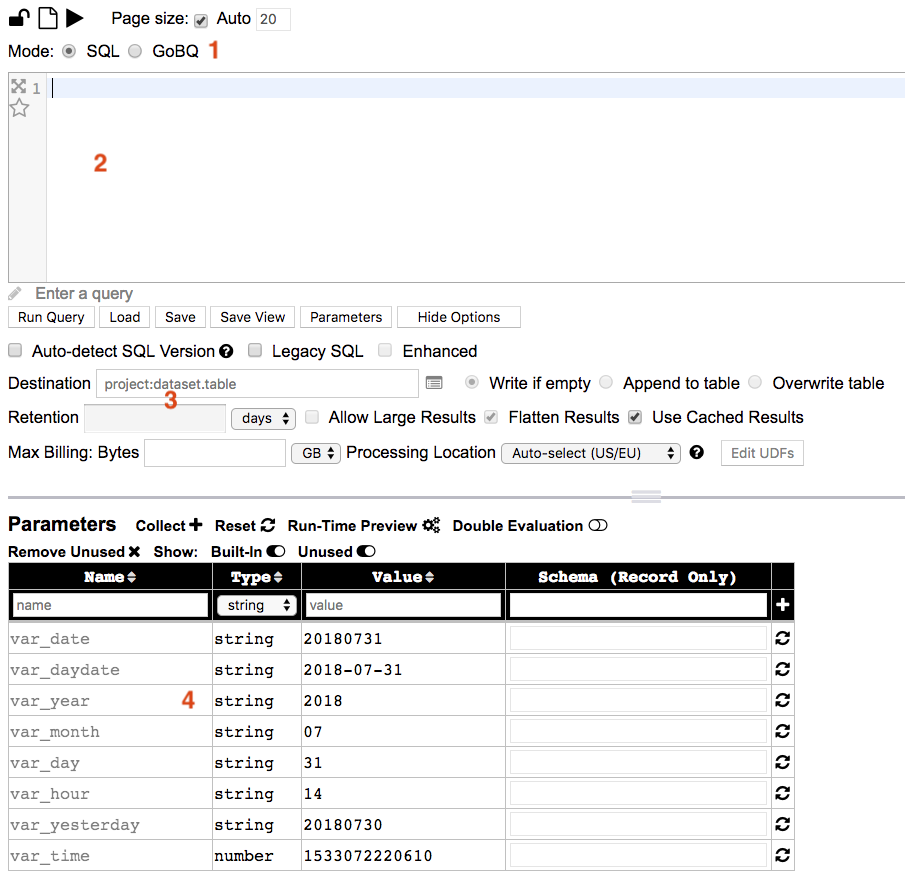
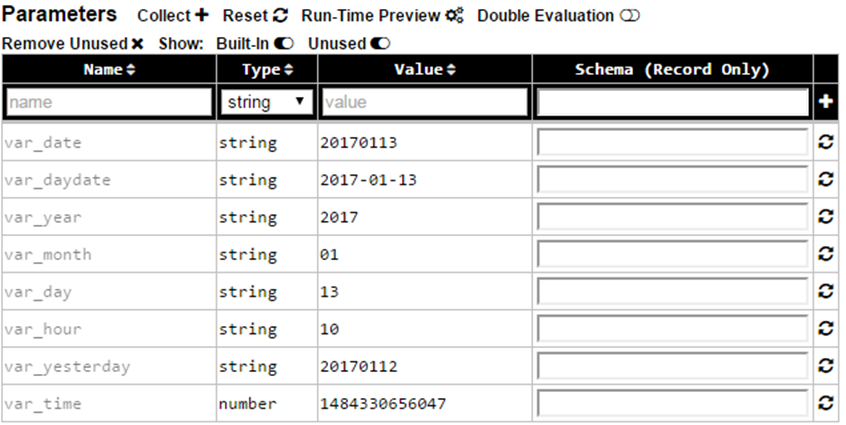
Parameters can be used in query text area, GoBQ text area, Inline UDF text area, and Options input boxes 1. Parameters are identified by <var_parametername>, :var_parametername, @var_parametername, or @parametername a. <> syntax - uses the value only - so parameter replaced with its value b. : syntax - uses both the value and data type - so parameter replaced with its typed value. (for example - for string type parameter is replaced with "value" c. @ syntax - uses both the value and data type - so parameter replaced with its typed value. (for example - for string type parameter is replaced with "value" 2. Click Parameters button to open Parameters window and add custom parameters defined in query/input boxes. If Parameters window is already open, this button will close the window. 3. A list of built-in parameters are displayed along with any custom parameters added when Parameters is clicked. Parameters not in use are greyed. Double-click on any parameter name to add it to the current editor. 4. Custom parameters can also be added by filling out name, type, and value from Parameters table and clicking + 5. Value fields that contain no value are bordered red when parameter is used and yellow when the parameter is not in use 6. Parameters with record type have accompanying schema input field 7. Click to refresh built-in parameter to reflect the current date/time. 8. Click to remove custom parameter |
Parameter Menu Options

| Menu Item | Action |
Collect |
Adds parameters not already included to list |
Reset |
Resets built-in parameter values to default and clears custom parameter values |
Run-Time Preview |
Opens modal and displays content with parameters substituted with values (see below) |
Double Evaluation |
Enables second round of parameter evaluation |
Remove Unused |
Removes all unused (greyed) custom parameters |
Show: Built-In |
When enabled built-in parameters are displayed When disabled built-in parameters are hidden |
Show: Unused |
When enabled parameters that are not in use are displayed When disabled parameters that are not in use are hidden |
Run-Time Preview
Working with parameters

Run-Time Preview will display workspace in PopUp with substituted values
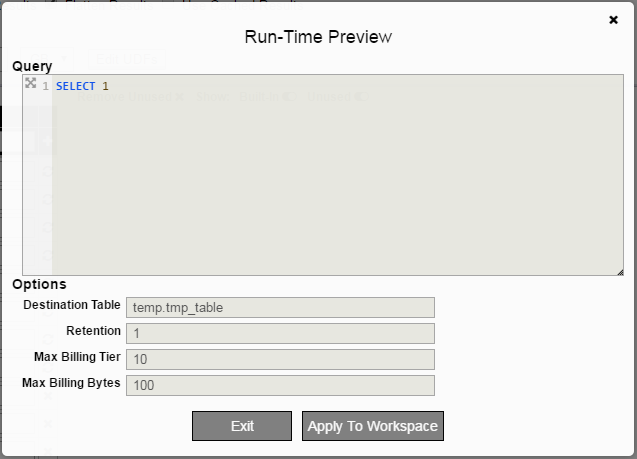
Click on Run-Time Preview to display substitution of parameters with their value
Click on Apply to Workspace to permanently substitute values to workspace. This action cannot be undone
Record Parameter
Record parameter consists two parts: Schema and Value. It is different from other parameter type in the sense that a record parameter can contain more than one field. For example, user can create a Record parameter named var_car that contains all attributes of a car. The attributes of the car can then be accessed by field name: <var_car[id]>, <var_car[brand]>, <var_car[color]>, <var_car[country]>, <var_car[year]>. They can also be accessed by index: <var_car[1]>, … <var_car[5]>. So instead of creating five separate parameters, the attributes of the car are encapsulated in one Record parameter.
To create
1. Enter name of the parameter.
2. Select record as its type.
3. Enter the value. If there is more than one field, separate the fields by comma. For example:
a. If a string field contains comma, wrap the string with quotes.
In this example, <var_car[3]> is the string "Red,Blue":
b. To escape double quote in a string field, use 2 double quotes:
In this example, <var_car[2]> is the string Ford "Falcon":
4. Enter the schema. It is expressed in the format of: name type [,name type …]
where type can be: string, number, or boolean.
For example:
a. The full schema from the example is:
id number,brand string,color string,country string,year number
b. Field type in the schema is optional. If it is not specified, all fields will be treated as string. For example, all fields will be treated as string for this schema:
id,brand,color,country,year
c. Schema is optional. If it is not specified, fields of the record parameter can be accessed by index (starts from 1): <var_car[1]>, <var_car[2]>, …, <var_car[5]>
To access
1. The field of a record parameter can be accessed:
a. By index (starts from 1):
This returns the first field of the record parameter:
<var_car[1]>, :var_car[1], @var_car[1], or @car[1]
b. By field name:
<var_car[brand], :var_car[brand], @var_car[brand], or @car[brand]
2. The index 0 returns the last field.
For example:
<var_car[0]> is equivalent to <var_car[5]> following the example where the record has 5 fields.
3. :var_car[#] returns the field count of the record parameter, which is 5 following the example.
4. If the subscript has no index or field name:
a. <var_car[]> is the string representation of the record parameter, for example:
10,Ford,Red,USA,2016
Workspace
Concept
|
|
Workspace includes Mode, Options, Query/Script Area, and Parameters
|
Save Workspace
|
|
Click on Save to bring up Save Workspace dialogue |
 |
|
|
|
Include Options
Entries, selections, and UDF in options will be saved when checking Include Options from Save Query/Workspace |
 |
Include Parameters
Parameter options, built in parameters, and custom parameters are saved along with their type and value when include parameters is checked in Save Query/Workspace |
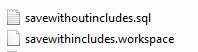 |
File is saved to default download folder
The file extension is
|

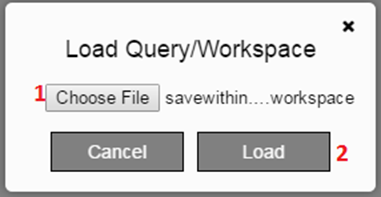
Load Workspace
|
|
Click on Load to bring up Load Workspace dialogue |
 |
|
|
Before load workspace
After load workspace (with Include Options and Include Parameters checked)
|
Loading Workspace will populate all saved areas and options into the Workspace area |