Overview
Scheduled daily in the morning, a sequence of tasks are executed to extract data from Google BigQuery, merge data points with metadata, calculate metrics, loop through attributes, save data to a table, export the data to an FTP server and Google Cloud Storage, email the process owner of process status, and distribute an HTML report via email to a distribution group. All of these actions are available and made possible because of Magnus Workflow.
Magnus Workflow manages Tasks, scheduling, and ownership of processes that primary bridge the gap between Google BigQuery data and ETL tools. Workflows can consist of any of the available Tasks in any combination to perform complex, scheduled, automated functions. Workflows are scheduled by specifying frequency and time period of run. Workflow control is in the hand of creators who own the process and are able to delegate and share with other users.
Workflows feature shortcuts, search/replace, and parameters to make process design easier. Shortcuts allow designers to quickly jump to tasks. Search and Replace features an easy way to update any text within a workflow. Parameters help generalize values so that they can be used in any task though out the Workflow.
Header
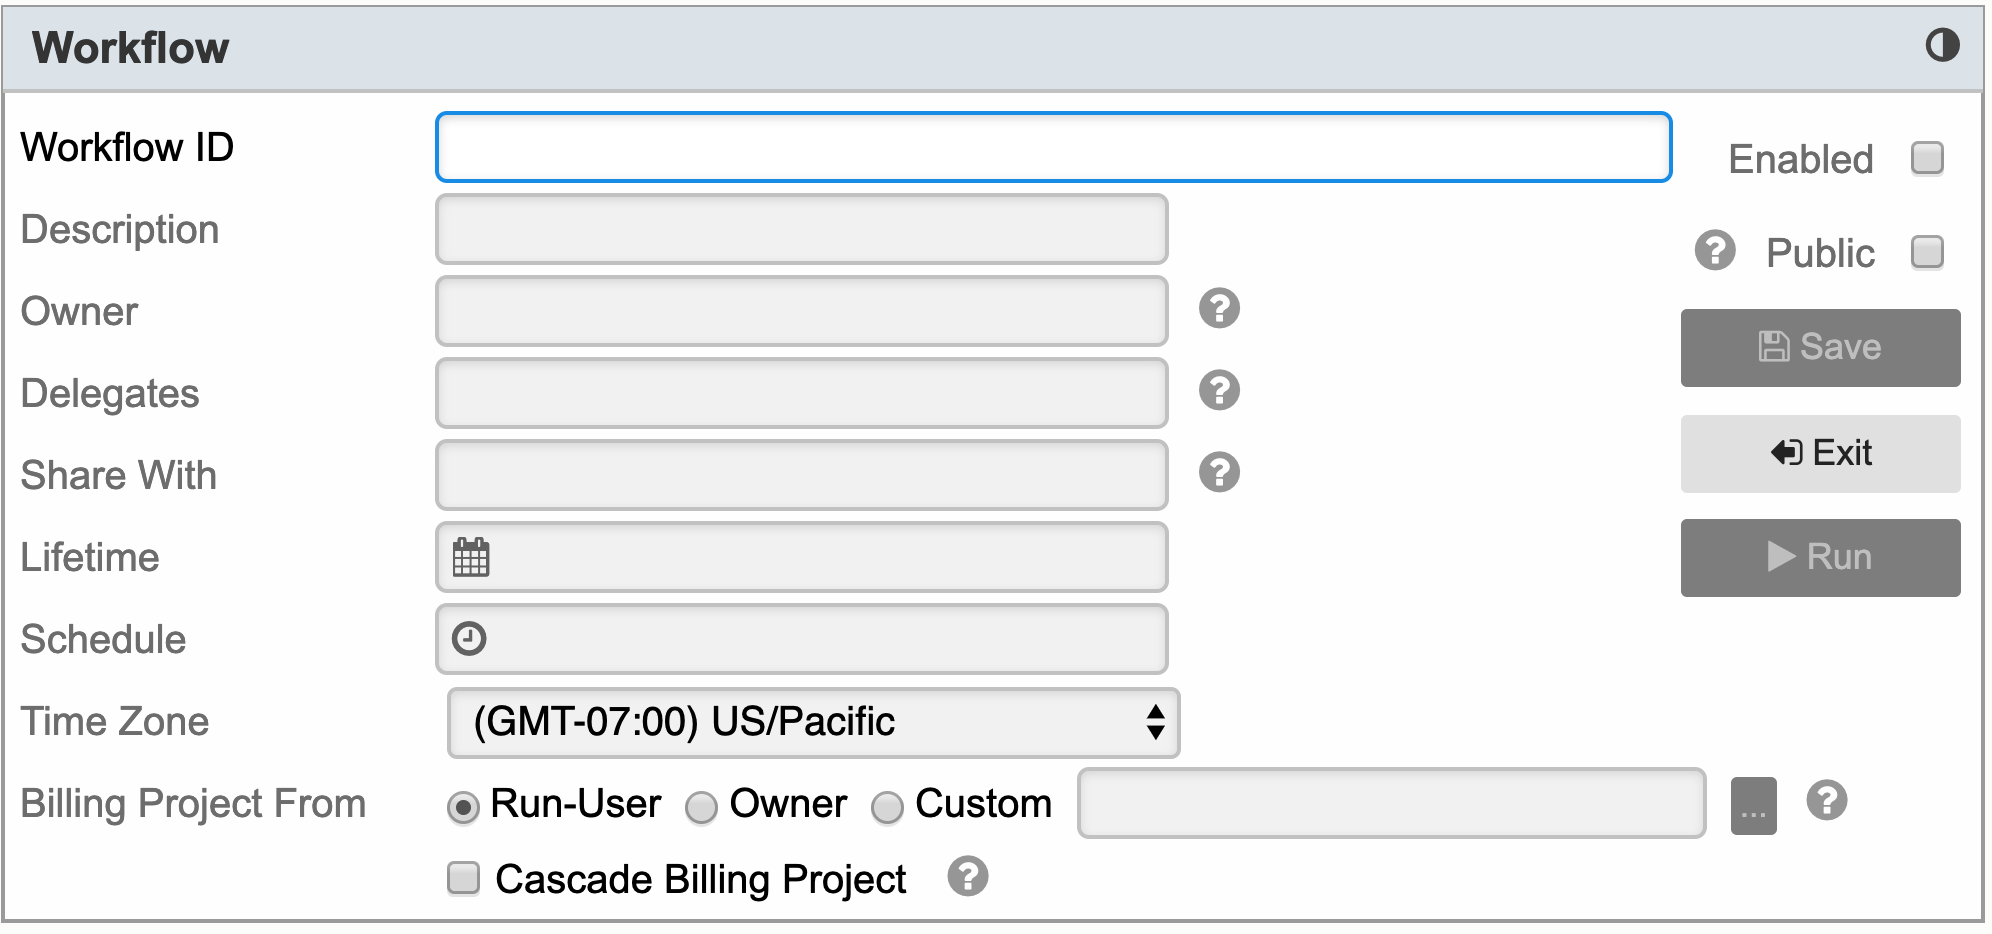
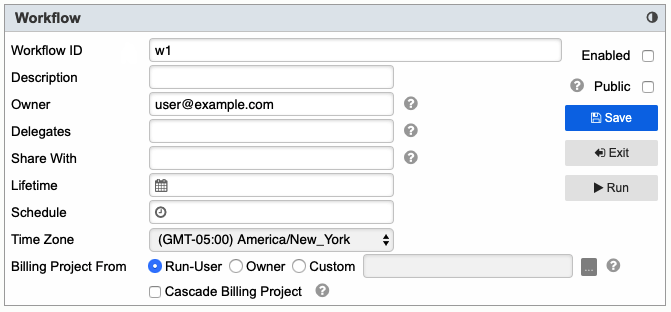
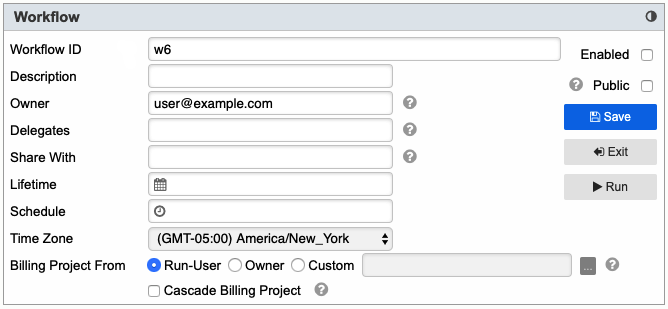
A workflow has the following properties:
| Workflow ID | Unique name of the workflow |
| Description | Used to describe purpose of workflow (optional) |
| Owner | Account under which workflow is run when scheduled Primarily the user who created workflow User account is case-sensitive! |
| Delegates | Users who can edit and run workflow Added by Owner or other Delegates Optional User accounts are case-sensitive |
| Shared With | Users who can run workflow via Execute Workflow Task Added by Owner or Delegates Optional User accounts are case-sensitive |
| Lifetime | Time period during which scheduled workflow is executed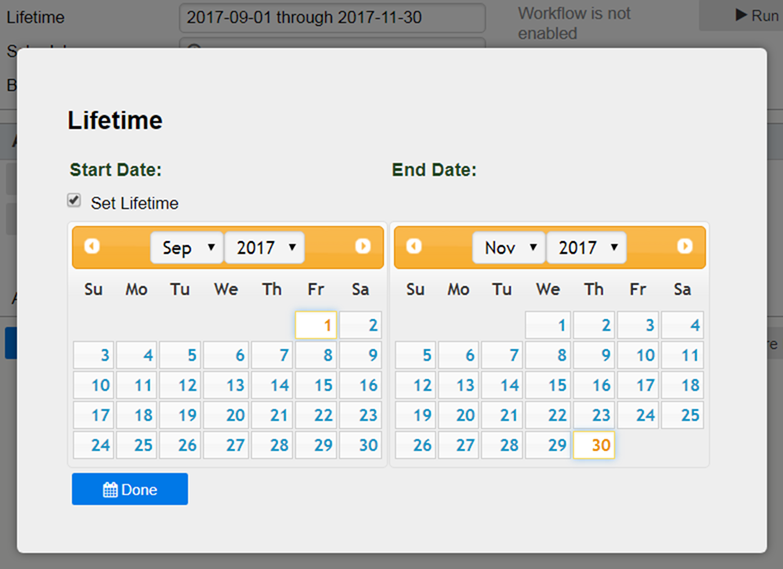 |
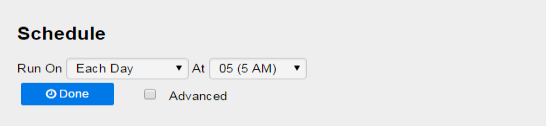
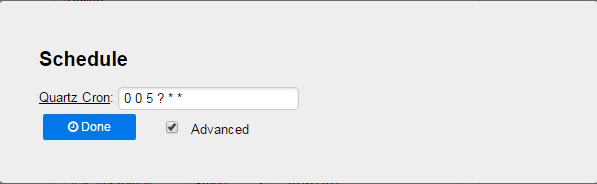
| Schedule |
When to execute a workflow Please consider: Try not to schedule on the exact hour, half hour, or quarter hour. Optional Can be set using drop down options Or by setting Quartz Cron (Advanced) |
| Time Zone |
By default, the Workflow is executed in Magnus’ server time zone, which is US/Eastern. You can change the time zone in which to execute the Workflow. This affects when the Workflow is executed and the time-related built-in parameters. If the Workflow with US/Eastern time zone is scheduled to run at each day at 5 AM from 6/1/2018 to 6/2/2018, then it will run on 6/1/2018 and 6/2/2018 at 5 AM US/Eastern time. The following built-in parameters will reflect the date and time in US/Eastern time zone during the execution: var_date, var_daydate, var_year, var_month, var_day, var_hour, var_yesterday, var_timezone. |
| Enabled | Enable/Disable workflow schedule. |
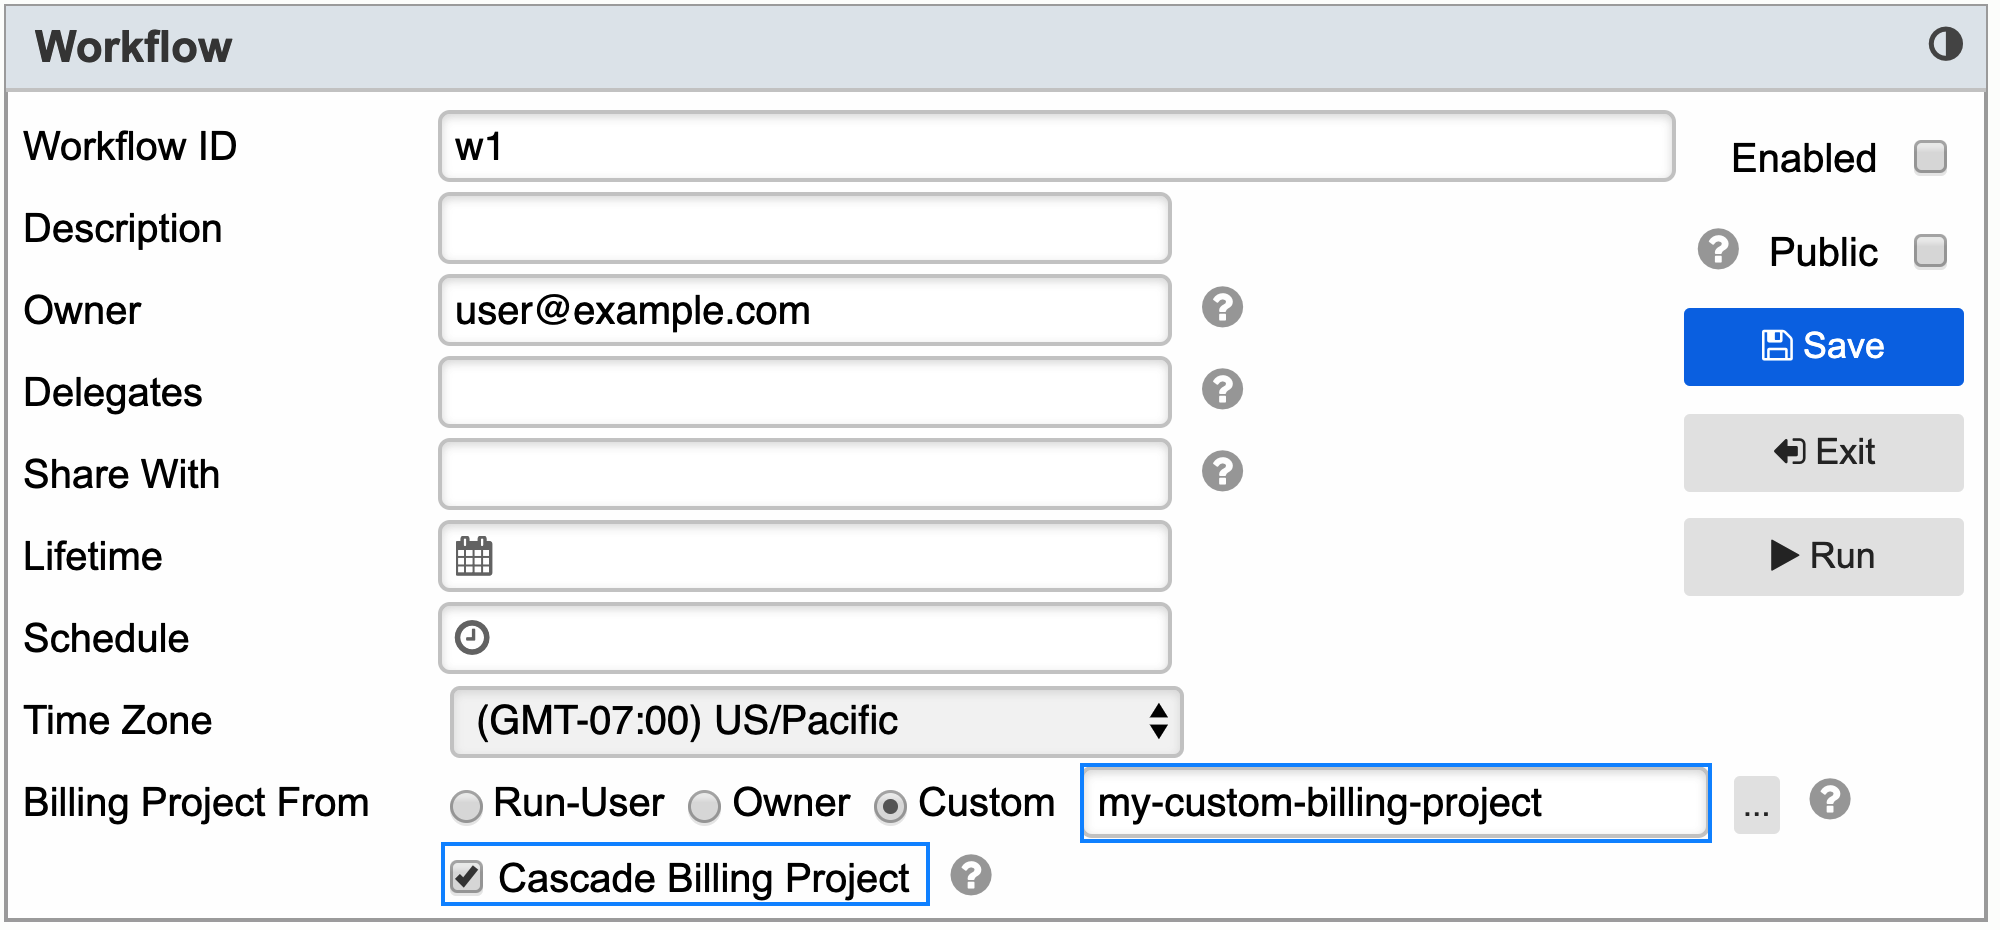
| Billing Project From |
Owner or Delegate User can choose what Billing Project a specific workflow should use Run-User: use the Magnus-assigned billing project of the user who is running the Workflow. |
| Cascade Billing Project |
If checked, during workflow execution, the billing project ID that is derived from the setting “Billing Project From” will be passed down to child and descendent workflows. During the execution of the descendent workflows, the cascaded billing project will be used. This applies for descendent workflows that are executed via Execute Workflow Task or Remote Workflow Execution. The user who is running the workflows must have required permission in the cascaded billing project.
Then all 5 workflows will be run under the billing project my-custom-billing-project. |
| Public | Checked: the Workflow is viewable by all users who have same or set to have visibility to Magnus-assigned billing project as the Workflow Owner Unchecked: the workflow is viewable only by its owners/delegates/shared users |
| Save | Save new or modified Workflow |
| Exit | Exit workflow. Prompts to save if there are unsaved changes |
| Run |
Runs workflow. Automatically saves if there are unsaved changes Workflow will run under Owner Account when scheduled Workflow will run under User Account who Manually Run Workflow |
| Workflow Header |
If clicked twice Tasks will expand/collapse |
| Show/Hide Disabled Tasks |  Clicking icon will show/hide disabled Tasks Clicking icon will show/hide disabled Tasks |
| Archived |
Option becomes available when Archive icon is clicked from the Workflows Browser Check indicates to Archive the workflow on save Archiving a workflow removes the workflow from listing in Workflow Browser |

Left Vertical Toolbar
Toolbar is available when adding new or editing existing workflow
 |
Go back to Magnus home page |
 |
Run workflow manually |
 |
Save workflow changes |
 |
Exit workflow |
 |
Jump to task Names of tasks in workflow will display in list
|
 |
Collapse/Expand all tasks |
 |
Hide/Show disabled tasks |
 |
Show Workflow Execution History |
 |
Show Workflow Versions |

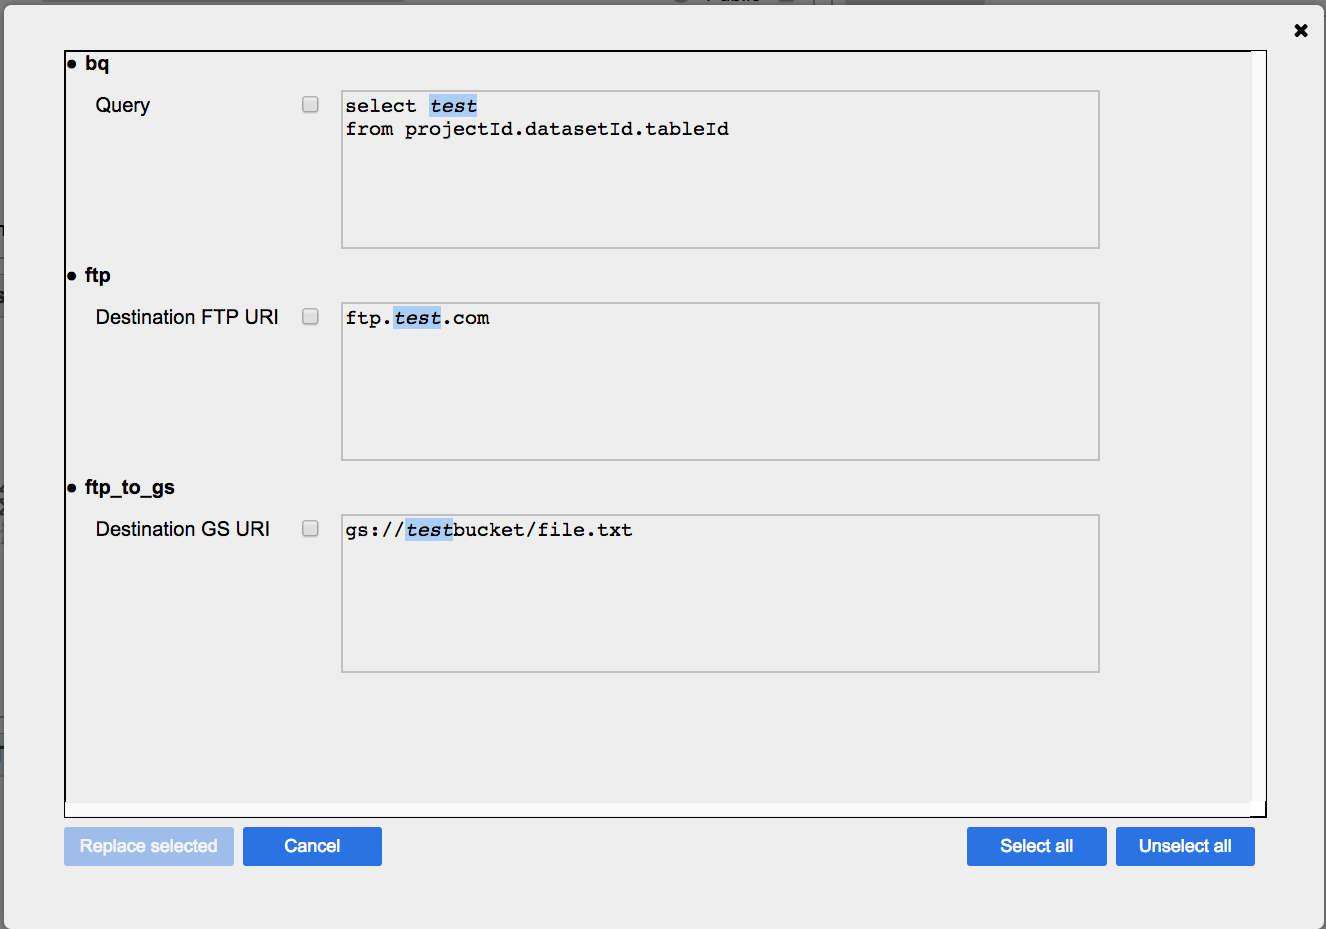
Find and Replace
Text within workflows are searchable and can be replaced by using Find/Replace feature
Find/Replace Collapsed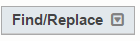
Find/Replace Expanded
| Find input box | The target keyword to be searched for within workflow |
| Replace input box | Text used to replace found keyword |
| Match case | Checked keyword search is case sensitive Unchecked keyword search is case insensitive |
| Match whole word | Checked entire keyword matches are displayed Unchecked partial keyword matches are displayed |
| Find button |
Clicking initiates Find Results will be displayed Selections can be checked from Results to determine which matches to Replace Select all and Unselect all are available for quick selections
|
Parameters
Parameters can be used throughout the workflow.
To add a custom parameter, follow the steps below:
1. Click to open Parameters tool 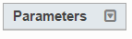
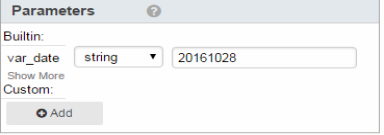
2. Built-in parameters are system defined parameters
3. Custom parameters are user defined parameters
a. Click Add to create custom parameter 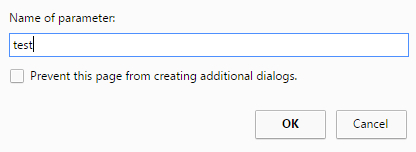
b. Parameter is always created with var_ prefix 
c. Parameter can be deleted if x is clicked
d. Parameter type can be string, number, Boolean, or record
Workflow footer
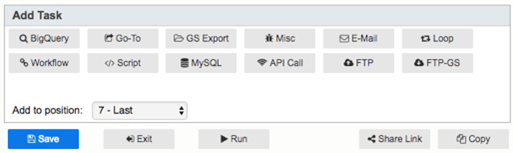
| Add Task container |
List of individual tasks that can be added to workflow Clicking on a specific Task button will add that task to the workflow |
| Add to position | Displays list of existing Tasks from which a selection can be made to insert added Task into that position |
| Save | Save new or modified Workflow |
| Exit | Exit workflow. Prompts to save if changes have been made |
| Run |
Runs workflow. Prompts to save if changes have been made Workflow will run under Owner Account when scheduled Workflow will run under User Account who Manually Run Workflow |
| Copy |
Creates copy of saved workflow Available to Owner and Admin |
| Share Link | Workflow shortcut link is a link that is auto generated by the system and can be used to access the workflow immediately from the browser |
Share Workflow Link (Permalink)
At the bottom of the Workflow Editor, there is a button titled as “Share Link” as shown below: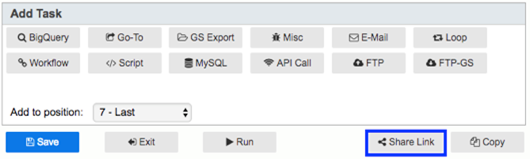
If the button was clicked then the system will show a text box that will appear with the shortcut link highlighted/selected: 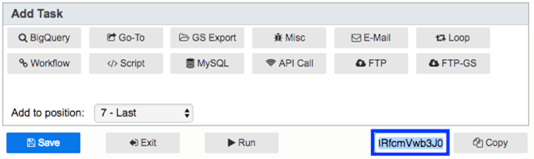
Now, user can copy and use this link to reference this workflow, share it with anyone who entitled
On-Save Notification
Any time – someone saves workflow – email notification can be sent to the owner of that workflow and cc to user who saved workflow.
There is a magic parameter available that allows enable/disable this feature for given workflow - var_sys_save_notification_enabled – by default it is false.
To set the recipients, add and set parameter var_sys_save_notification_recipients to a comma-separated list of e-mail addresses (default is workflow owner and user who did the change)
You can add this parameter and set it to false to disable notification
Notification Email will have details on Tasks that were modified , deleted or added
Ownership Change Notification
Magnus administrators have the ability to change workflow ownership. When there is a change in workflow ownership, previous owner and new owner will be notified via email about the change.
Failure Notification
It is important to have your respective workflows properly set with graceful alerting/notification toward its owners and consumers.
Magnus has all you need for this:
To fully control workflow notification options follow below instructions:
To disable notification, add and set boolean parameter var_sys_notification_enabled to false (default is true)
To set the recipients, add and set parameter var_sys_notification_recipients to a comma-separated list of e-mail addresses (default is workflow owner)
To set when notification is sent, add and set parameter var_sys_notification_event to failure, success or completion (default is failure)
To get this notification on manual runs and/or scheduled runs, set var_sys_notification_scope to manual, scheduled or all (default is scheduled)
To get this notification on all other modes of executions (via Execute Workflow Task, Trigger or Remote), set var_sys_notification_scope to all
To notify your company's Potens administrators as well, please contact them to mark the workflow mission critical. Such workflow is indicated by the bell icon: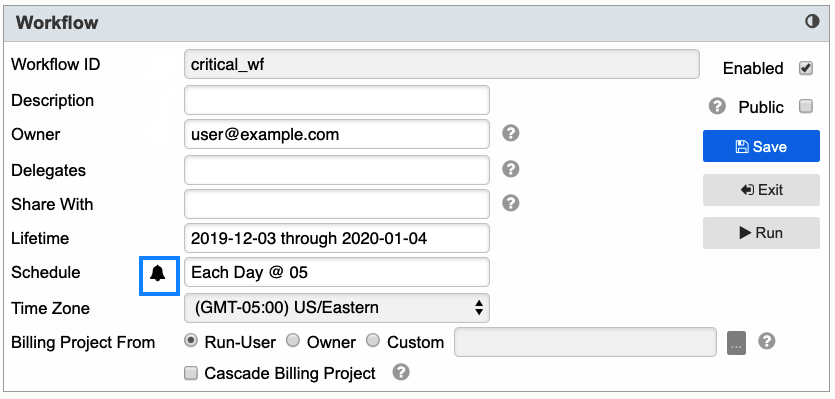
Please make sure you use this features when needed, especially for business critical workflows
Workflow Lifetime & Long-Term Workflows
By default, the maximum lifetime for a workflow is 93 days (Client Admins can request different limit for their Org).
Long-Term Workflows are workflows with Lifetime set for 90 or more days.
Instructions for setting / extending Long-Term Workflows:
Following below instructions will ensure that your workflow's schedule is not interrupted, and workflow will continue to run for another long-term duration, and you will get another expiration notification when lifetime will expire again.
So, open the workflow in Workflow Editor (shortcut - click on workflow name within the respective Home Page Module) and follow below steps:
- To extend the Lifetime of the Long-Term Workflow.
- Click on the magic wand icon to the right of Lifetime to extend it to next Long-Term duration.
For example, a workflow set to 90 days - will be extended to another 90 days.
If workflow set for 1 year – will be extended to another 1 year. - It is also possible to set a new Lifetime manually. You are still limited to whatever duration is currently set.
IMPORTANT: if Lifetime will be (purposely or accidentally) set to duration lower than previously set – next time that duration will be a limit.
For example, workflow was set for 1 year. Then Lifetime was changed to 6 months. Next time you will want to extend or change Lifetime duration for that workflow – 6 months will be the limit
- Click on the magic wand icon to the right of Lifetime to extend it to next Long-Term duration.
- To set non-Long-Term Workflow as a Long-Term Workflows with 90-93 days.
- Click on the magic wand icon to the right of Lifetime to extend it to 93 days.
It is also possible to set new Lifetime manually. Still you are limited by 93 days
- Click on the magic wand icon to the right of Lifetime to extend it to 93 days.
- To set non-Long-Term Workflow as a Long-Term Workflows with lifetime of more than 93 days.
Send request to your Org Potens.io Admins - Admins are not limited in setting Lifetime
Size Limitation
Workflow size is limited to 5 MB; user cannot save a Workflow that is more than 5 MB in size. To keep Workflows within the size limit, it is recommended to clear any large Workflow-owned custom parameters at the end of the Workflow execution.
Cascade Billing Project
Once Cascade Billing Project is enabled, it is applied downstream in the workflow chain.
Example #1:
Say you have a workflow chain w1 > w2 > w3 > w4 > w5, where w1 calls w2, w2 calls w3, w3 calls w4, and w4 calls w5.
The workflow headers are:

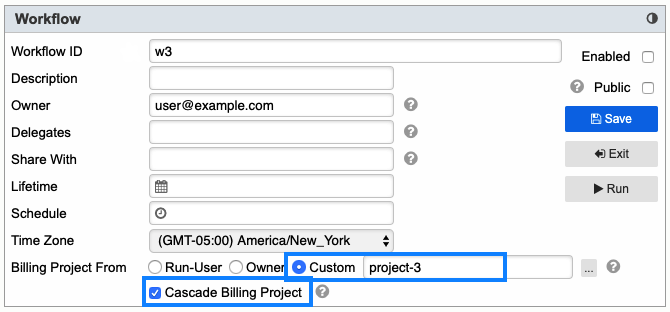
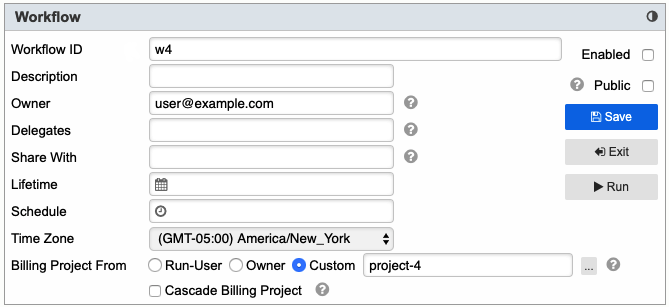
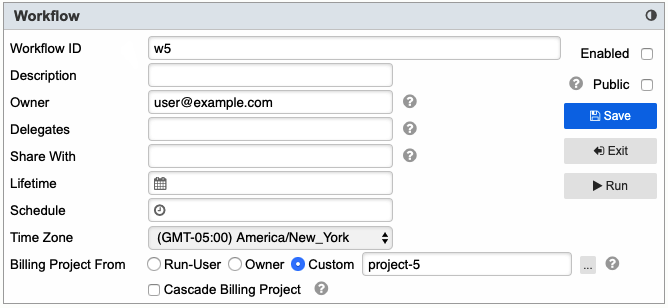
When the workflow chain executes, the billing project used for each workflow will be:
- w1, w2 – billing project used will be that from the Run-User.
- w3, w4, w5 – billing project used will be project-3 because Cascade Billing Project is enabled at w3. And once that is enabled, the billing project is trickled downstream, overriding the billing project setting of w4 (project-4) and w5 (project-5).
Example #2:
Say you have a workflow chain:
w1 > w2 > w3 > w4
> w5 > w6
In this workflow chain, w1 calls w2, w2 calls w3 and w5, w3 calls w4, and w5 calls w6.
The workflow headers are:

When the workflow chain executes, the billing project used for each workflow will be:
- w1, w2, w5, w6 – billing project used will be that from the Run-User.
- w3, w4 – billing project used will be project-3 because Cascade Billing Project is enabled at w3. And once that is enabled, the billing project is trickled downstream, overriding the billing project setting of w4 (project-4).
Batch Mode
Tasks can be Batch Deleted or Batch Copied within the Workflow Editor after entering into Batch Mode.
To enter Batch Mode click the “Enter Batch Mode” menu item from the left side navigation bar.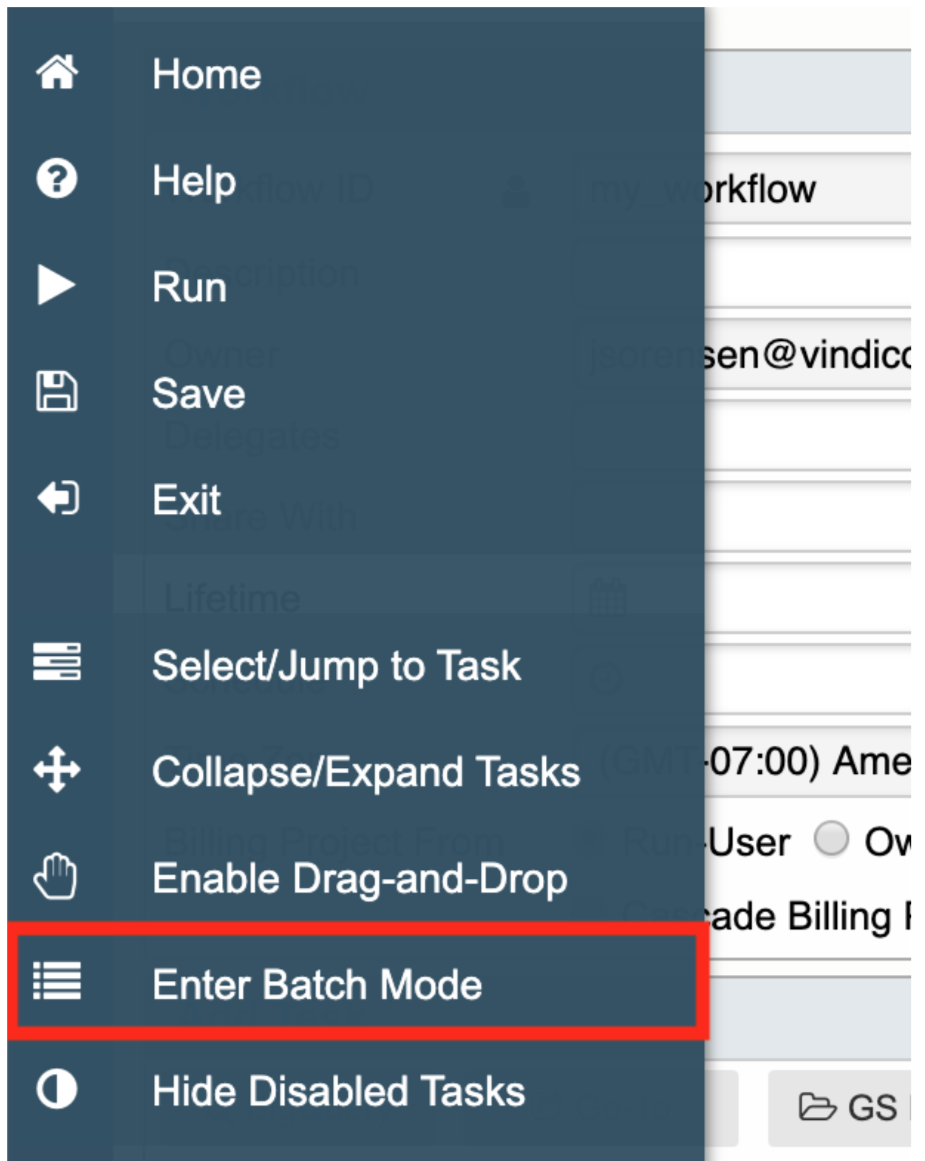
After entering into Batch Mode all tasks within the workflow will appear collapsed with checkboxes aligned to the right side for selecting multiple tasks.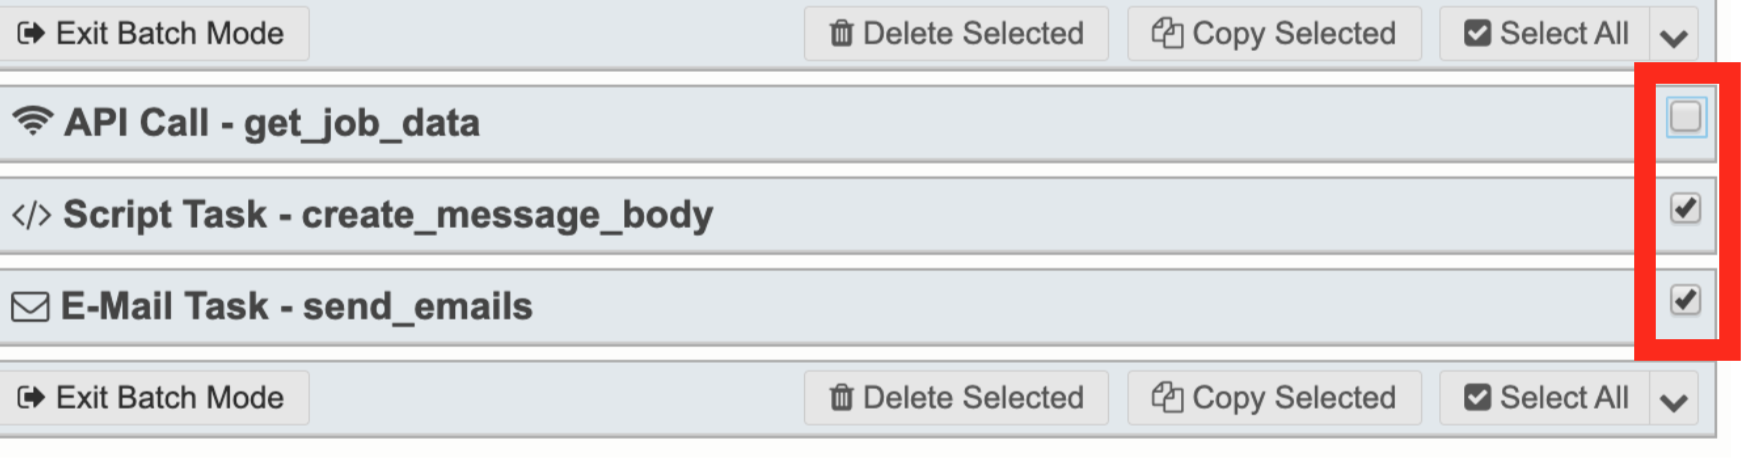
The Batch Mode toolbars are accessible above and below the list of tasks.
Click the “Exit Batch Mode” button to return to the default view.
Click “Delete Selected” to remove selected tasks from the workflow.
Click “Copy Selected” to duplicate selected tasks.
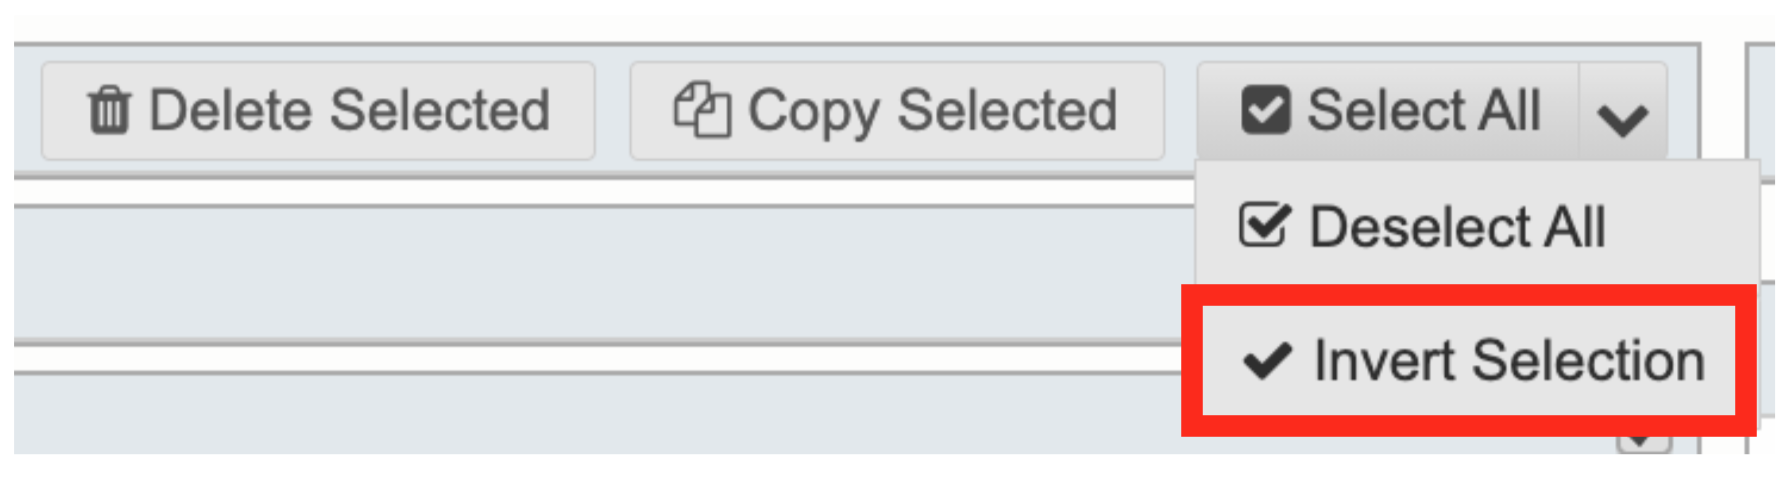
When selecting tasks the Selection Button is available to check all, none or invert the current selections.
Clicking the down arrow on the right side of the Select All button will open or close the menu.

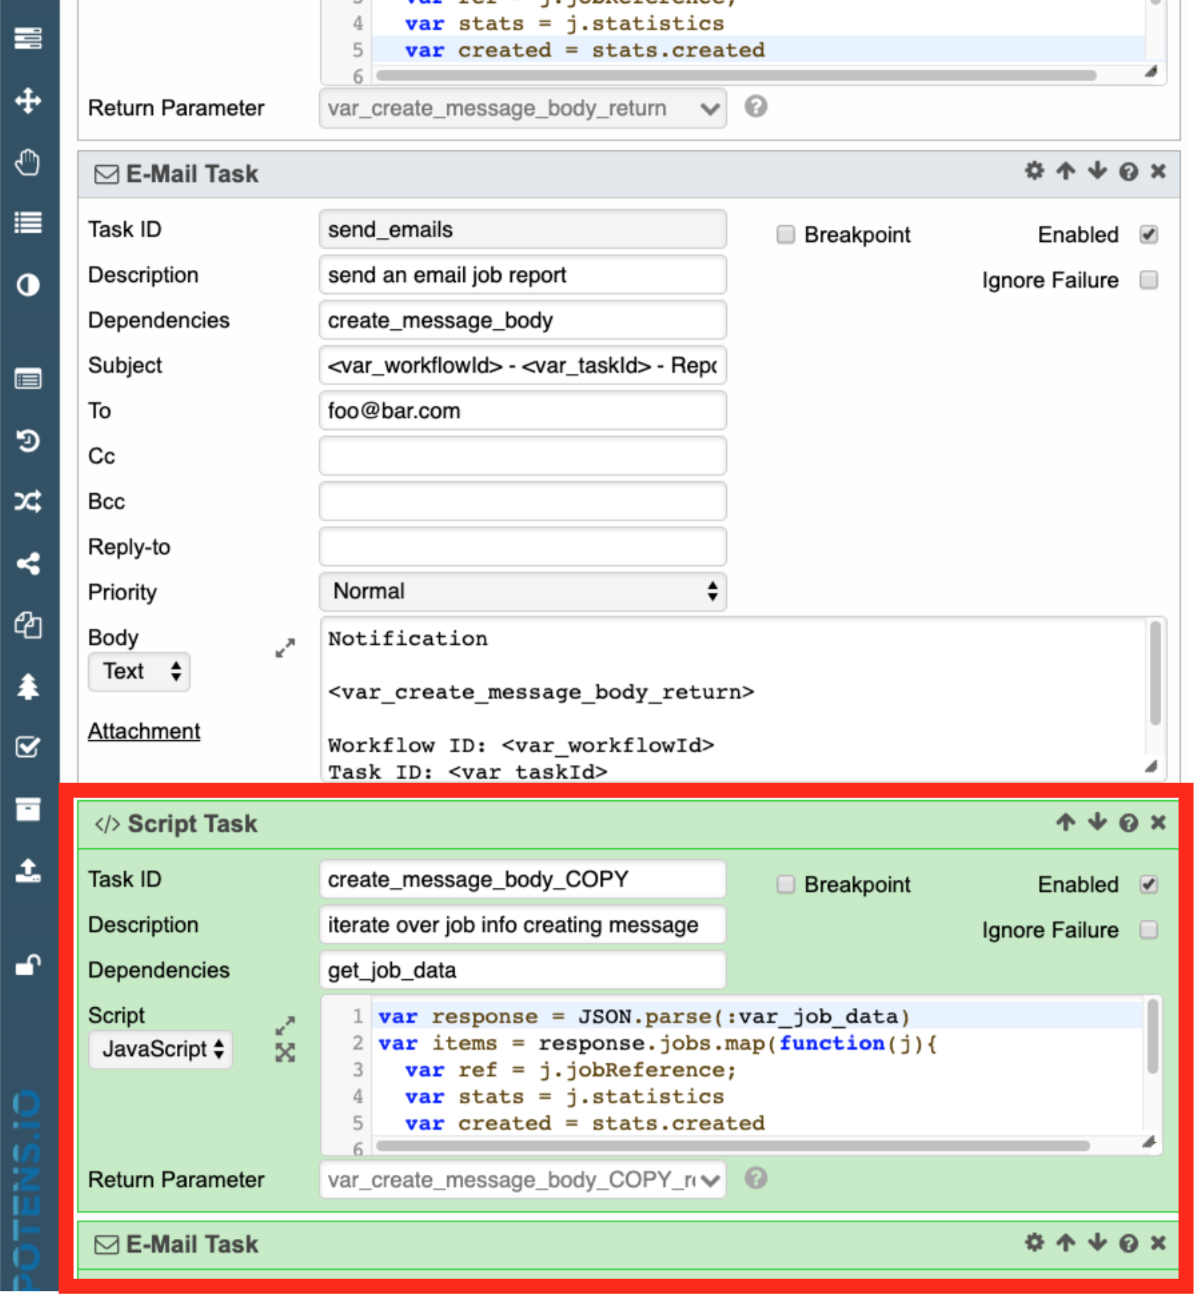
Clicking on the Copy Selected button after selecting tasks opens the Batch Copy modal.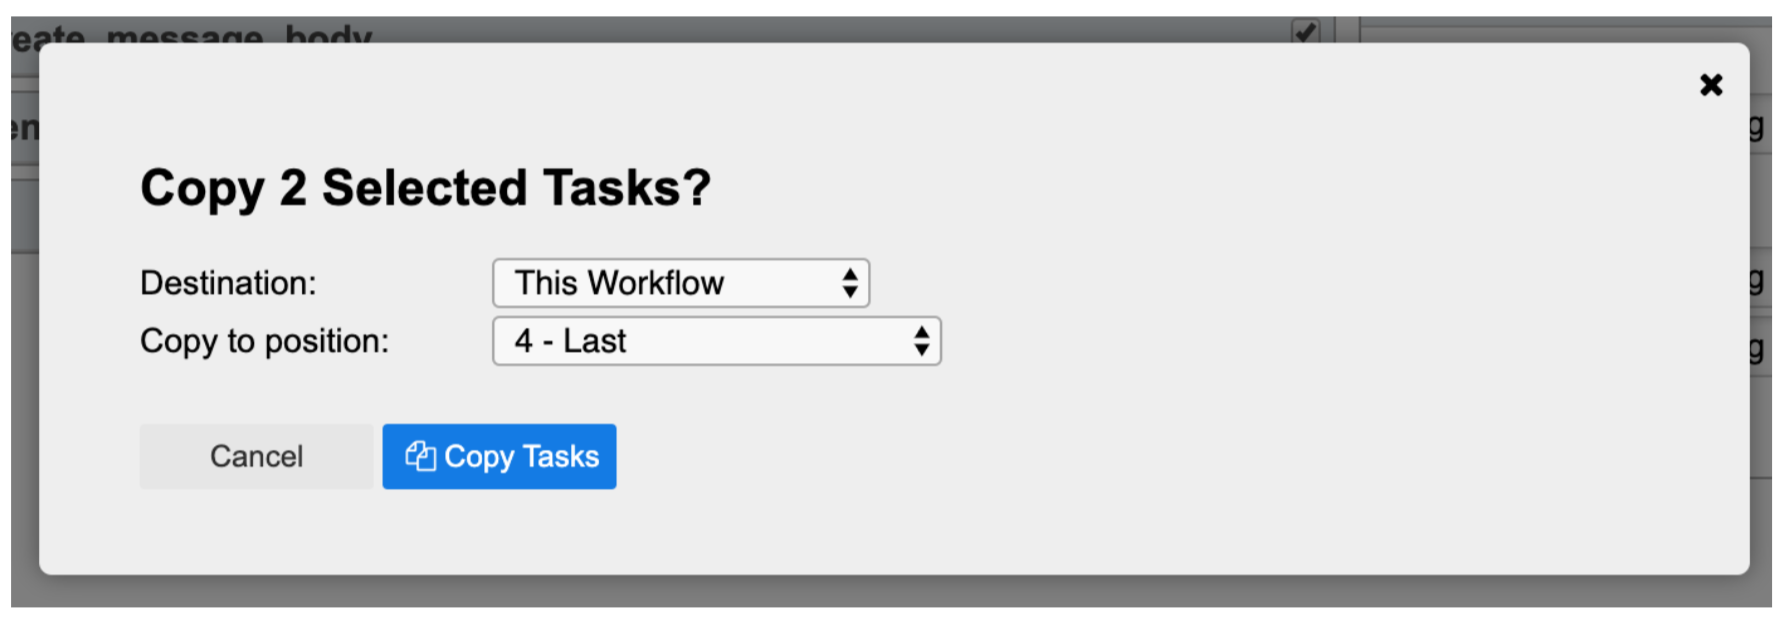
The Destination selector allows you to choose the target workflow for the batch copy.
Currently only “This Workflow” is allowed.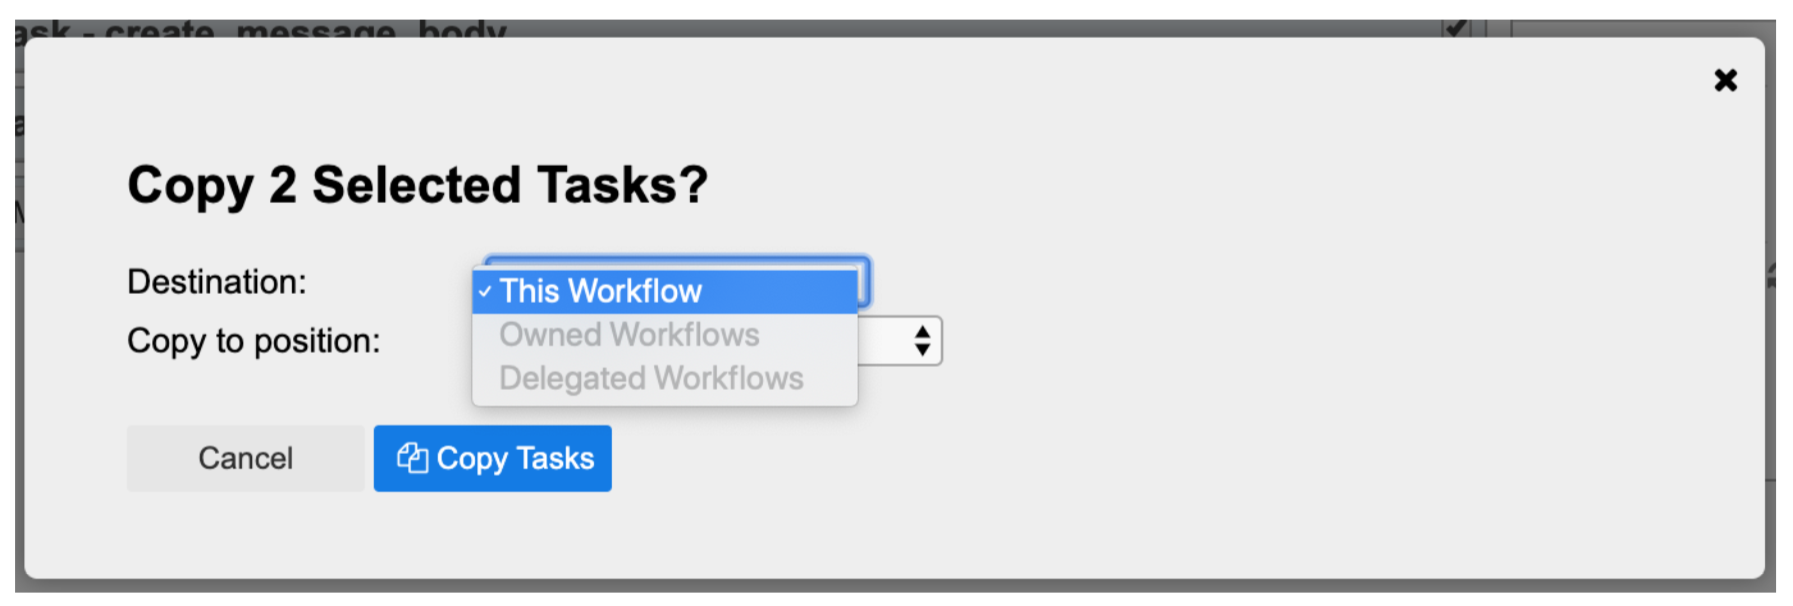
The Copy to Position selector allows you to select the position of the copied tasks within the target workflow. Copied tasks will be inserted in order above the selected task position. Selecting the Last option will insert the copied tasks at the bottom of the tasks list.
Copied tasks are suffixed with “_COPY”. The suffixed names can be edited until the workflow is saved.
Copied tasks are also highlighted green.
The highlight persists after exiting Batch Mode up until until the workflow is successfully saved.