Logo
  1. Potens.io
  2. Goliath
  3. How To

Articles > Storage

  • Navigation
  • Run Query
  • Save
  • Storage

This article provides users with a general guide to the features listed.

These features may have been updated or superseded by additions found in the release notes.

Read the content below to become familiar with the feature and review the release notes to get the latest iteration.

Overview

Storage lists all buckets for the current project along with their files.

Right clicking on a bucket or file shows a Contextual Menu offering actions for that object.

Cloud Storage contains concepts of Buckets and Objects. 

  • Buckets are containers that hold data.  They are listed under their project.  Bucket names are unique across Google Cloud Platform.   
  • Objects are pieces of data stored in Google Cloud Storage.  The object can be a file such as text, comma separated value, zip file, image, etc.  Object names can include slashes (/) to represent hierarchical structures.  Goliath parses the object name and displays it as folders and files.  For example, an object named /folder1/folder2/filename.txt will display under the bucket as a folder named folder 1 that contains a sub folder named folder2 that contains a file named filename.txt.

GCS Storage


001.png

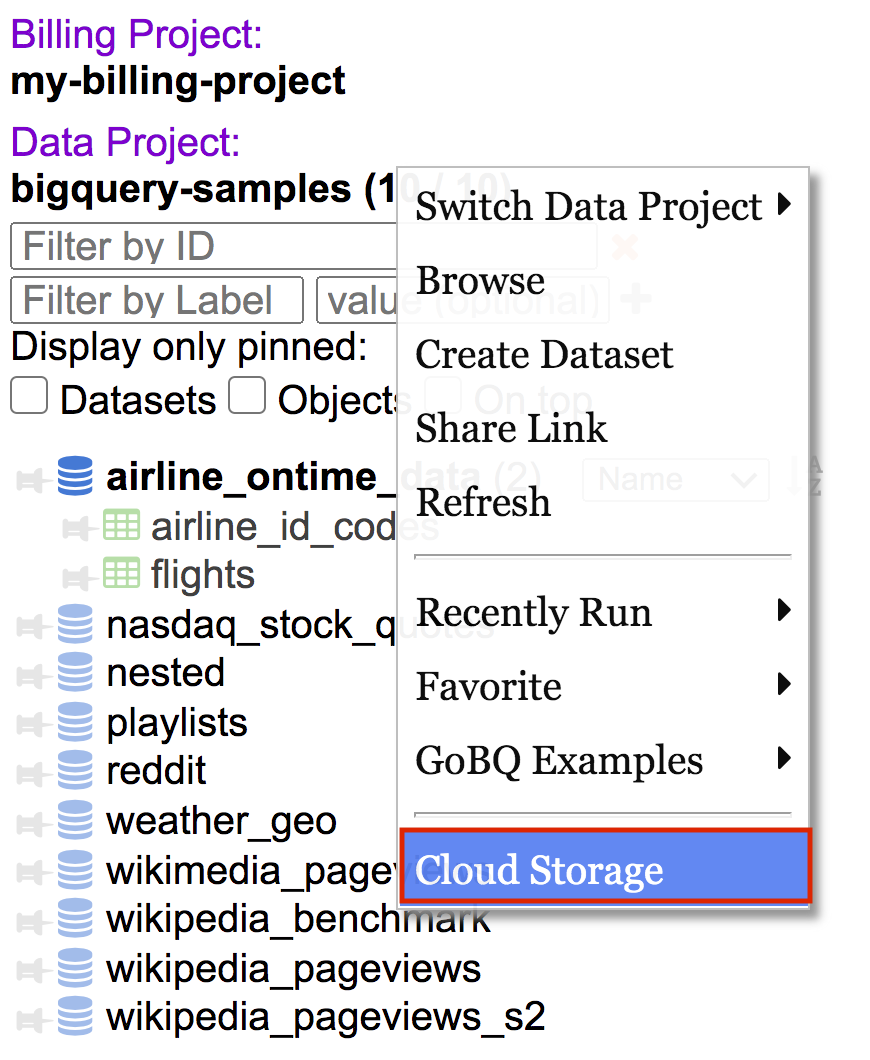
Access Google Cloud Storage

  1. Right click data project header to display data project context menu
  2. In data project context menu select Cloud Storage
1402.png

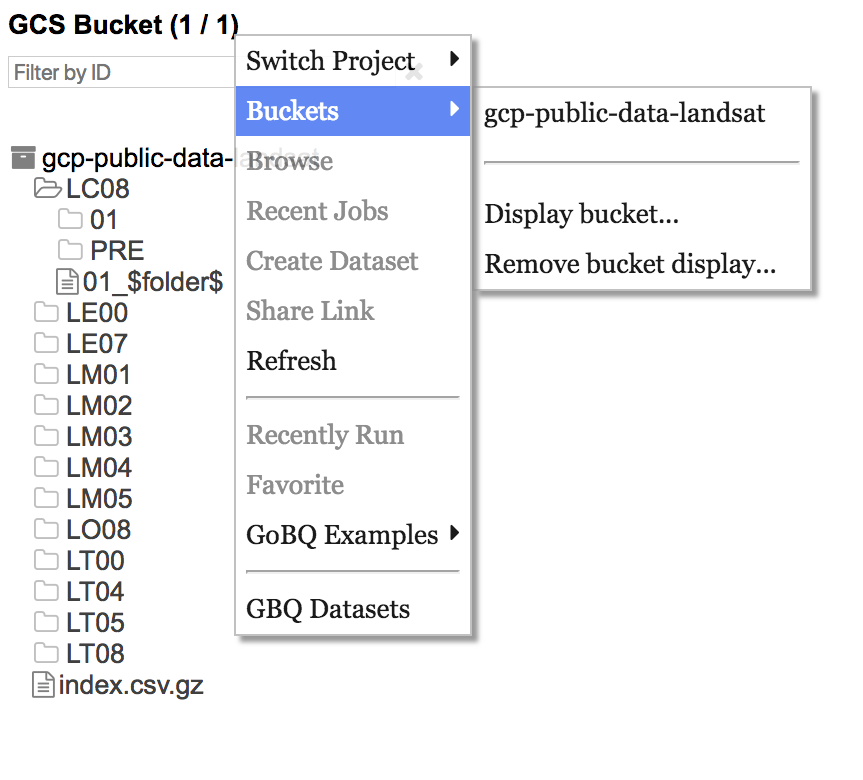
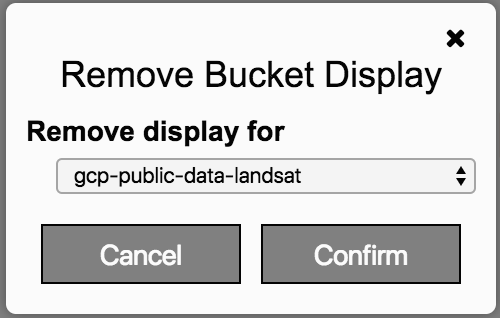
Google Cloud Storage Context Menu 

When Storage navigator is active Buckets item is added and other items are greyed out. 

Buckets displays individual GCS buckets that can be accessed.  

Clicking on a bucket will load the individual bucket. 

Display bucket… opens a dialogue to add a bucket

Buckets is the name of the bucket to access.

Remember will add the bucket to the Buckets list.  If Remember is left unchecked the bucket will load in the navigator but not added to the Buckets list.

Remove bucket display… opens a dialogue window presenting a drop down list of saved buckets that can be selected for removal

1403.png

1404.png

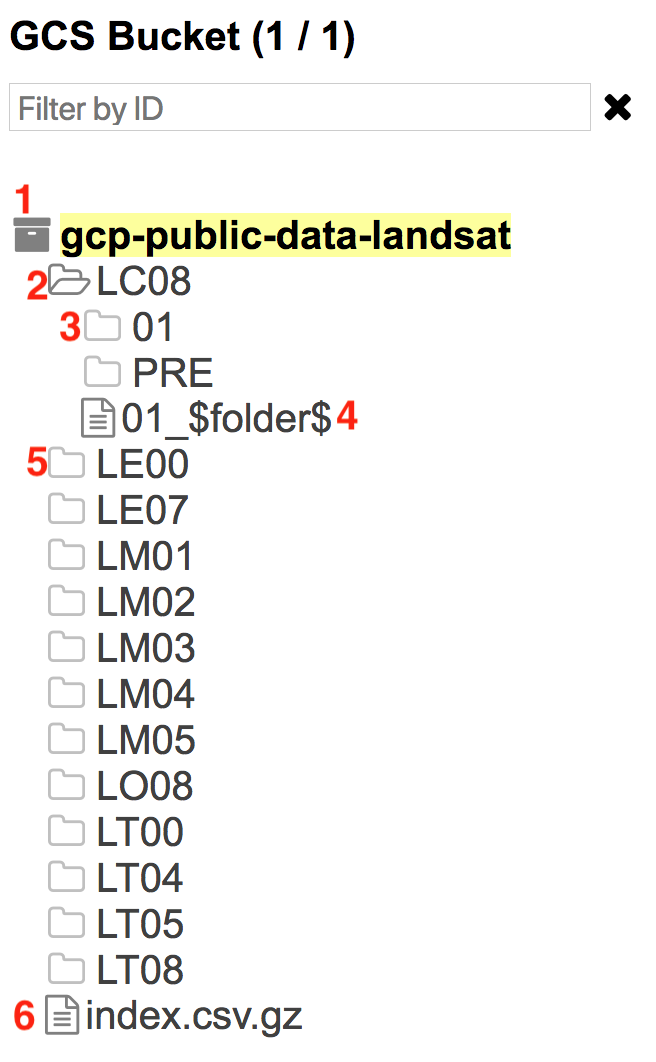
Buckets, folders, subfolders, and files

  1. Bucket
  2. An open folder
  3. An unopened sub folder
  4. List of files under folder
  5. An unopened folder under bucket
  6. A list of files under bucket


Buckets

Context Menu

1405.png 
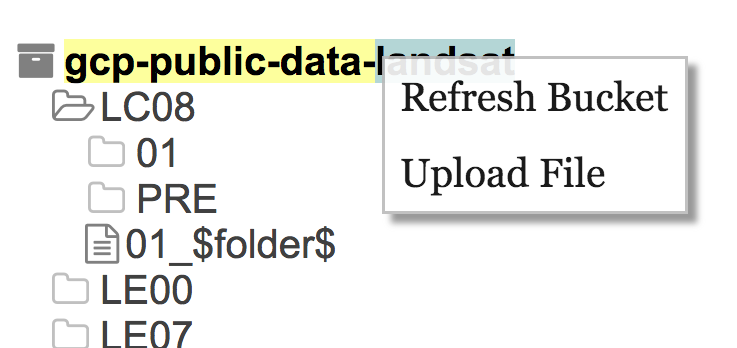
Bucket Context Menu is accessed by right-clicking on bucket name

Item

Action

Refresh Bucket

Refreshes the list of objects under the bucket

Upload File

Uploads a local file to Google Cloud Storage.  The file will be uploaded to the bucket that was clicked on. 

  1. Click to select a local file.
  2. The name of the destination folder.  If no folder is specified the object will upload directly under the bucket.  If specifying a folder end all names with a slash (/)
The name of the file including extension


Files

Context Menu

1406.png 
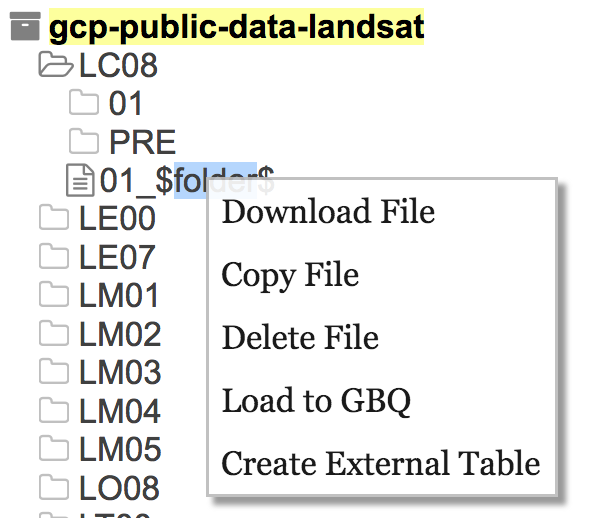
File Content Menu is accessed by right clicking on the file name

Item

Action

Download File

Downloads the file locally. 

If the file size is small the contents will be opened in a new browser window

Copy File

1407.png

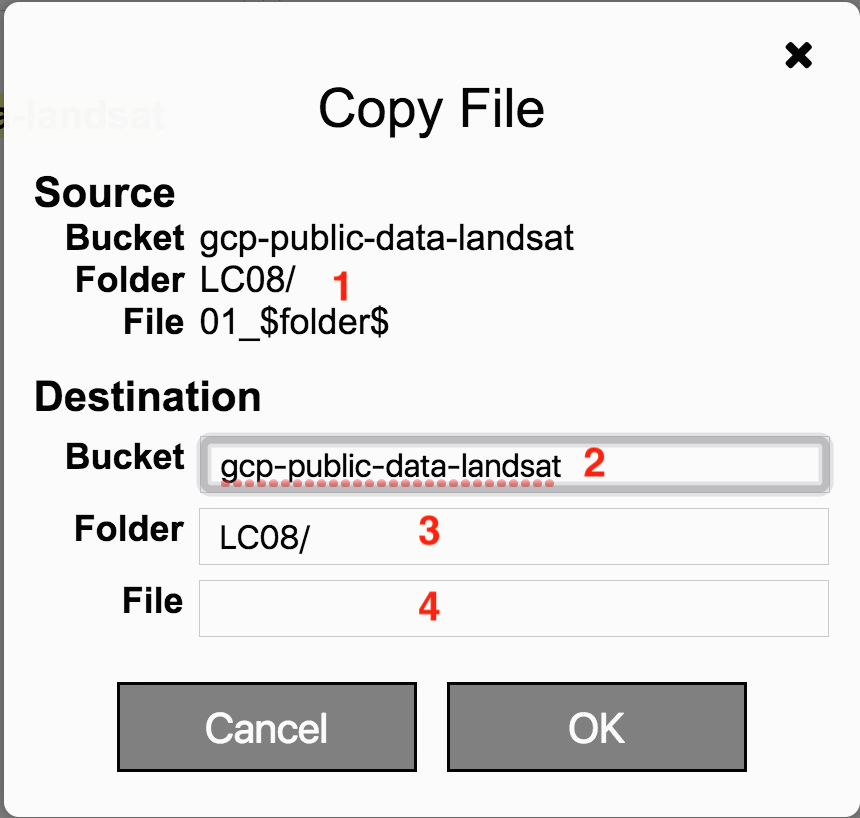
Copies a file from one Google Cloud Storage location to another.

  1. The bucket, folder, and file name of the file to be copied.
  2. Bucket where the file will be copied to
  3. Folder where the fill will be copied to.  Leave blank to copy to root of bucket.  If including folder end the name with a slash (/)
  4. Name of the copied file including extension

Delete File

Deletes the selected file

Load to GBQ

1408.png

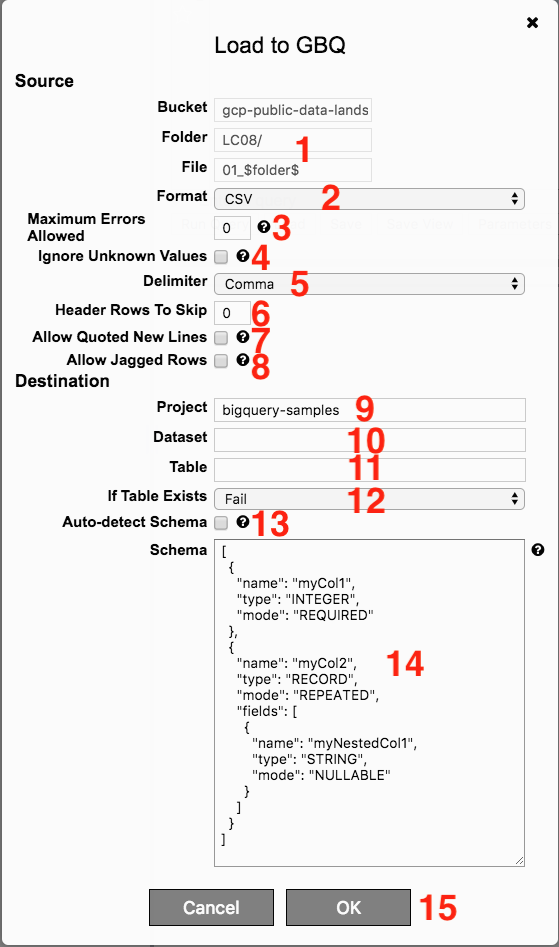
Load data from cloud storage to GBQ destination

  1. Pre-populated source bucket, folder, and file name
  2. Specify the format (CSV, JSON, AVRO)
  3. Add a numeric value to indicate how many errors are acceptable for the load before the job should fail
  4. Check this box to ignore entries in source that do not match data schema in destination.  These values will be ignored and not loaded
  5. Select the delimiter of the source file (Comma, Tab, Pipe, Other).  If Other is selected enter the custom delimiter
  6. Enter a number of rows to skip, such as headers, that are not to be loaded
  7. Check if data contains new lines within quotes
  8. Check to ignore missing optional columns

Continue by specifying the Google Big Query destination table configuration

  1. Project where the table will be created
  2. Dataset where the table will be created
  3. Enter the name of the table
  4. Select from drop down what should happen if the table exists (Fail, Append to it, Overwrite it)
  5. Check to have the system auto-determine the schema based on source file.
  6. If auto-detect schema is unchecked manually type the schema of the table to be created.  Format is JSON and must have name and type

    Example:
      {
      "name": "myCol1",
      "type": "INTEGER"
      }
  7. Submit by clicking OK

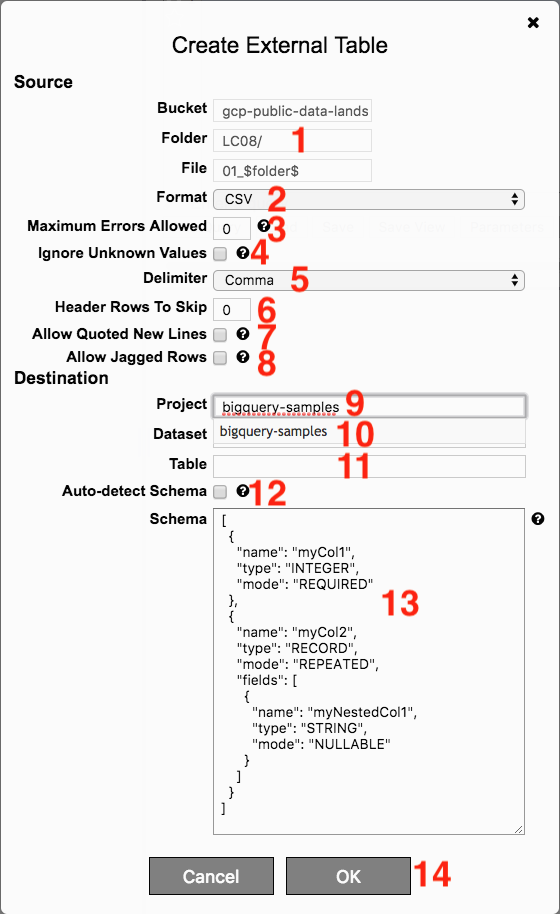
Create External Table
1409.png

Create a Google Big Query external table to the Google Cloud Storage file

  1. Pre-populated source bucket, folder, and file name
  2. Specify the format (CSV, JSON, AVRO)
  3. Add a numeric value to indicate how many errors are acceptable for the load before the job should fail
  4. Check this box to ignore entries in source that do not match data schema in destination.  These values will be ignored and not loaded
  5. Select the delimiter of the source file (Comma, Tab, Pipe, Other).  If Other is selected enter the custom delimiter
  6. Enter a number of rows to skip, such as headers, that are not to be loaded
  7. Check if data contains new lines within quotes
  8. Check to ignore missing optional columns

Continue by specifying the Google Big Query external table configuration

  1. Project where the external table will be created
  2. Dataset where the eternal table will be created
  3. Enter the name of the external table
  4. Check to have the system auto-determine the schema based on source file.
  5. If auto-detect schema is unchecked manually type the schema of the table to be created.  Format is JSON and must have name and type

    Example:
      {
      "name": "myCol1",
      "type": "INTEGER"
      }
  6. Submit by clicking OK
Potens.io
Launch Magnus | Goliath