Introduction
In the previous tutorial, Go-To Task, we showed an example of how to modify the workflow by evaluating criteria and jumping to tasks within the workflow. This allowed us to create sophisticated workflows that were customized based on data. In the example, we exported data to GCS for Subscribers and sent data via email message body for Customers.
Scenario
What if we wanted to enhance the workflow further by identify the top start station names by number of trips and then sending each station a list of bike Ids that ended at the station and the number of trips made on those bikes? We can create this sub report as another workflow that is execute from within our main workflow. This is accomplished by using Execute Workflow task.
By the end of the tutorial you will know
- how to delegate and share workflows
- how to prepare a workflow for execution
- how to use an execute workflow task
- how to set arguments
Steps
For starting stations that had the most bike share trips we want to receive an email that displays the bike ids and number of trips that ended at the station. We want an email and list for each of these stations.
Before using the Execute Workflow Task let's create a new workflow that will generate the email. Exit any open workflows, go to the Magnus Home page, and click Add Workflow. Provide a name for the workflow.
Add a BigQuery Task and name it bike_trips. We will obtain the list of bikes and trips ending at a station. Create a custom parameter named var_source_table and set value to bigquery-public-data.san_francisco.bikeshare_trips. Create a custom parameter named var_end_station_name. This is used in the WHERE clause to filter the station name. Add the below query to BigQuery Task bike_trips.
SELECT
    bike_number,
    COUNT(1) AS trips
FROM
    `<var_source_table>`
WHERE
    end_station_name = '<var_end_station_name>'
GROUP BY
    bike_number
ORDER BY
    bike_number
Add another BigQuery Task and name it enrich_data. We will enrich the query results of the previous task with HTML for later use in an email body. In the query the statement add
SELECT CONCAT('<table><tr><td>Bike Number</td><td>Trips</td></tr>',STRING_AGG(CONCAT('<tr><td>', CAST(bike_number AS STRING), '</td><td>', CAST(trips AS STRING), '</td></tr>'), ''),'</table>') AS message
FROM (
    SELECT
        bike_number,
        trips
    FROM
        `<var_bike_trips_output>`
)
Create a custom parameter named var_email_body. This parameter is used to store the query result message and is referenced in the email body of the E-Mail task. In BigQuery Task enrich_data set Destination Parameter to var_email_body.
Add an E-Mail Task. Populate the Subject field by adding custom parameters <var_email_subject><var_end_station_name>. Create custom parameter var_email_subject and set value to Bike Report for. You can replace this subject with anything you’d like. Create custom parameter var_email_to and set the value to the recipient’s email address.
Set E-Mail Task body to HTML and add the following into the text area
<pre><b>Here is your list of bike IDs and the number of trips that ended at <var_end_station_name></b><br>
<var_email_body></pre>
As good practice clear out the dynamically set custom parameter var_email_body by using a Script Task for resetting.
Save the workflow.
If we were to manually run the workflow we would first enter a value for parameter var_end_station_name. This would filter the query results for that station and send an email with the list of bike IDs and the number of trips. Instead we want to run the workflow for each of the top 3 stations. We can do this by adding an Execute Workflow Task in our original workflow.
Exit the newly created workflow and re-open the prior workflow created in the Go-To Task tutorial. We want to run the newly created workflow for the top 3 stations. We need to first obtain the top three stations.
In the workflow created in Go-To Task add a BigQuery Task to the end of the workflow and name it get_top_stations_by_trips. In the query area add
SELECT
start_station_name,
SUM(trips) AS trips
FROM `<var_bq_table>`
GROUP BY
start_station_name
ORDER BY
2 DESC
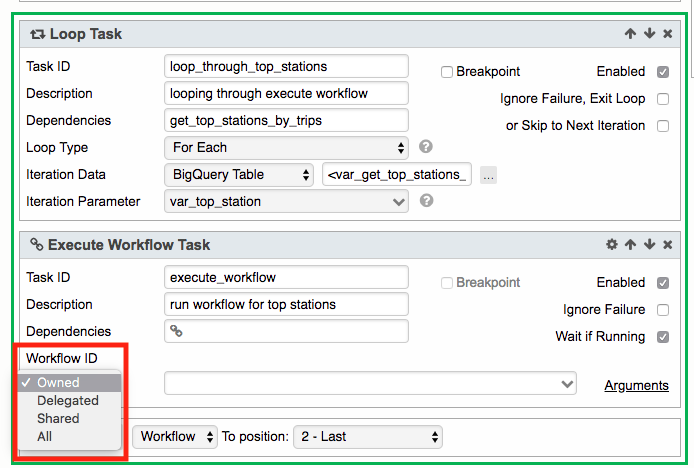
LIMIT 3Next, we need to loop through each of the stations. Add a Loop Task to the end of the workflow and name it loop_through_top_stations. For Iteration Data set the input to magic parameter output of the previous task <var_get_top_stations_by_trips_output>. Create a custom parameter var_top_station and set data type to record. In Loop Task set Iteration Parameter to var_top_station.
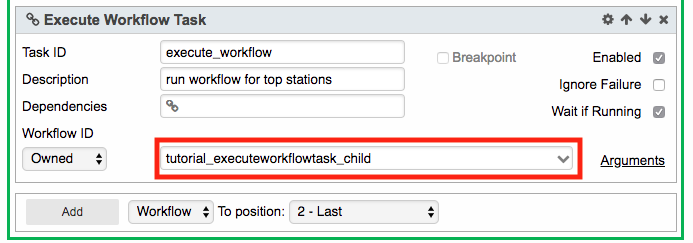
Finally, we need to execute the newly created workflow. Within the loop loop_through_top_stations add Workflow Task and name it execute_workflow. Execute Workflow Task will kick off the specified workflow when the workflow is run. In Workflow ID click on Owned. This will list all of the workflows you are owner of including the workflow we created for this tutorial.
Click on the drop down list to see all of the workflows and select the workflow you previously created.
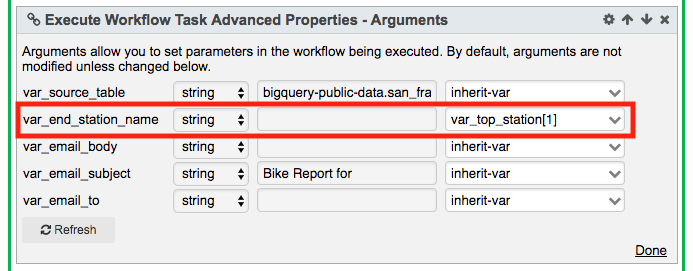
In Execute Workflow Task click the Arguments link to bring up the advanced properties panel. All of the custom parameters that were created in the workflow are listed here. They can be left to the default value or assigned a value. Identify var_end_station_name. We want to pass the station name of the top 3 stations we identified to this workflow. In the drop down list to the right of the custom parameter select var_top_station with field 1. Leave the other parameters as inherit-var. Click Done.
As good practice clear out the dynamically set custom parameter var_top_station by using a Script Task for resetting.
Save and run the workflow.
Review
When run the workflow will execute the query to obtain the top three stations and iterate through each station in a loop that will run a workflow with that station name passed into the parameter. Each time the workflow is executed an email will be generate for that station listing bike IDs and the number of trips taken.
In this example we created a simple workflow that goes to a single email address. You can expand on this example by including different email addresses for each station and assigning them when executing the workflow. This is just one of many scenarios that you can do to enhance the workflow to meet your needs.
Additional Documentation
Execute Workflow Task https://potensio.zendesk.com/hc/en-us/articles/115003495492-Execute-Workflow-Task
Go-To Task https://potensio.zendesk.com/hc/en-us/articles/115003528571-Goto-Task
Misc Task https://potensio.zendesk.com/hc/en-us/articles/115003544772-Misc-Task
Loop Task https://potensio.zendesk.com/hc/en-us/articles/115003528871-Loop-Task
GC Export Task https://potensio.zendesk.com/hc/en-us/articles/115003471191-Cloud-Storage-Export-Task
E-Mail Task https://potensio.zendesk.com/hc/en-us/articles/115003495472-Email-Task
Parameters https://potensio.zendesk.com/hc/en-us/articles/115003529371-Parameters
BigQuery Task https://potensio.zendesk.com/hc/en-us/articles/115003471031-BigQuery-Task
View Completed Workflow
Completed versions of the workflows in this tutorial can be found at
https://magnus.potens.io/?l=dHV0b3JpYWxfZXhlY3V0ZXdvcmtmbG93dGFza19wYXJlbnQ=
https://magnus.potens.io/?l=dHV0b3JpYWxfZXhlY3V0ZXdvcmtmbG93dGFza19jaGlsZA==
What's Next?
The list of tutorials introduced Core Tasks in addition to other tasks and concepts. You can learn more by reading documentation listed under the additional documentation section of each tutorial and visit Potens.io wiki.